December 8 - 🔌 User Interviews now integrates with Sprig! Connect accounts to recruit high quality participants fast for concept tests, usability tests, and surveys
Research with the confidence that you’re always testing with the right users, all within one streamlined workflow.
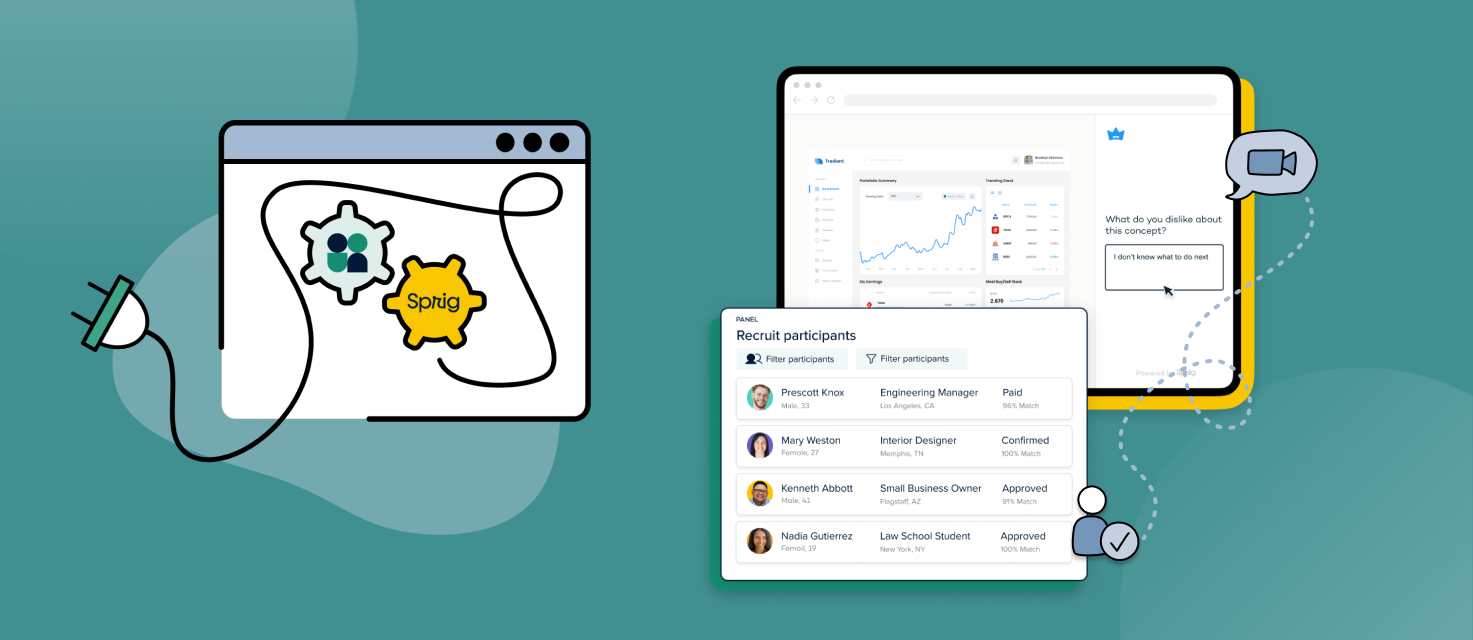
The best research starts with the right users, which is exactly why we’ve partnered with Sprig on our newest integration. Together, User Interviews and Sprig empower teams to collect high-quality insights from the right users—fast. Connect accounts to access a pool of 2.1+ million participants for the moments where your testing requires a more targeted audience, or simply a fresh user perspective. Or, use Research Hub to manage your panel when testing with your own users.
This integration optimizes your entire research workflow across the two tools. Here’s how it works:
- Build a concept test, usability test, or survey in the Sprig platform. With Sprig, you can test across the product development lifecycle (pre and post launch!)
- Find the right participants for your study. Test with your own customers or source from our 2.1 million+ panel with detailed consumer and professional targeting.
- Send your study to participants, and capture real-time user insights. Automate the entire flow from invite to incentives.
- Track progress and access task recordings from a single place. Let our integration do the work of tracking participants across platforms.
Get started from our integrations page: log into your User Interviews account, click on your username at the top right of the screen, and select “Integrations” from the dropdown menu.

Have questions about our Sprig integration? Read our support guide for more information.
Not yet a Sprig user? Visit Sprig for all your concept and usability testing needs.
December 7 - ⚙️ Hub custom views are easier than ever to manage with the new column configuration panel
We’re taking your custom view of the Hub table one step further, making it possible to rearrange and toggle columns at scale.
Earlier this year we released Hub custom views, allowing researchers to hide/show and reorder columns in the Hub table via a drag/drop interaction. Many teams are using this feature, but we’ve heard that it can be fiddly for those with really large Hub tables containing lots of custom data fields.
Today we’ve released a new panel in Hub that consolidates all of your columns. You can very quickly toggle visibility on and off, as well as rearrange columns without needing to scroll horizontally across the table.

To open up the panel, click the “Manage” button at the top right of your Hub table, and select “Edit fields” from the dropdown. Use the toggles to set the visibility of each field, and use the grab handle to move columns. You can also opt to show or hide all fields using the uppermost toggle. When you’re done, simply x out of the panel, and your changes will be immediately applied to your Hub table.
Hub custom views are saved at the individual user level. This means that if a user makes a change to their view, that change will persist for them only. The rest of the team will not see that change. We know that different researchers on the same team have may different use cases and priorities that influence how they wish to view participant data in the Hub table.
December 6 - 🧑 Introducing our new, more limited Teammate role to help teams democratize research safely
Limit permissions for teammates who only occasionally need to collaborate on research—available on Hub custom subscriptions.
Today, we’re excited to introduce a new option when it comes to creating a robust team structure in User Interviews. Joining our Team Admin and Researcher roles is the brand new Teammate role.
Our largest customers have many different team members across the org involved in research—user researchers, product managers, designers, and more. We’ve heard that managing permissions and access for a growing number of users can be tricky.
With this more limited role, Admins can involve more stakeholders in research, with full confidence that their permissions match their needs, and sensitive data is locked down to only those who need it. As users need more access, Admins can upgrade their roles.
Teammates can:
- View projects created by their team
- Collaborate on specific projects they’re invited to
Teammates cannot:
- Launch their own projects
- Access the Hub panel or invite participants
- Access team settings or invite team members
Get the full breakdown of permissions across our Team Admin, Researcher, and Teammate roles.
December 1 - ✋ Avoid over-recruiting by limiting the number of project invitations your team can send
Worried about a teammate mistakenly sending thousands of invites for a 5-person study? With Hub invite limits, you can prevent that from happening.
You’ve invested time and energy building up your Hub panel, so you want to ensure that users are being recruited into studies in a sustainable way. Today, we’re extending Hub invite rules to include invite limits!
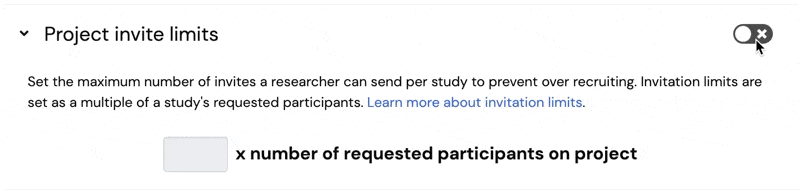
Here’s how it works
Team Admins* can specify a limit on the number of project invitations a researcher can send. The limit is set as a multiple of the requested number of participants for any future project. For example, if the limit is set at 5x, a study requesting 10 participants can send up to 50 invites. But if the limit is set at 10x, the same study could invite 100 participants, and so on.
When any researcher on your team launches a project, the limit will be imposed on invites sent directly from the Hub table or via CSV upload. The researcher will see warnings in the app as they are approaching the limit.
*Note: If your team has not specified roles, every team member has admin privileges by default. See our team roles support guide for more info.
To get started with invite limits
1. Navigate to the Hub panel
2. Click on “Manage Hub invite rules”
3. Toggle on “Project invite limits”
4. Input a number to define your limit
Team admins can make adjustments at any time, but for researchers, invite rules and limits are displayed as locked.
Tips for setting an appropriate limit
Your chosen limit will depend on the responsiveness of your audience. Remember that you’re setting a maximum for every project your team launches, so if the limit is overly restrictive, some projects may not be fulfilled. On the other hand, if you set it too high, over-recruiting may continue to be an issue.
💡Tip: Check out email metrics from recent Hub projects to get a sense of average response rates.
Teams on Hub custom subscriptions have access to Hub invite rules & limits. These features are especially useful for enterprise teams with large panels (thousands, or tens of thousands of users) and who have many researchers on the team recruiting from the same pool.
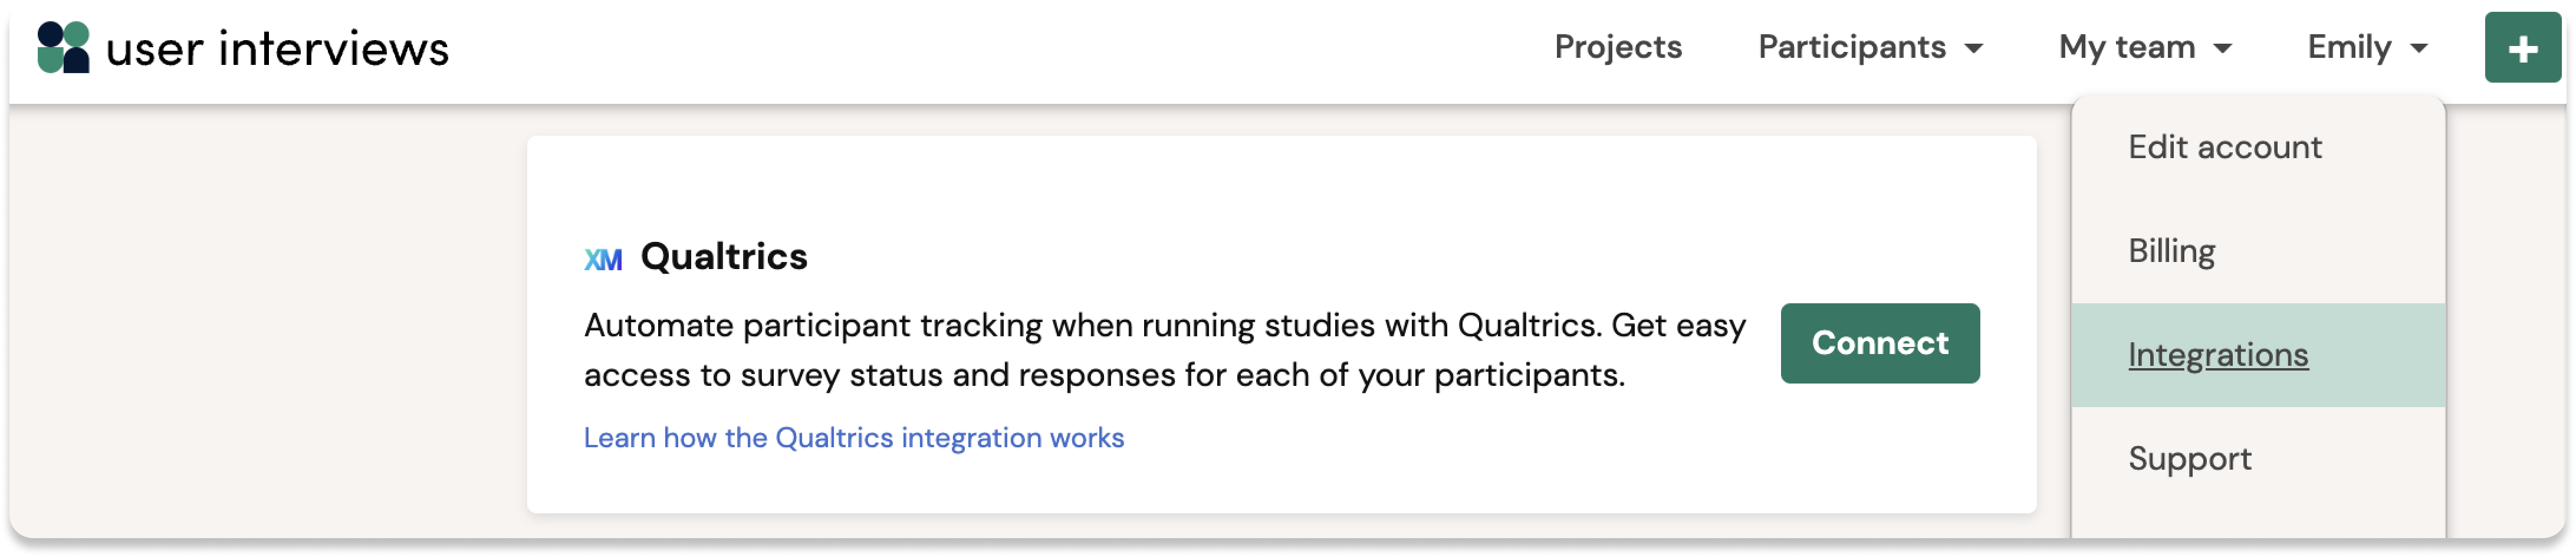
October 25 - 🔌 Introducing our Qualtrics integration! Get the best of both worlds: a flexible survey solution paired with the highest quality respondents
Connect two best-of-breed tools to power your research process.
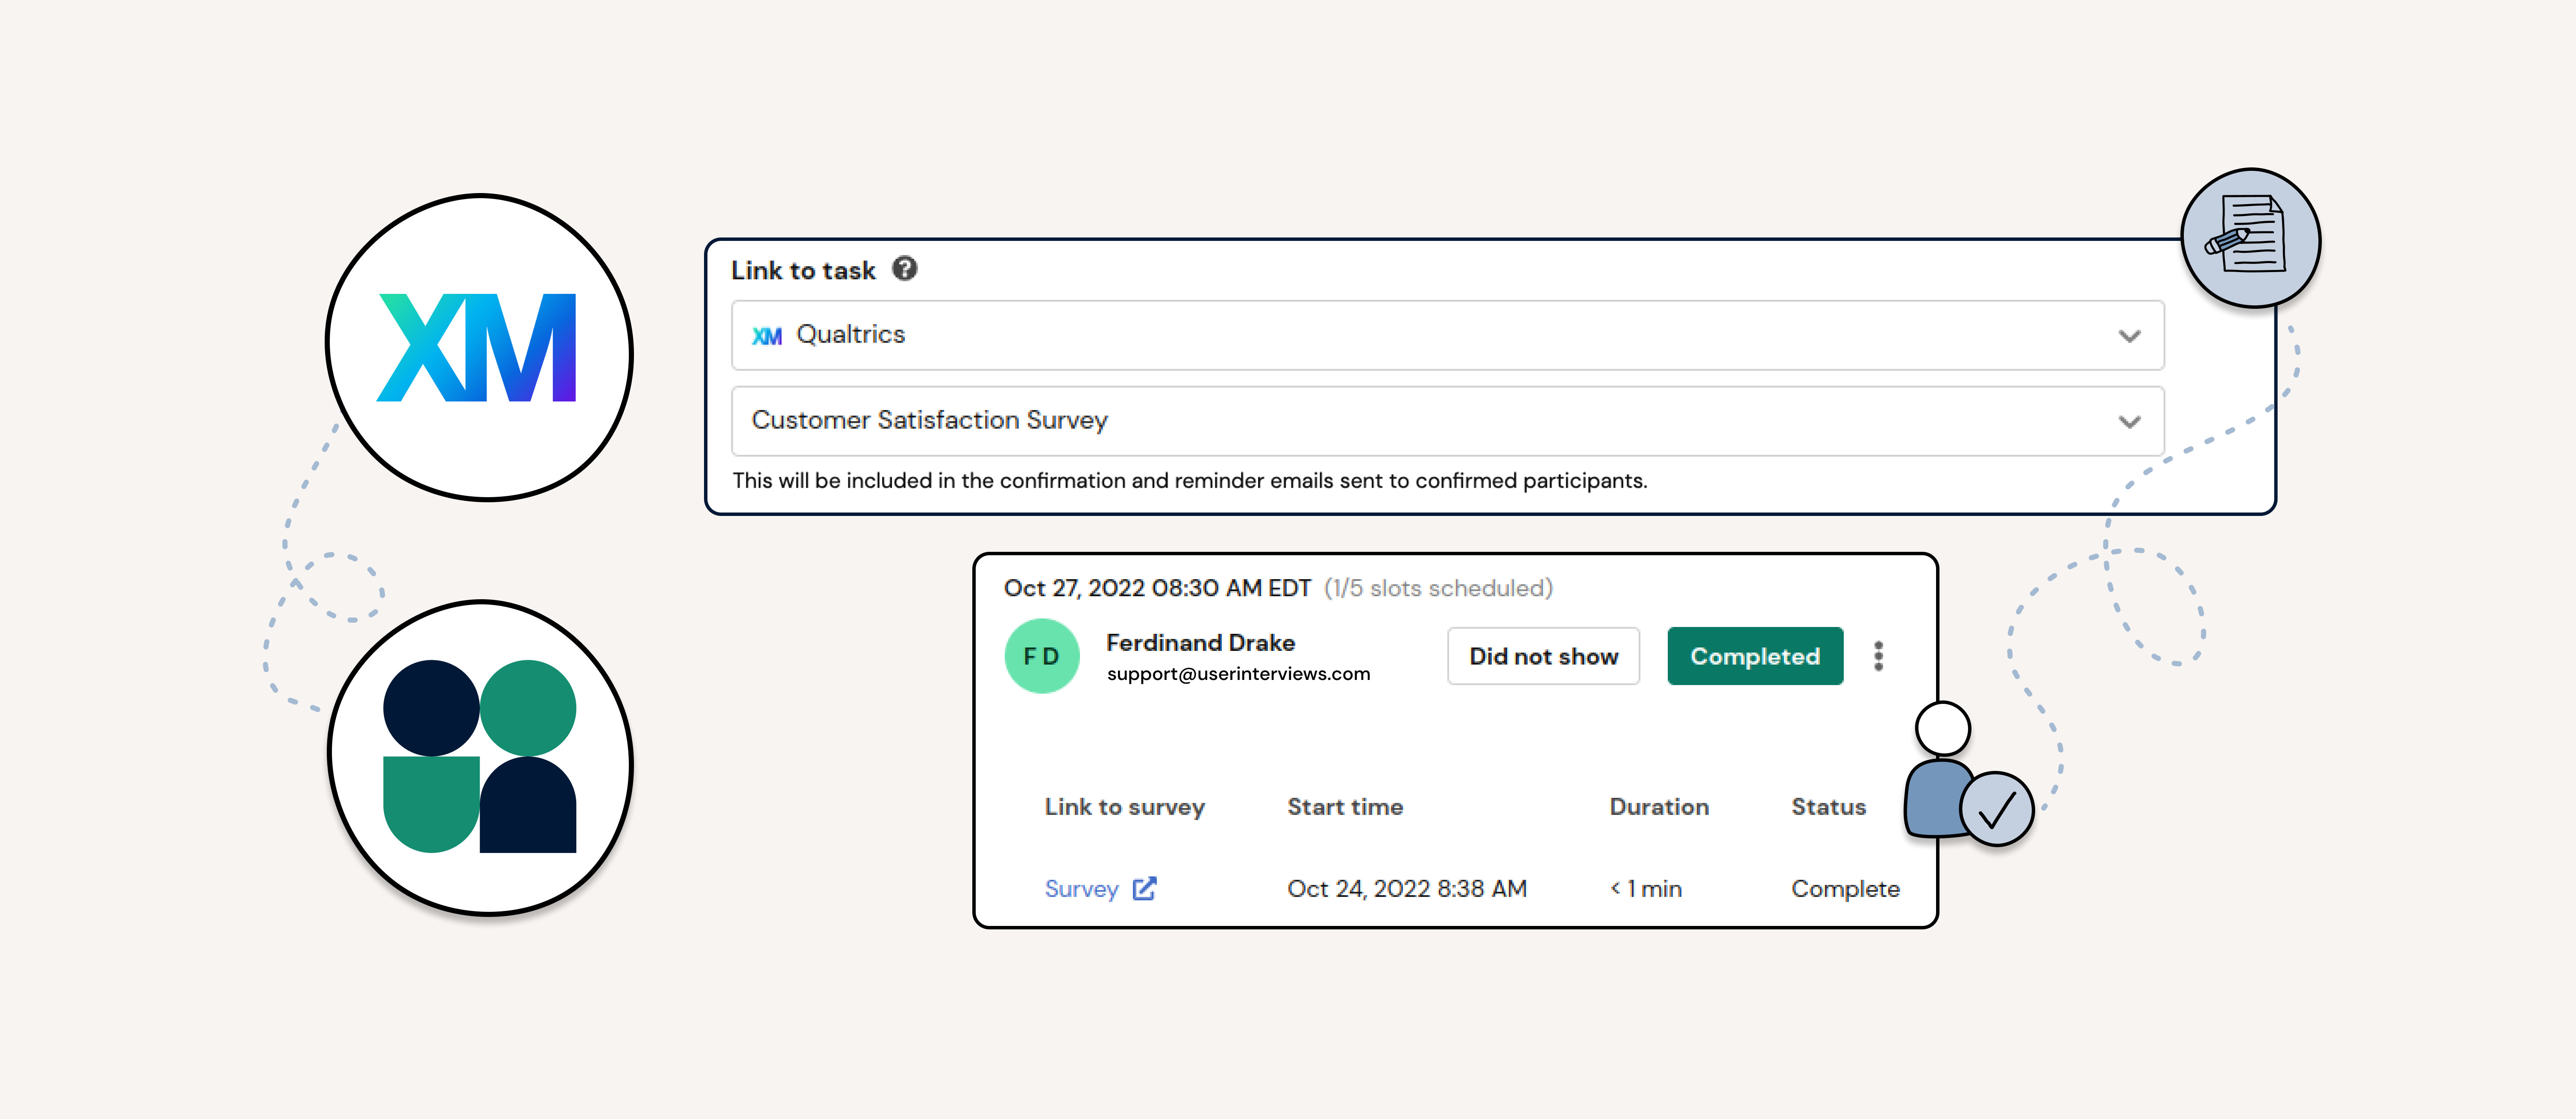
If you often run surveys as part of your research workflow, this integration is for you. Qualtrics is a powerful online survey platform that lets you build anything from a simple feedback questionnaire to a detailed research study.
Build sophisticated surveys with Qualtrics, target high-quality participants (or your own customer segments) with User Interviews, then automate participant tracking across the two tools. Run small or large scale surveys with confidence—we’ll capture all of the important data to keep your study moving forward.
Enabling this integration will streamline several steps in the research process
- Automate the creation and distribution of survey links to participants
- Track the status of participants as they progress through your study
- Identify completions so you can easily trigger incentive payments
Get started from our integrations page: log into your User Interviews account, click on your username at the top right of the screen, and select “Integrations” from the dropdown menu.
💡Note: If you are the first user in your team to enable the integration, you will be prompted to provide us with an API token, which can be provided by your Qualtrics Brand Administrator. Read on for more details in our support guide.
October 22 - 🧠 A smarter approach to unmoderated research for Hub & Recruit
Our unmoderated research workflow just got a major upgrade: introducing a new, more adaptable “smartflow” that adapts to your study.
We know from talking with many of you that different studies—from surveys to usability tests, to mini assignments and more—require different workflows that should adapt to your study. With this update, we’re bringing everything you love about moderated research with User Interviews to the unmoderated research experience. Our revamped workflow first and foremost, is smart. Simple when it needs to be, yet flexible enough to support the most complex studies. So whether your study is a simple survey, or requires more steps such as manual reviews, careful screening, or documents like NDAs, our smartflow has you covered. Read on about how our new workflow and integrations support different scenarios for seamless unmoderated research.
October 20 - 🏃 Research Hub gets a serious performance boost
If you use Research Hub to manage your participant panel, we’ve got some good news for you—Hub is getting some serious speed and reliability upgrades. Starting today, you’ll notice some big improvements in the Hub experience, especially when managing enterprise-size populations. In the Hub panel, you should see large populations loading up to 70% faster, and large CSV imports up to 4x faster.
October 4 - ➿ Introducing our Loop11 Integration! Connect accounts to unlock lightning fast recruiting for usability tests
With this integration, we’re making user testing even easier and empowering teams to make smarter design decisions.
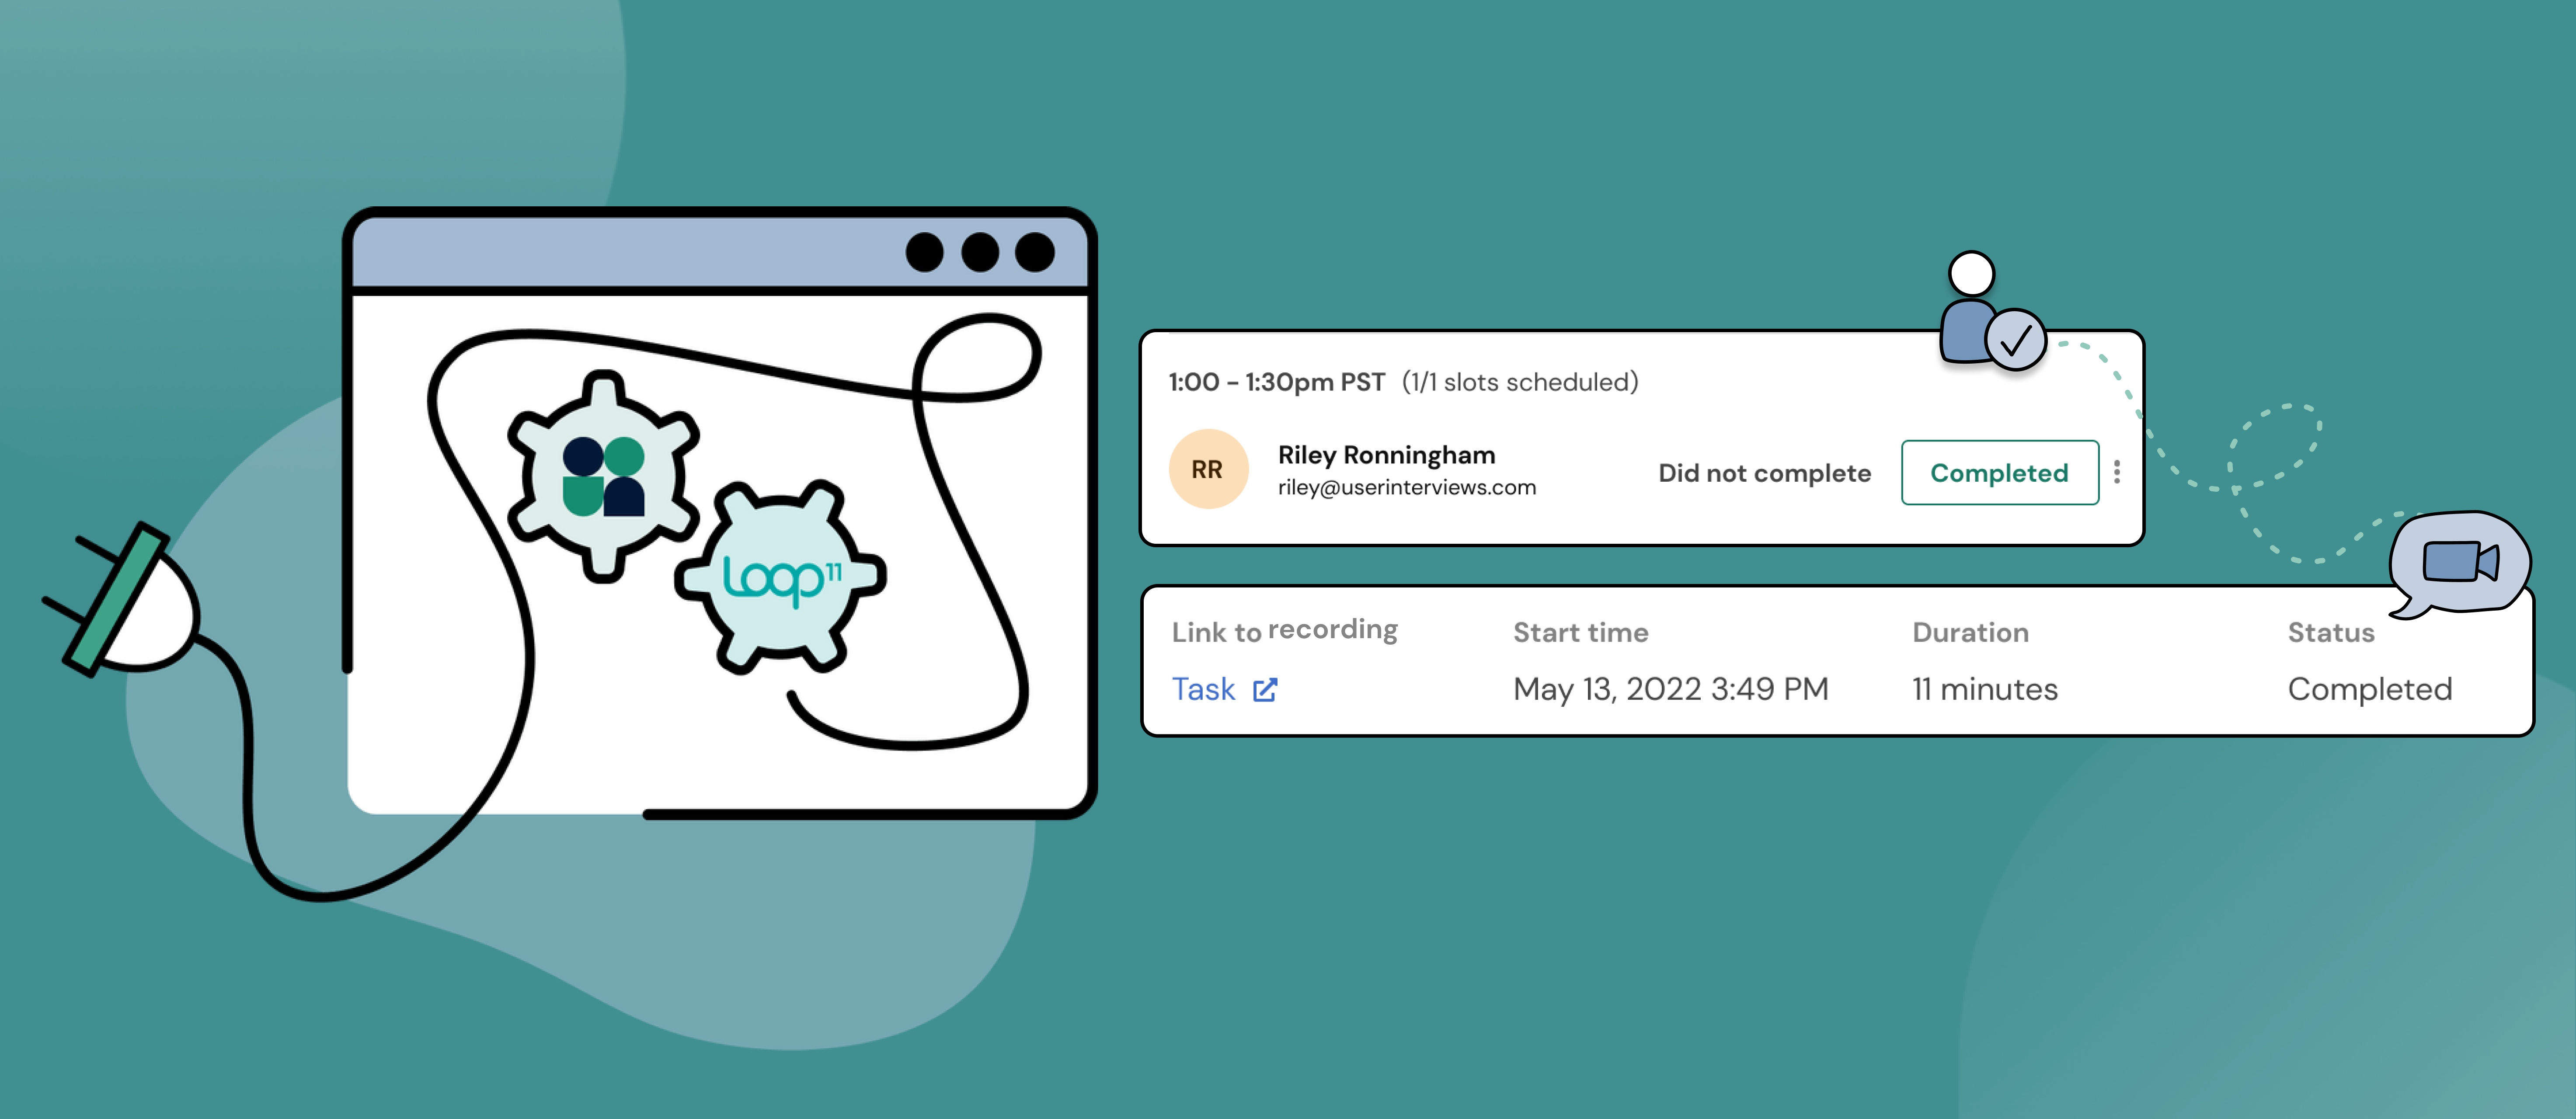
Use Loop11 and User Interviews together to streamline workflows across two of your favorite tools. Our new integration helps researchers unlock lightning fast recruiting for usability tests. Build a test with Loop11’s intuitive platform, recruit high quality participants (or your own customer segments) fast with User Interviews, and then automate participant tracking across the two tools. It’s that easy.
When you connect accounts and link to a Loop11 project, we will automatically display Loop11 session data within your User Interviews workspace. You’ll be able to see all of the important details including session duration, start or end time, and completion as participants progress through your study. And you’ll have easy access to your participants’ tasks and recordings, all in real time.
Why turn on this integration?
User testing should be easy. With this integration, teams can collect insights from users, fast—and bring them to the center of every product decision. Enabling this integration will streamline several steps in the research process:
- Target your own customers or recruit high quality participants from User Interviews’ 1.7 million+ panel for your study.
- Build a test, send it to participants, and capture user insights and analytics. Automate the entire flow from invite to incentives.
- Track progress and access task recordings from a single place. Let us do the work of tracking participants across platforms.
Get started from our integrations page: log into your User Interviews account, click on your username at the top right of the screen, and select “Integrations” from the dropdown menu.
💡Note: Our integration currently only supports unmoderated studies
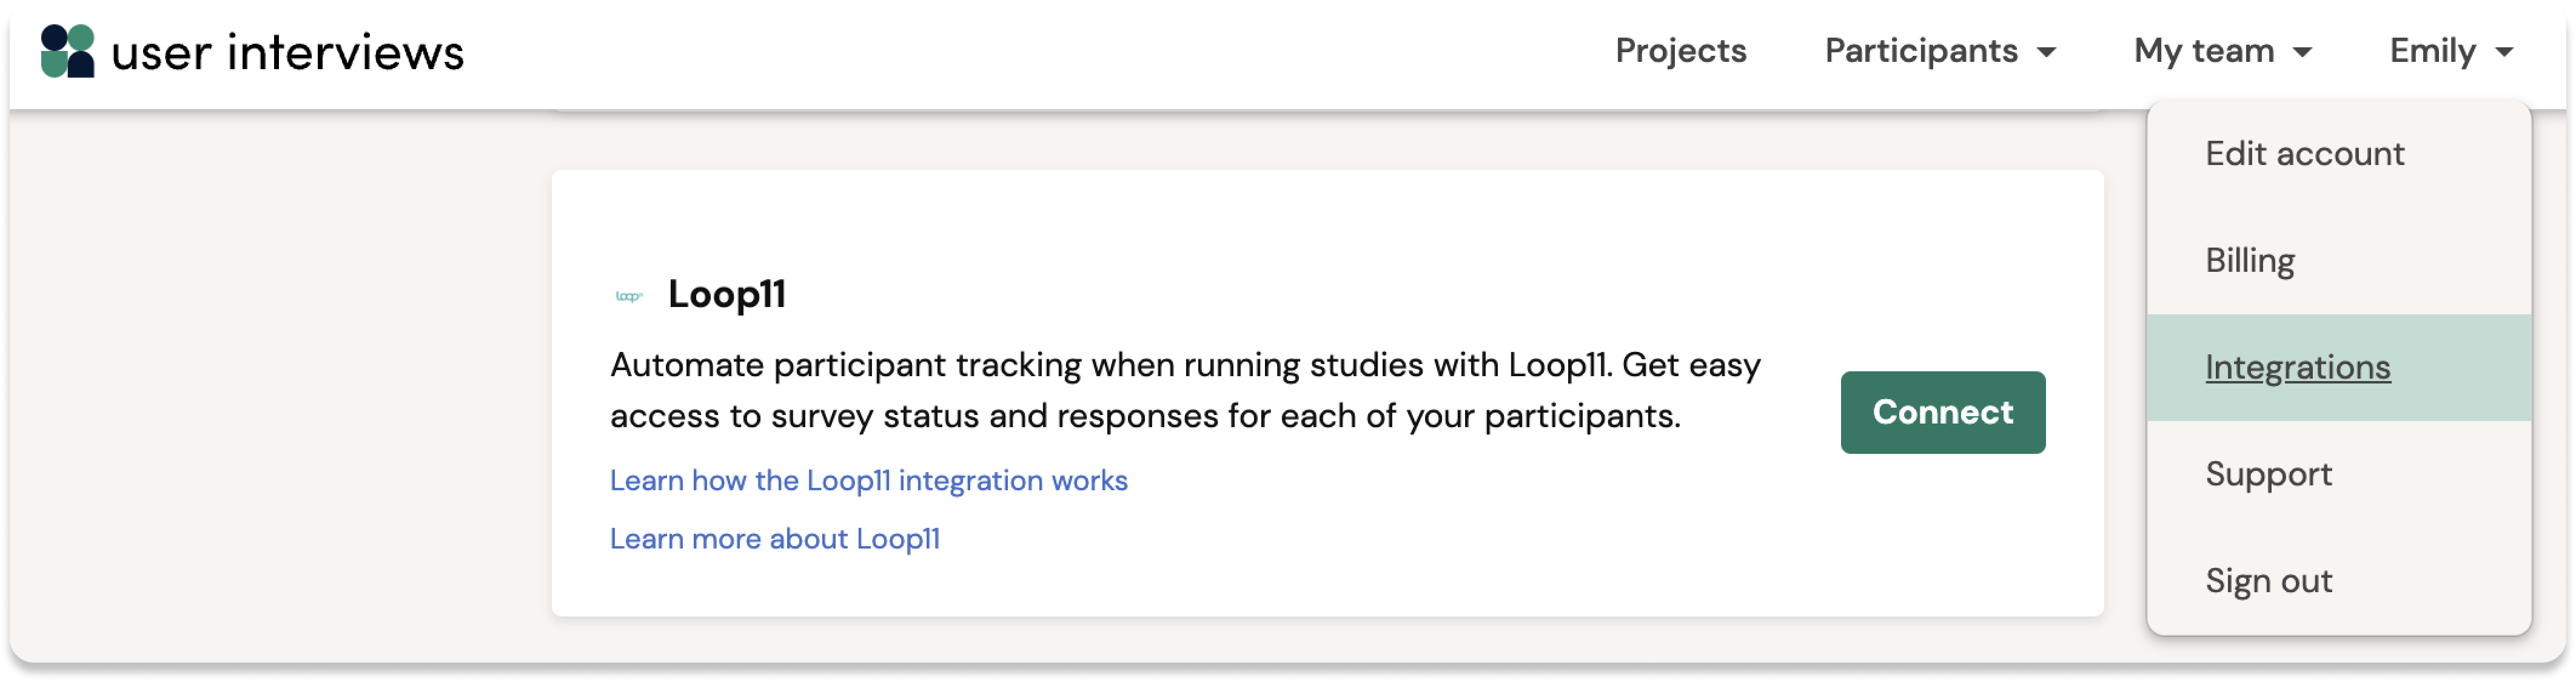
Have questions about our Loop11 integration? Read our support guide for more information.
Not a Loop11 user? Visit Loop11 for all your usability testing and interviewing needs.
October 4 - 🔒 We’ve refined permissions for Admin & Researcher roles to better support large organizations using Research Hub
Create a robust team structure in User Interviews by assigning Team Admin & Researcher roles to members of your team—available on Hub custom subscriptions.
Today, we’re defining granular permissions for Team Admin and Researcher roles on Hub, to guard against accidental actions taken by unauthorized users, and to give teams more confidence to onboard new users to the platform.
As a reminder, role assignments are available to Hub teams on custom subscriptions. Reach out to your customer success manager to enable them on your account.
Today’s biggest changes are related to locking down certain customizations and panel settings by Researchers, so they cannot make changes that inadvertently affect the whole team. Those with a Researcher role can no longer:
- Delete participants from Hub
- Delete fields in Hub
- Delete Hub labels (except ones they created)
- Upload, replace, or delete the Team logo
- Edit the Team name
👉 Get the full breakdown of permissions across Team Admin and Researcher roles.
As we further expand support for large teams, we will be adding new roles soon: a more restricted View-Only role, and a more powerful Org Admin role that can manage people, projects, and settings across all teams.
Team roles can be enabled for your account by contacting your customer success manager. Learn more in our team roles support guide.
October 4 - ✅ Recruiting B2B participants? Select auto-approval for speedier sourcing.
We’re bringing auto-approval to B2B projects, enabling researchers to eliminate a time-consuming step in their recruiting workflow.
Auto-approval has been a popular automation feature of B2C recruiting for a while, and we’re excited to extend this feature to B2B recruiting as of today.
When you turn on auto-approval for your project, User Interviews will automatically approve and invite applicants who are a 100% match to your project's characteristics and screener survey. This cuts out a whole step from the recruiting workflow (i.e. manually reviewing and approving applicants one at a time) and allows participants to go directly from study application to scheduling a session, without any intervention from you. Of course, if you need more control over your recruit, manual approval is still an option.
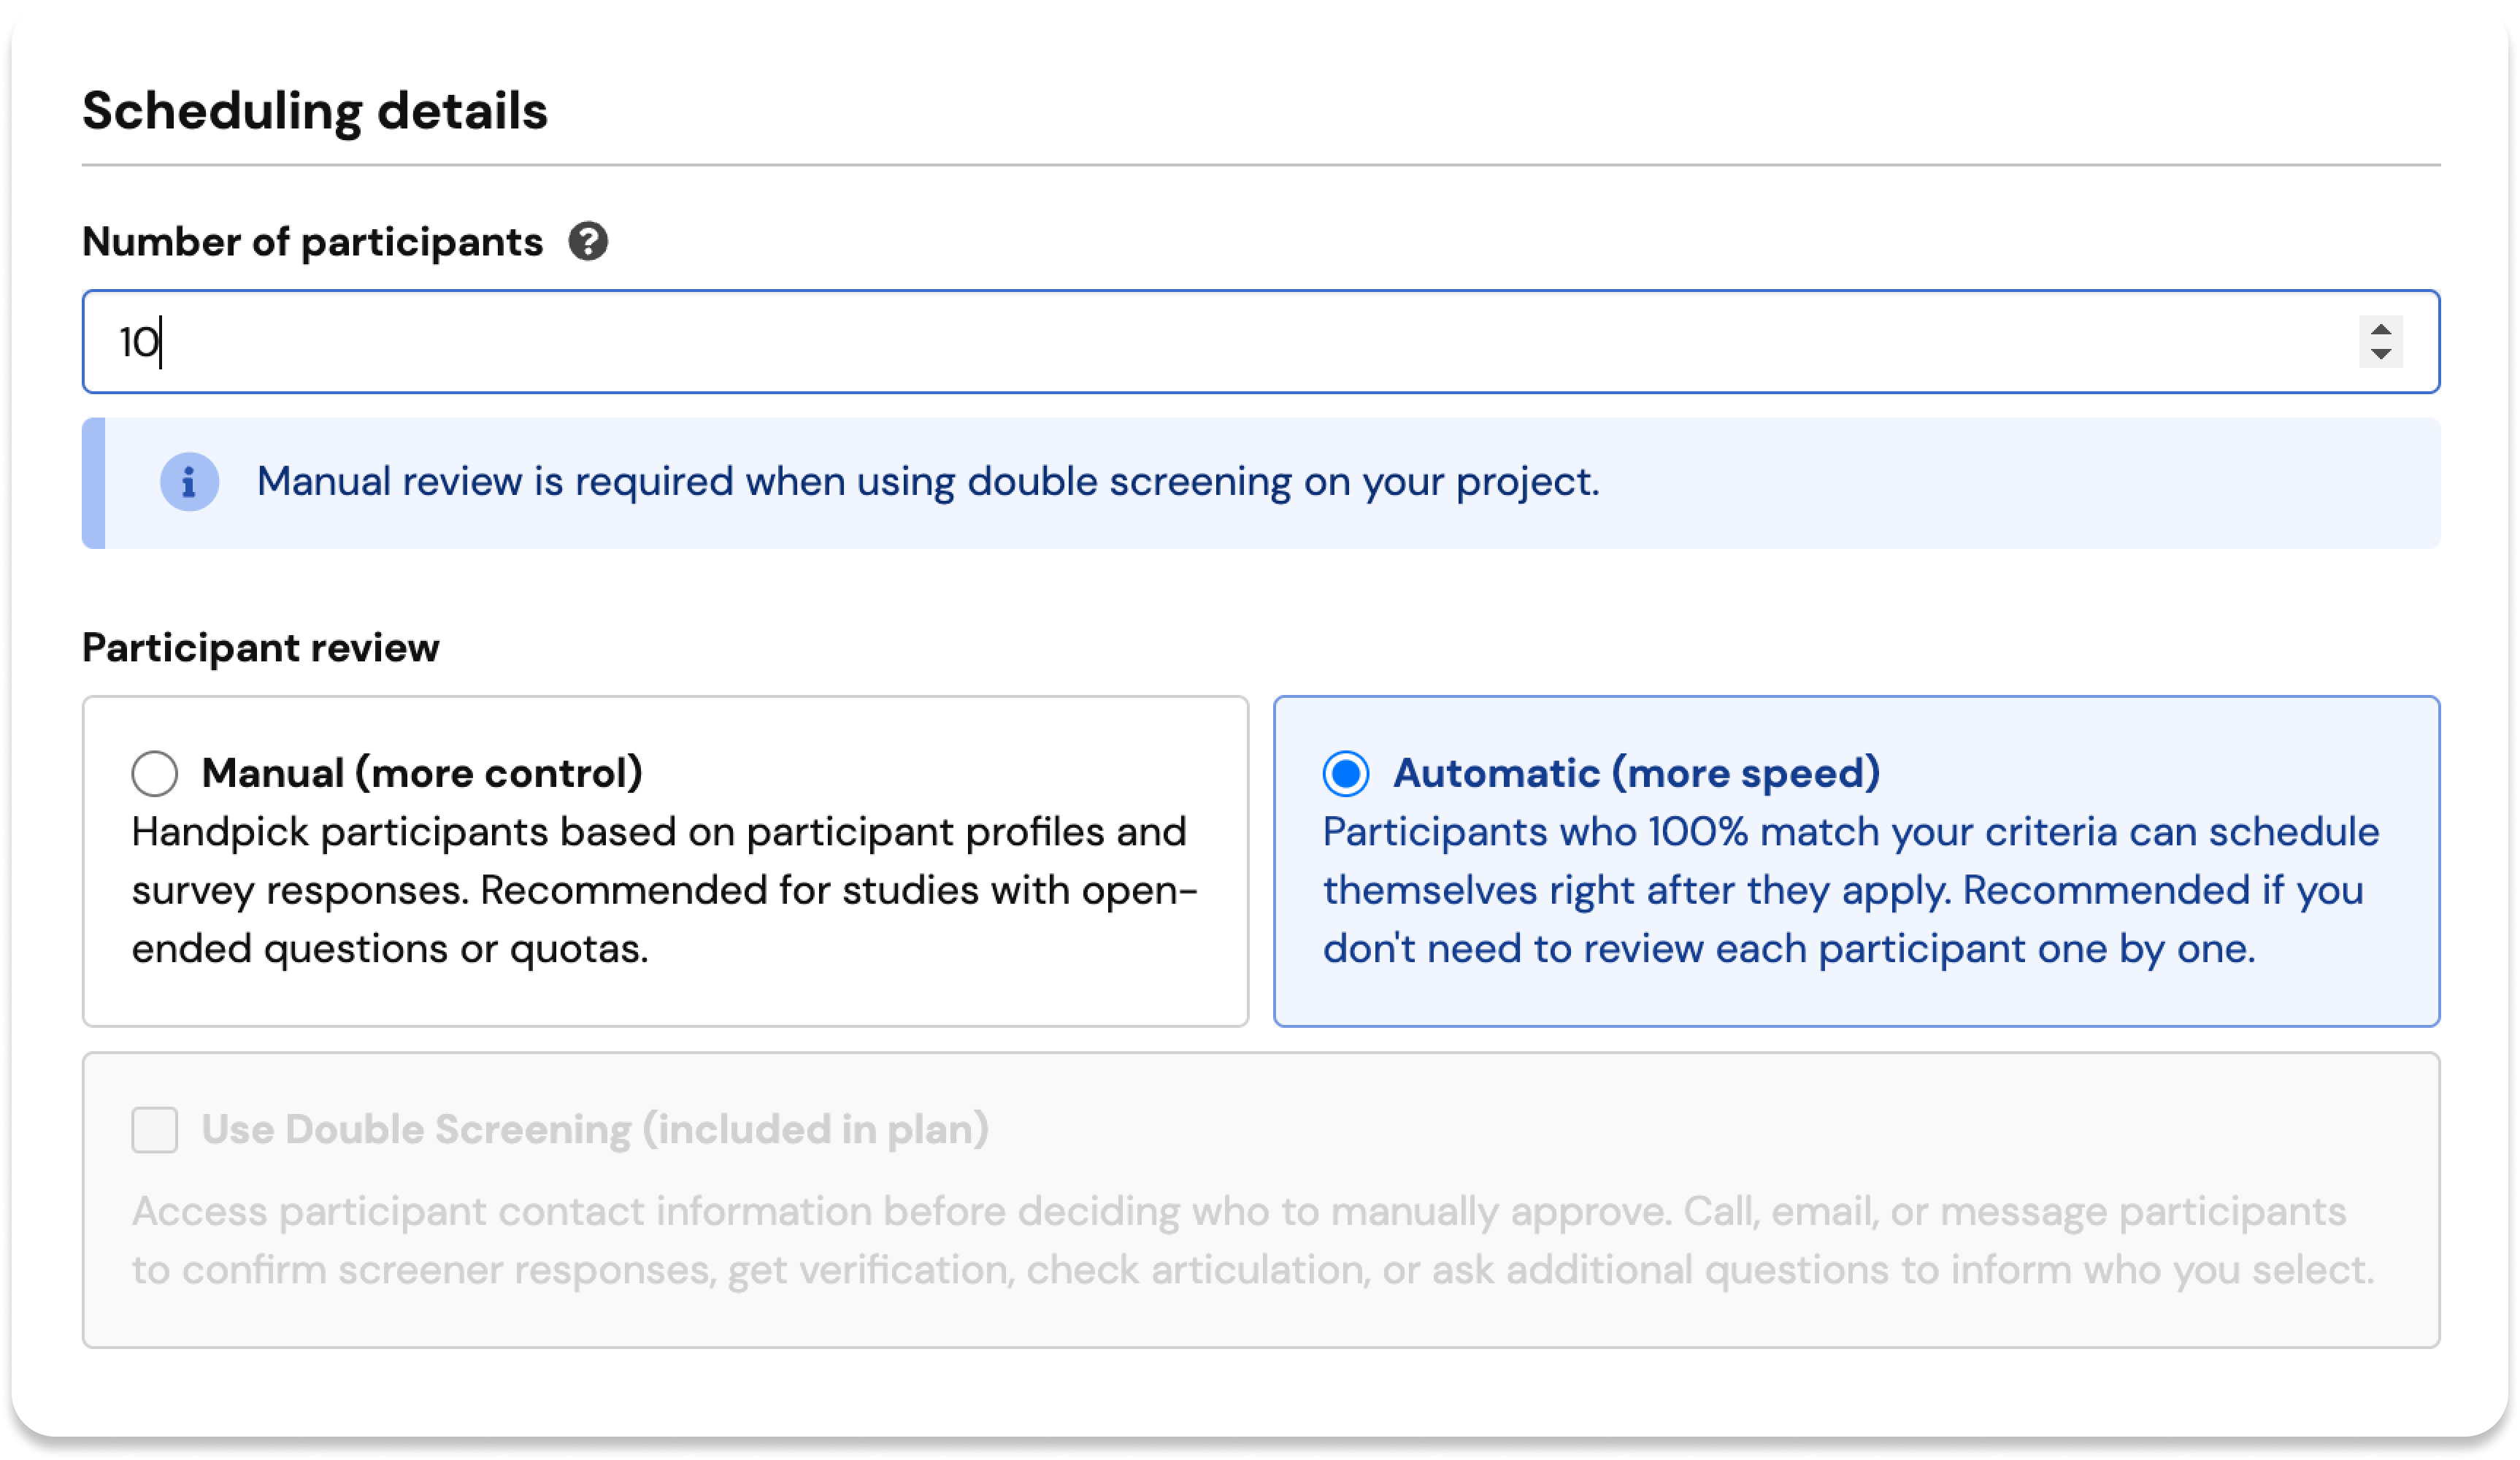
This is a big win for larger studies like surveys or unmoderated tasks, where manually approving lots of applicants can be an unnecessary and time-consuming task.
Learn how to switch between manual and automatic review in our participant review support guide.
September 9 - 💸 Research Hub now supports incentives in 17 currencies and 28 countries
Great news for teams with a global research practice—we've just expanded the number of currencies and countries we support, for incentives sent via Research Hub.
Set the incentive amount in USD, and participants in supported countries can redeem their incentive in their local currency.
Hub incentives are available in the following currencies:
AED, ARS, AUD, BGN, BRL, CAD, CHF, CZK, EUR, GBP, INR, PHP, PLN, RON, SEK, USD and SGD.
Hub incentives are supported in the following countries: UAE, Argentina, Australia, Bulgaria, Brazil, Canada, Switzerland, Czech Republic, Austria, Belgium, Finland, France, Germany, Ireland, Italy, Netherlands, Portugal, Spain, UK, USA, India, Philippines, Poland, Romania, Sweden, and Singapore.
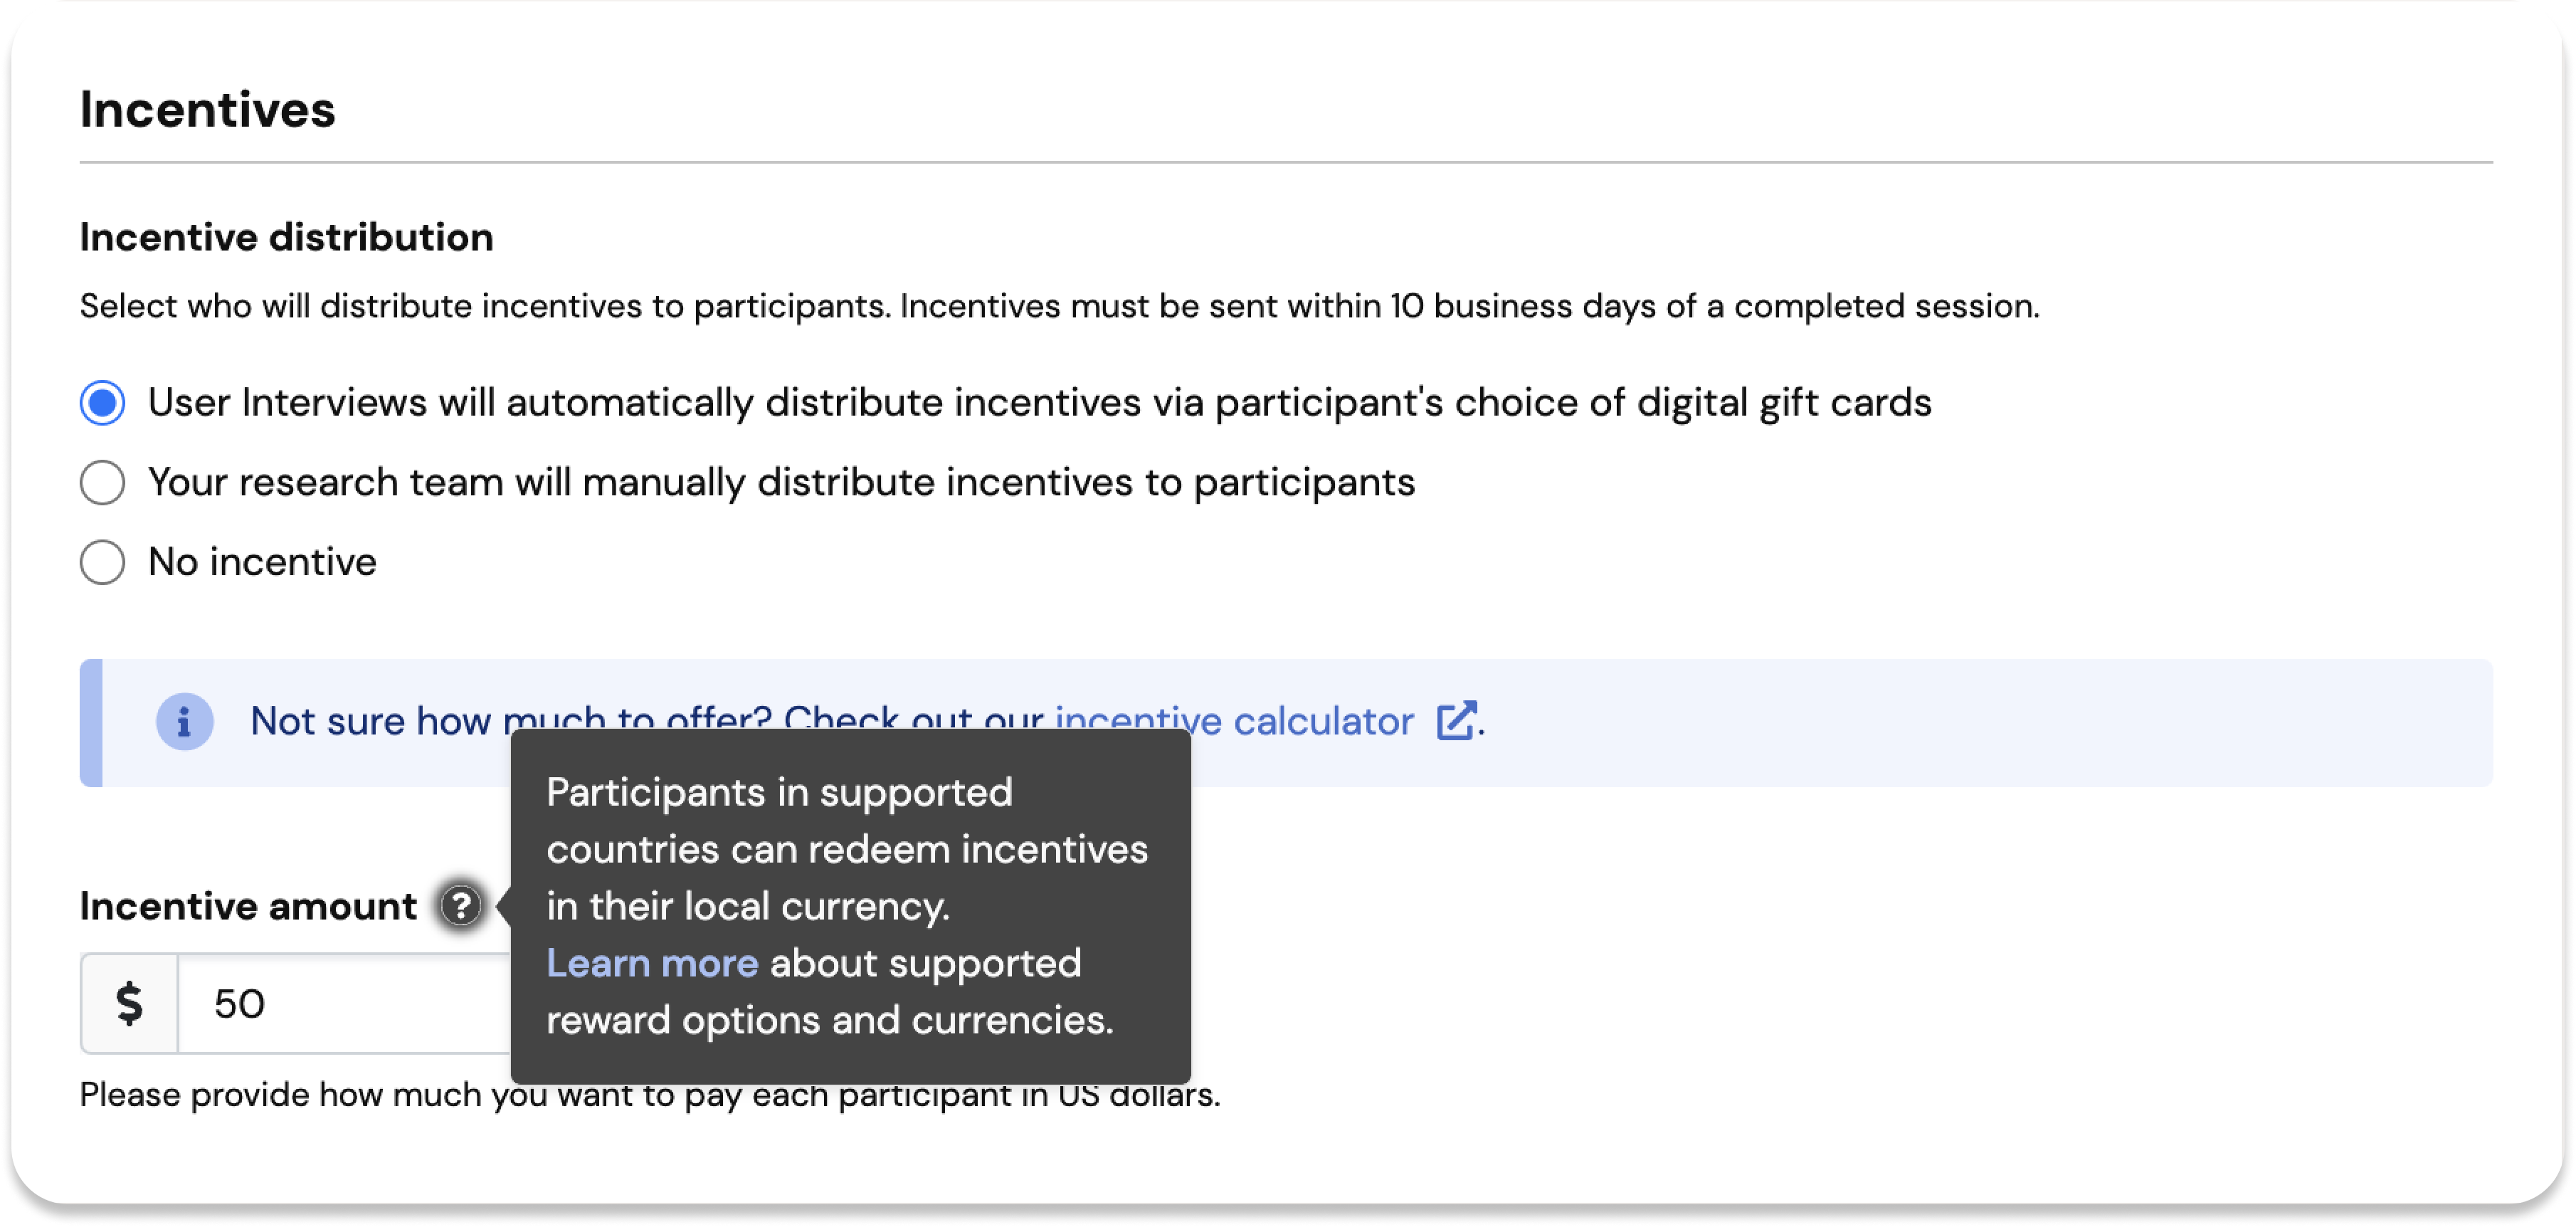
There is no change to Recruit incentives, but we are looking at expanding support in the new future—stay tuned for an update soon. For now, Recruit incentives are available in the following currencies: AUD, CAD, GBP, USD, and EUR (Germany and France only).
Learn more about incentives in our support guide.
September 7- 📝 Introducing our Typeform Integration! Run engaging surveys while recruiting with User Interviews
That’s right—another integration coming your way to make running surveys a breeze. User Interviews now integrates with Typeform!
If surveys are part of your research toolkit, we’re excited to introduce another option to your workflow—Typeform is an online survey tool that lets you create conversational, visually beautiful, one question at a time style surveys, all within a simple and easy to use interface. And if you missed it, we also recently launched our integration with SurveyMonkey, another widely used survey tool great for any kind of purpose, including market research and customer experience. Whatever your preference, we’re continuing to build more integrations so you can use even more of the tools you know and love.
To get started, connect your User Interviews and Typeform accounts, launch a study, then sit back, relax, and let our integration automate participant tracking across the two tools. Similar to our SurveyMonkey integration, we capture all of the data you need to move your study forward so that running surveys at scale is a breeze. Whether you’re surveying 10 people or 500, everything is accessible in real-time from a single place within the User Interviews interface, where you can easily track progress, mark participants complete, pay out incentives, and get to insights faster.
Get started from our integrations page: Log into your User Interviews account, click on your username at the top right of the screen, and select “Integrations” from the dropdown menu.

Connect accounts to enable a simple end-to-end study workflow:
- Recruit and manage participants with User Interviews
- Link out to your survey on Typeform
- Let our integration handle activity tracking across the two tools
Once you’ve collected your survey data, it’s easy to prepare for analysis. We’ve added a unique identifier for each participant on a project so it’s easy to combine your User Interviews participant data and Typeform task/survey data into one single dataset for analysis. This is a randomly generated set of numbers and letters that will show as an additional data column in both User Interviews (Participant Project Export) and Typeform data exports. These identifiers are key, allowing researchers to connect participant data across tools for analysis—and keep any PII data hidden, if necessary.
Have questions about our Typeform integration? Read our support guide to learn more. And stay tuned for more one-click integrations coming soon, Qualtrics just might be on the horizon!
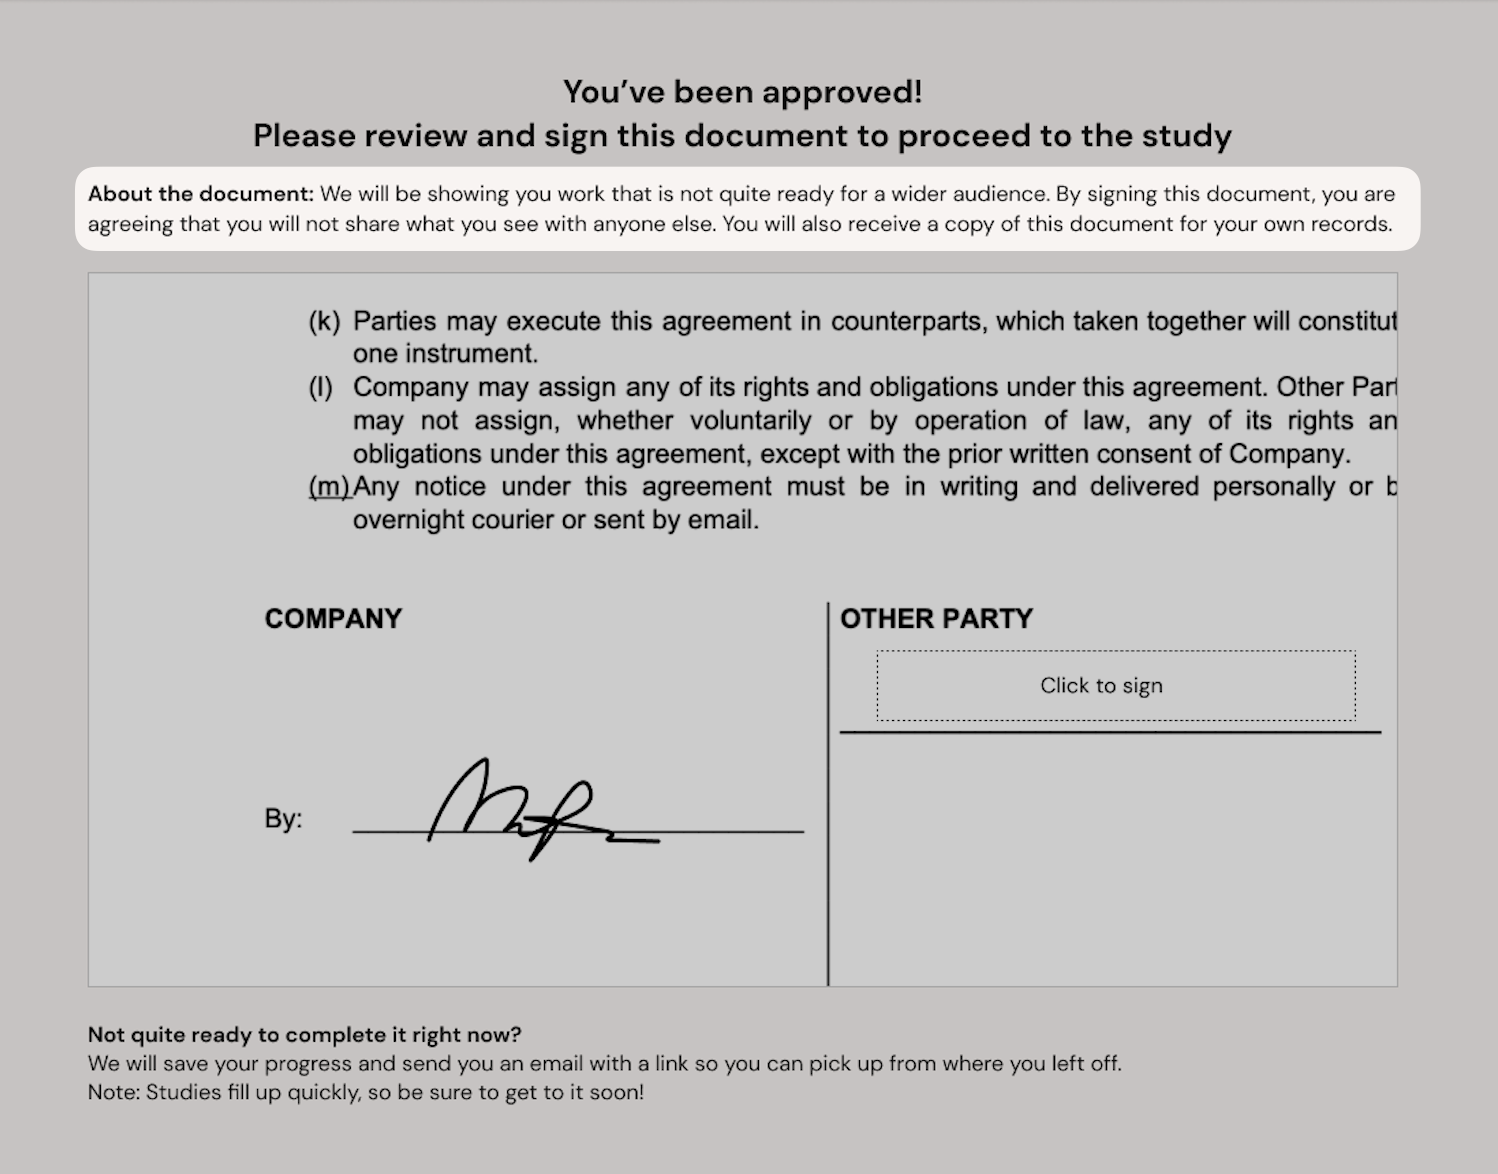
August 30 - ✍️ Researchers can now add context to document signing for participants
As a participant, it’s important to feel informed and comfortable at all steps of the research process. The faster they can get through sign up and approval logistics the better—the study is the fun part after all! With this update, researchers who require participants to sign an NDA or release form for their studies will now have the option to add an “About the document” summary. This appears at the top of the document and can give participants important context about what the document is and why they are signing at that point in the process.
Adding this summary is simple—navigate to the “Document description” field in the builder, located underneath the Request document signature “Upload” button and add your text. This summary can be added to all moderated and unmoderated projects, in both Research Hub and Recruit. It is completely optional, but an effective way to reassure participants with the information they need to move more quickly through the process.
💡Note: Document signing is available as an add on to any paid plan, making it easy to collect document signatures from participants before a session.
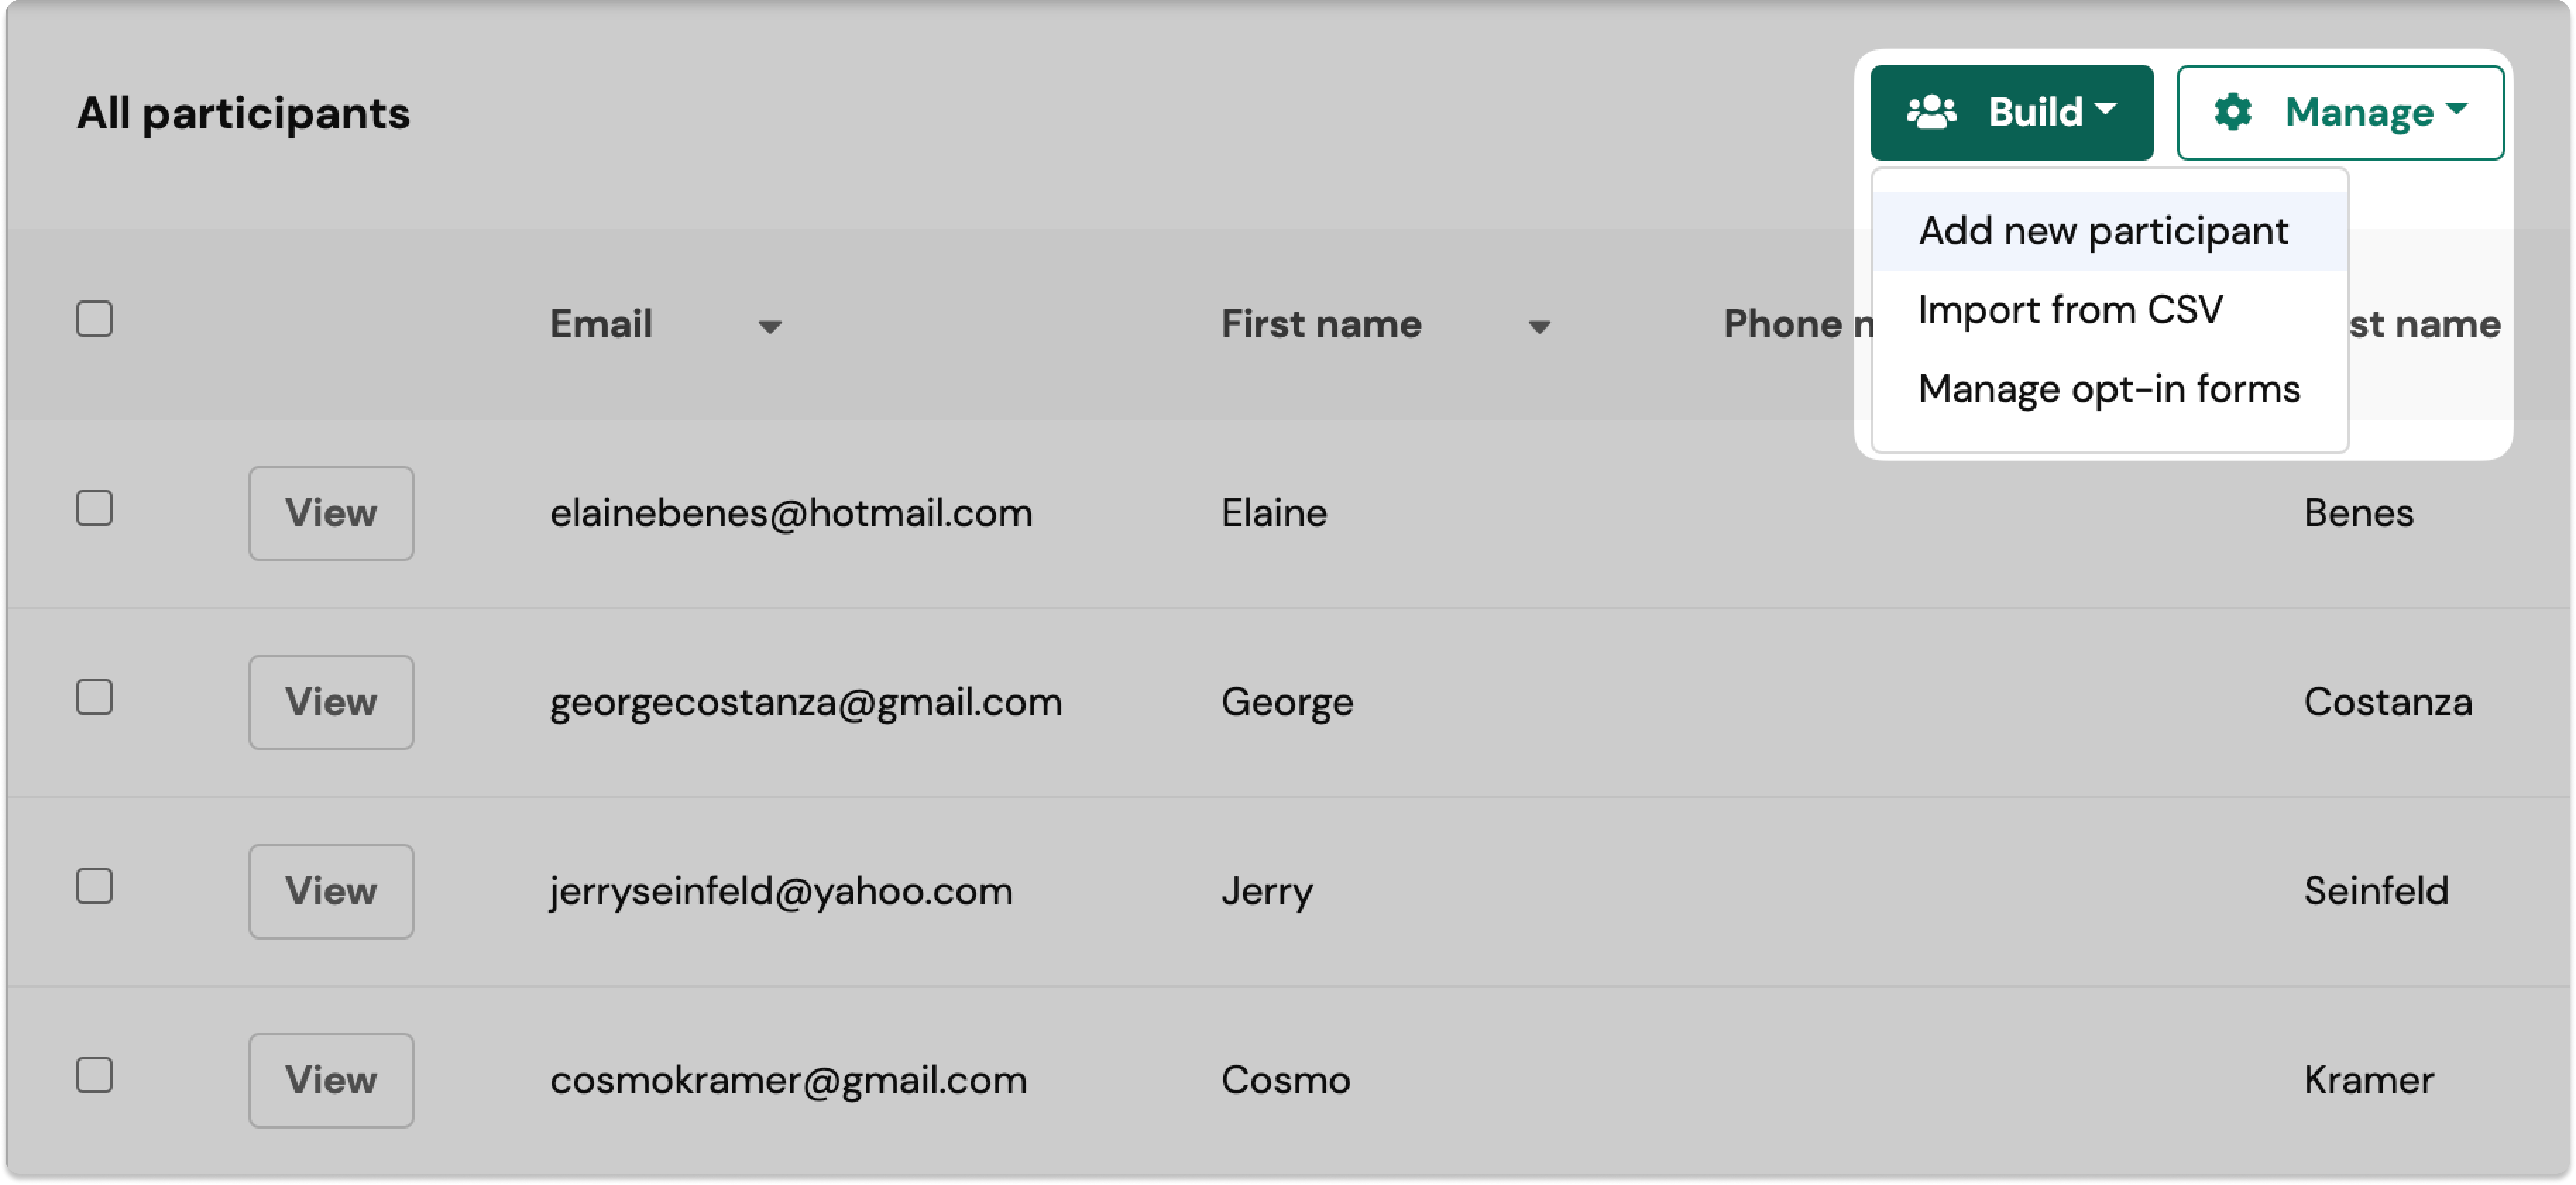
August 4 - 🕵️ Researchers can now add single participants to their Hub panel directly in their workflow
We know there are occasions where researchers may only need to add a few participants to their Hub population—whether that be a last minute addition, filling in missed contacts, or for testing purposes. Previously, researchers would need to follow the standard method of uploading a CSV file to do this—creating and exporting a CSV containing the row of participant data they want to add, and then uploading that file to User Interviews.
With this update, researchers will now be able to add a participant from directly within the product. When you navigate to the "Build" dropdown, you'll see a new option to "Add new participant." From there, simply enter the participant's email address and click "Add to Hub". This will create a new record in the system, and you'll have the option to add more specific details about that participant if necessary.
Learn more about building out and managing a large, engaged panel with our Getting Started with Research Hub guide.
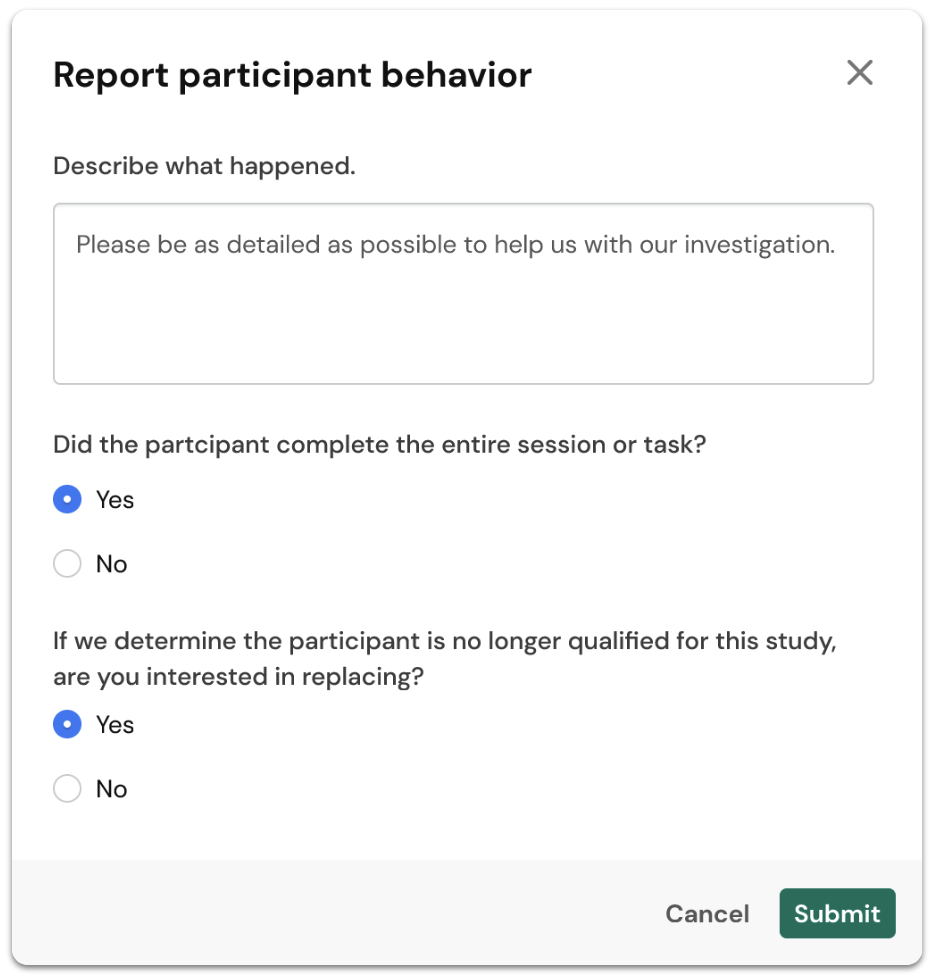
July 20 - 🕵️ Researchers can now report suspicious participants directly to our team while reviewing "Qualified" and "Unqualified" candidates
Previously, researchers could only report suspicious participants once their confirmed session was completed. We've taken this product update one step further, offering you the ability to report these participants prior to approval.
Researchers will now have the option to report these participants under the “Participant Quality” section of the "Participant Overview".
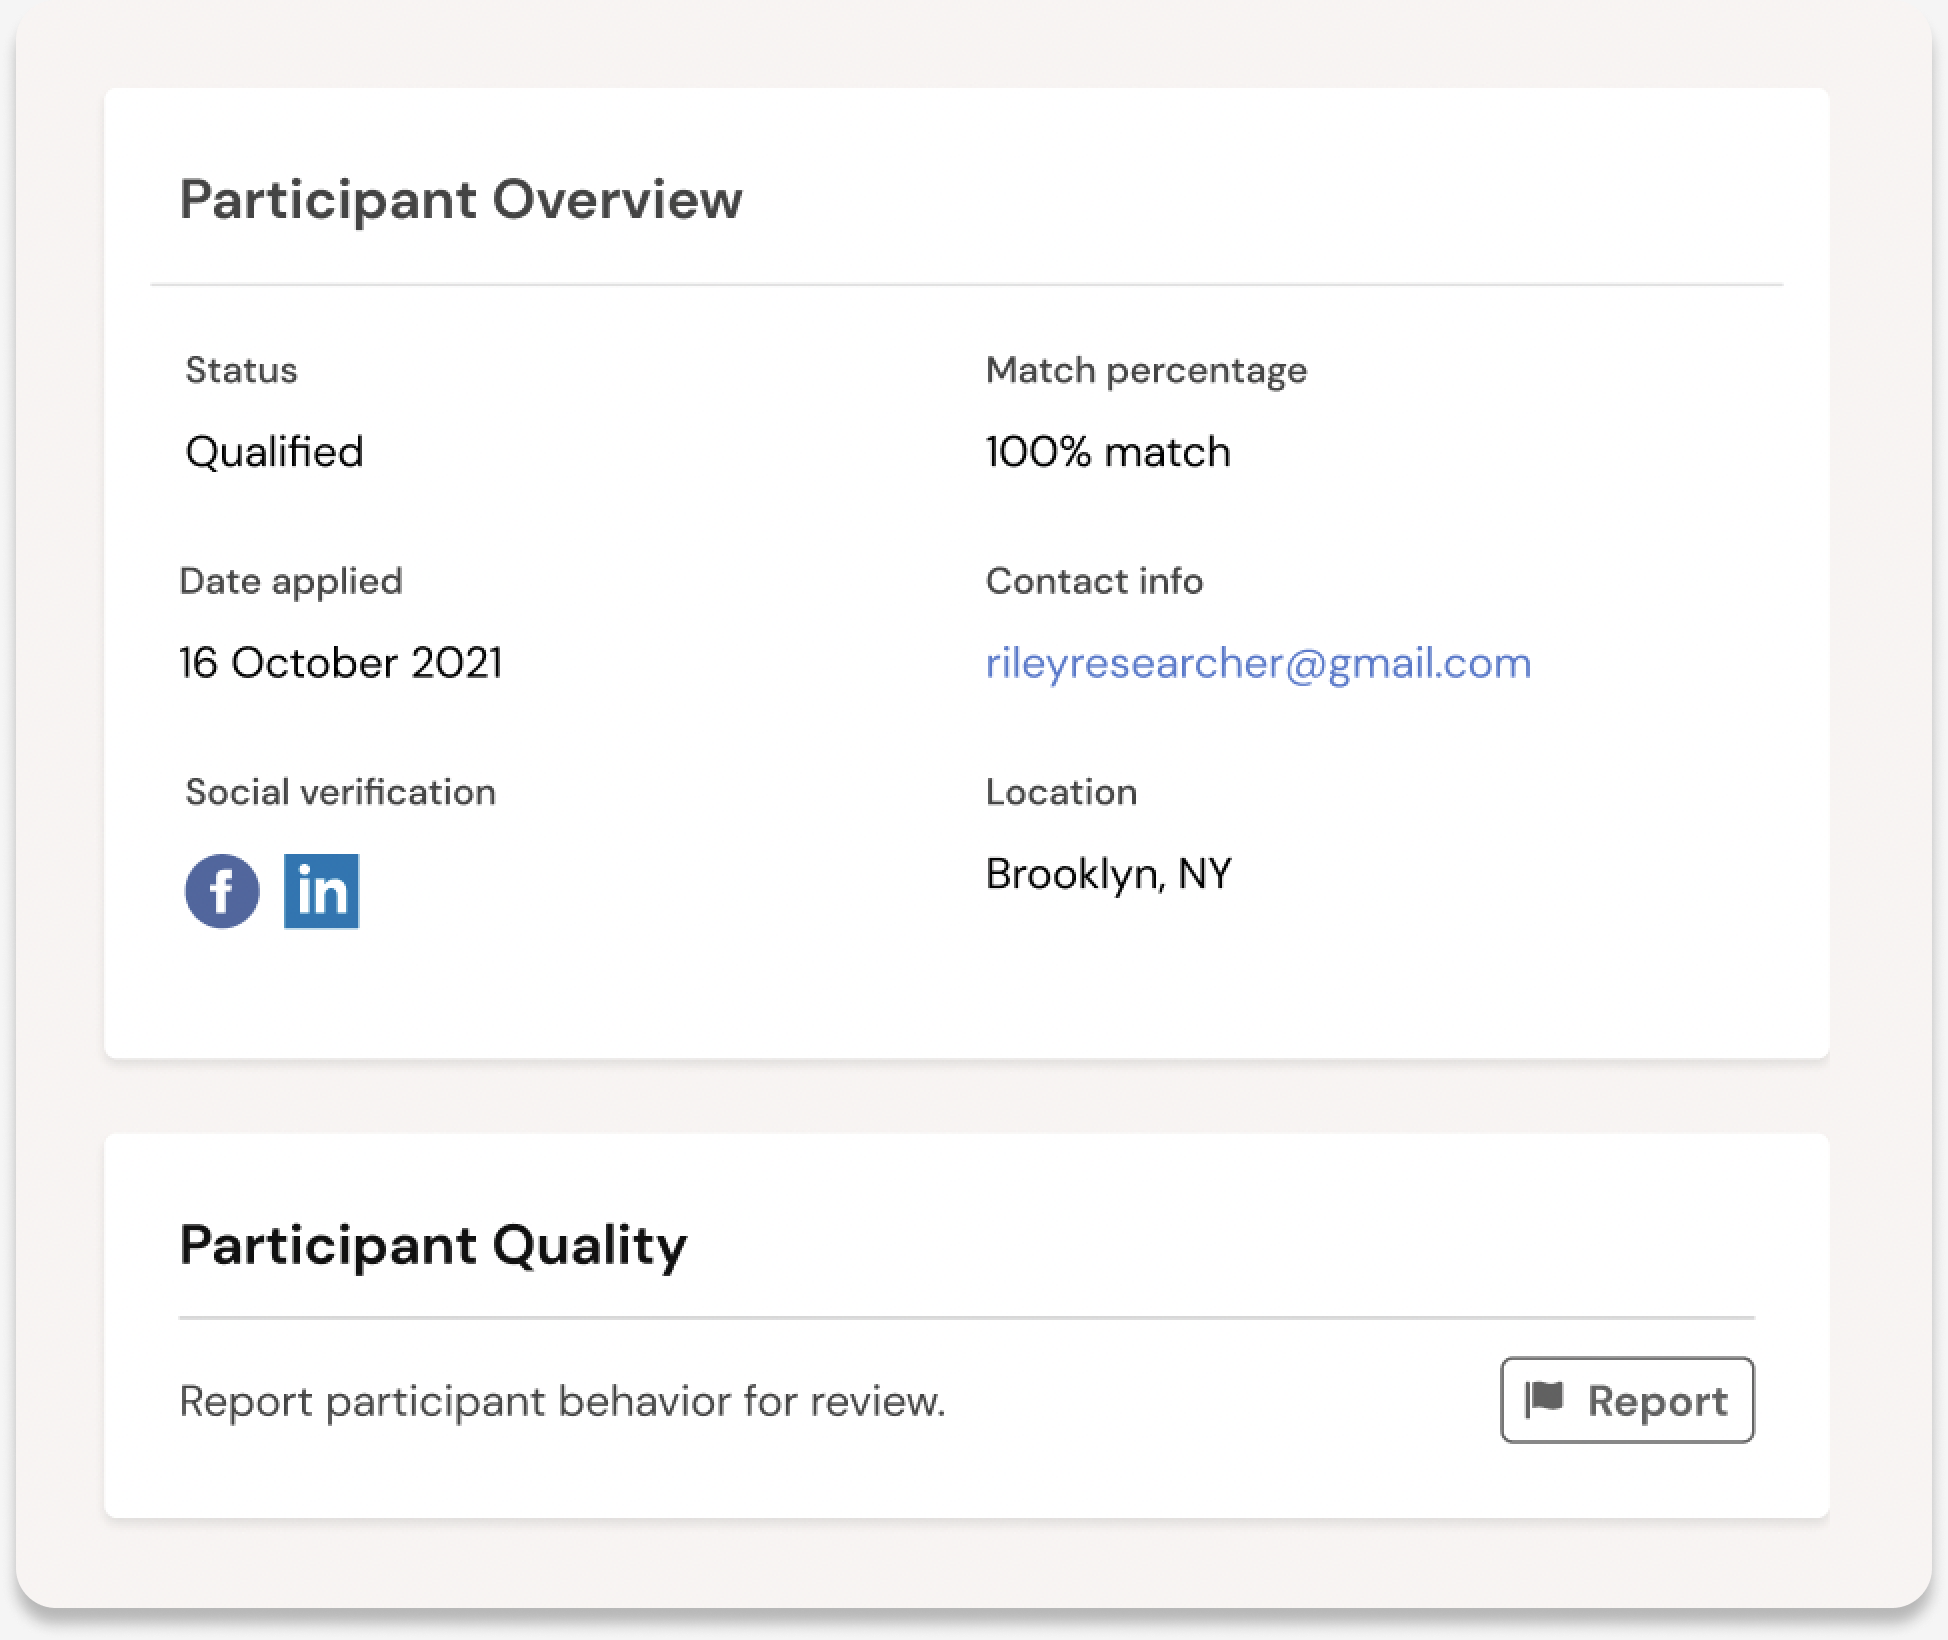
Similar to our previous update, researchers will then be prompted to share a brief description of the issues to aid in our review. Once you hit "submit", the reported participant will be hidden from your view while our team launches a thorough investigation.
To learn more about how User Interviews deters fraud on our platform, please see our support guide.
July 14 - 🪄 Screener surveys for Hub projects have been redesigned to better set expectations for your users
We’ve redesigned the screener survey template for all Hub projects to more clearly set expectations for users applying to your study.
Here’s the changelog:
- New page title clearly indicates that the screener step is part of the application for the study, and not the study itself. This has been a point of confusion for participants in the past, especially for unmoderated studies.
- An estimate for how long the screener takes to complete is now displayed under the page title. The time estimate is automatically calculated for you based on the number, length, and complexity of questions in your screener.
- A summary of relevant information about the study is now posted at the top of the screener. Info such as session length, incentive amount, and document signing requirements (if applicable) are presented in a condensed box above the screener questions.
This update is part one of a larger planned overhaul of the unmoderated workflow. Our goal is to give your users the most straightforward experience when participating in surveys, usability tests, and other unmoderated research by providing simple wayfinding to guide them from start to finish in as few steps as possible — no matter how simple or complicated your study may be.
Learn more about how to set up an unmoderated studies in Research Hub, and get all the details from this product update within our best practices guide.
July 13 - 🐵 Introducing our SurveyMonkey integration! Automate participant tracking for your surveys
If surveys are part of your research toolkit, you can now use User Interviews and SurveyMonkey together with our new integration.
This integration seriously expands researchers’ ability to run surveys with a large number of respondents, while automating recruitment and maintaining a system of record for all participant data.
This is just one of many integrations on our 2022 roadmap that will make User Interviews meaningfully connected to—and truly compatible with—a wide range of research tools and methods: interviews, focus groups, multi-day studies, surveys, concept and usability tests. We’ll be launching many more one-click integrations in the upcoming months, making User Interviews the most open, automated, and data-rich panel management solution, ready to plug into any research tool stack.
Connect accounts to enable a simple end-to-end study workflow:
- Recruit and manage participants with User Interviews
- Link out to your survey on SurveyMonkey
- Let our integration handle activity tracking across the two tools
Get started from our integrations page: log into your User Interviews account, click on your username at the top right of the screen, and select “Integrations” from the dropdown menu.
Learn more: User Interviews + SurveyMonkey: Recruiting for Surveys Made Easy
Have questions about our SurveyMonkey integration? Read our support guide to learn more.
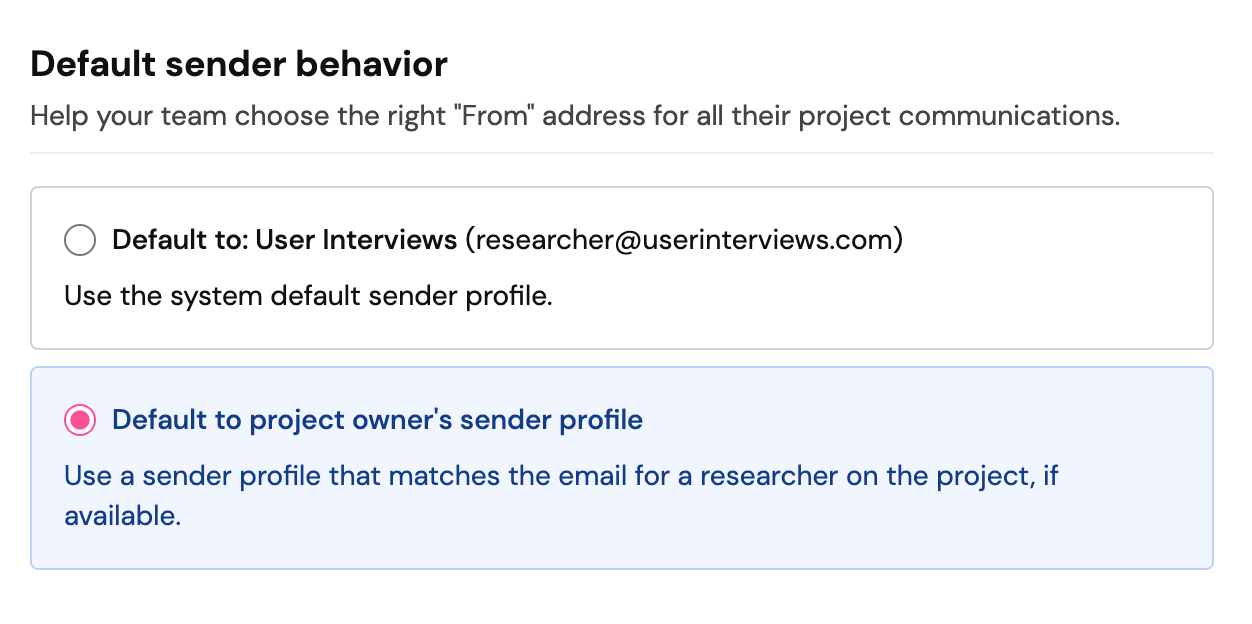
June 29 - ⚙️ Admins can set a default sender profile for their research team
Participants appreciate getting emails from those they're familiar with, so setting a sender profile for your Hub project is a great way to help build trust with your panel.
Now, team admins can set a default sender profile for their research team. This default "from" address can be set to come from either "research@userinterviews.com" or from a sender profile that matches a researcher on your project. These sender profiles paired with custom email templates and email themes help create on-brand communication for your team.
To enable this feature, your team must have a custom Hub subscription and have authenticated a sender profile domain.
Navigate to the “My Team” section and choose “Domain Settings” to get started.
June 13 - 📝 Admins can set default email templates so the whole research team can send consistent emails for any type of study
Hub team admins can now create default email templates for any combination of study type and format. Default templates save your team time and ensure consistent communication with customers. Once set, default templates will auto-populate in the project builder whenever a researcher on your team launches a study with that combination of study type and format.
To get started, login to User Interviews with your admin account and navigate to the “Email Templates” page under the “My Team” dropdown menu. Click on the ellipsis next to any template set to view available actions, and select “★ Set as Default”.
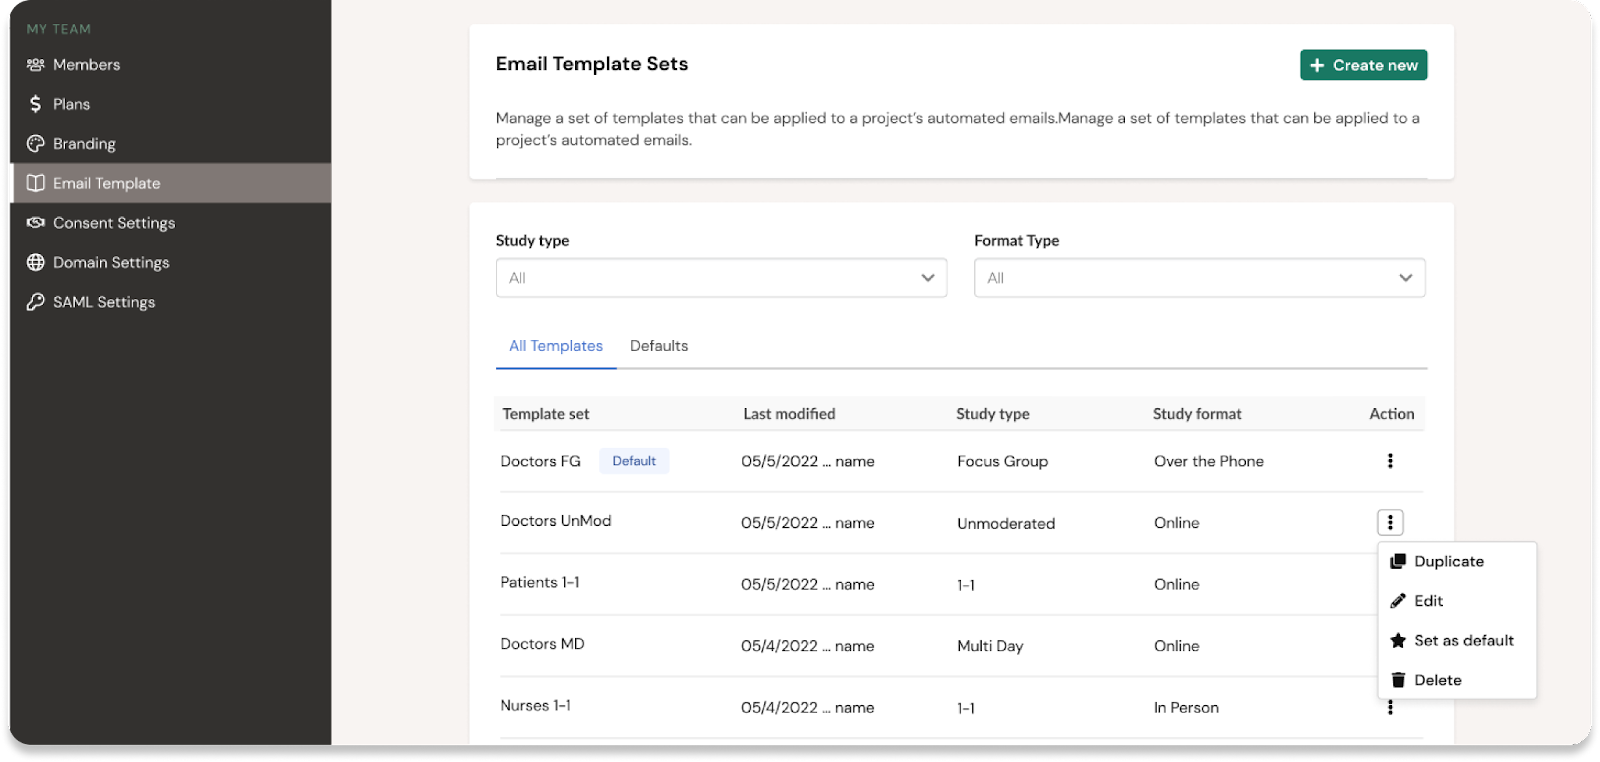
For example, you can create one set of templates for a 1:1 online interview, another set of templates for a 1:1 phone interview, a third set for an unmoderated one-off task, and a fourth set for an unmoderated multi-day task. You can get as granular as you need with these combinations, depending on the type of research your team is running.
View and manage all default templates together under the new “Defaults” tab on the “Email Templates page.
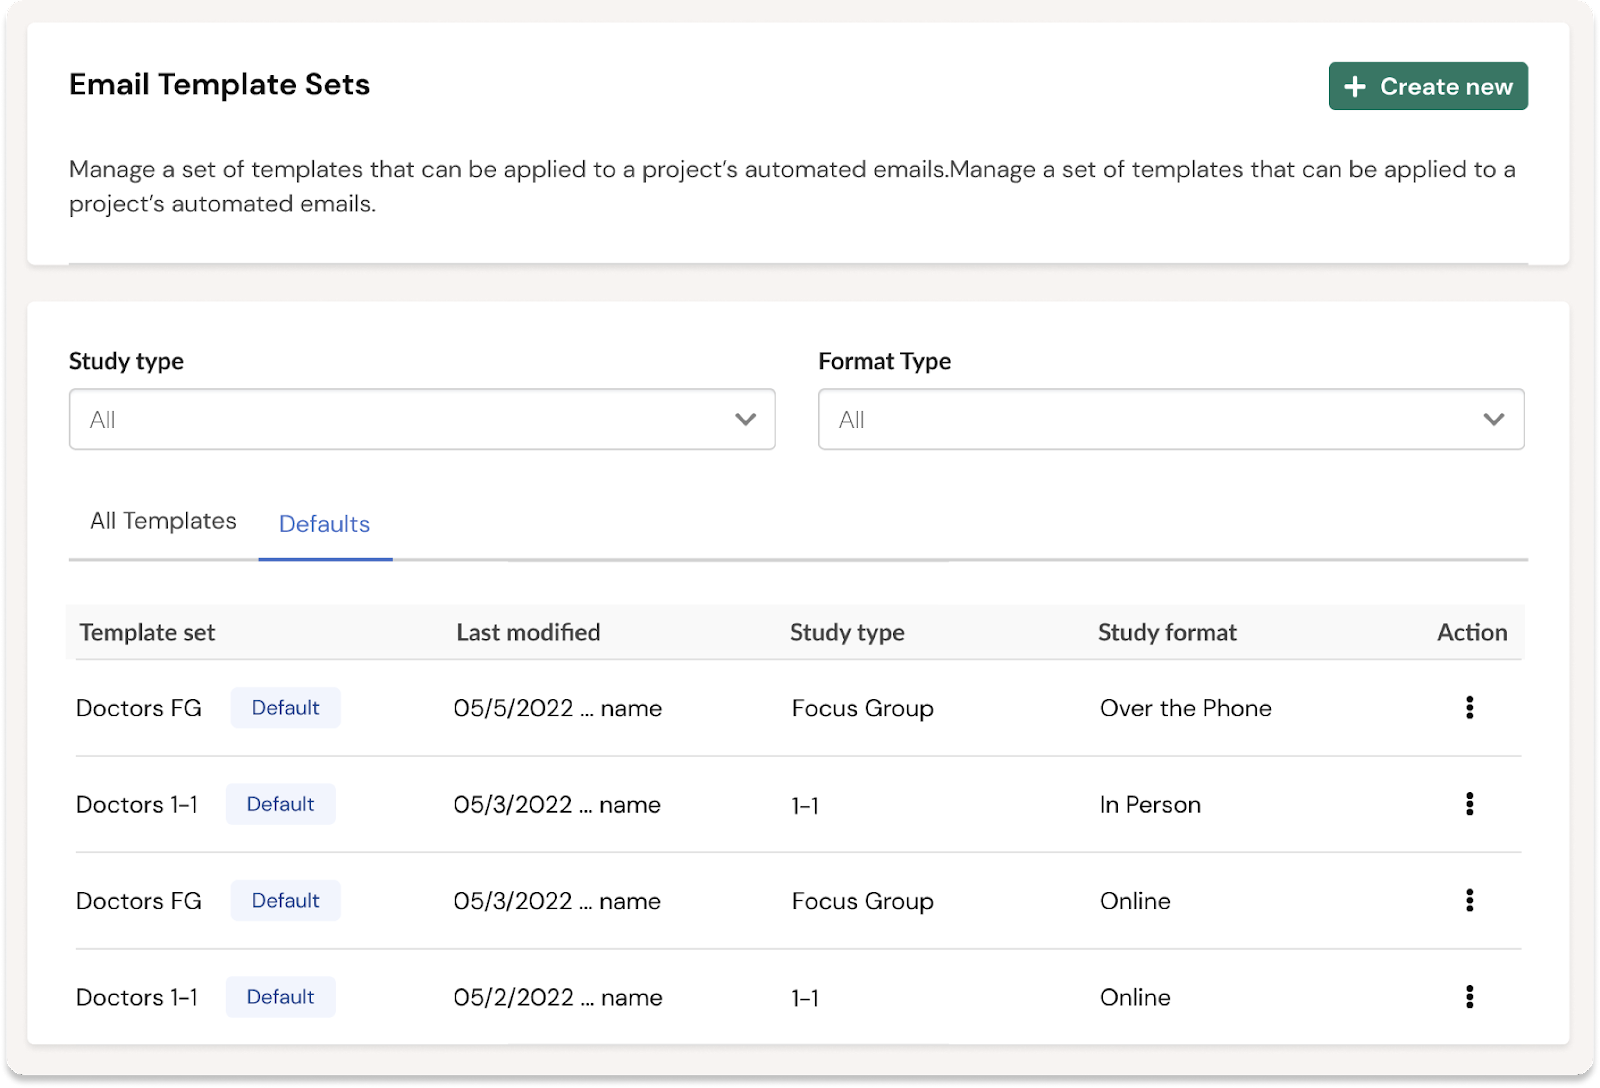
Default email templates are not locked, and individual researchers can select alternatives when building their project if they need to.
May 23 - ✅ Filter participants by the opt-in form or source they used to join your panel
Many teams create multiple opt-in forms for use in different places. Maybe you include a link to an evergreen opt-in form in your customer newsletter, but you use a separate opt-in form for inviting users to a beta program. There’s often a valuable relationship between how users joined your panel, and which studies they may be a good fit for.
We’ve added opt-in forms to our list of activity filters in Research Hub. You can filter your entire panel by one or more opt-in forms, or you can apply a filter to exclude specific opt-in forms.
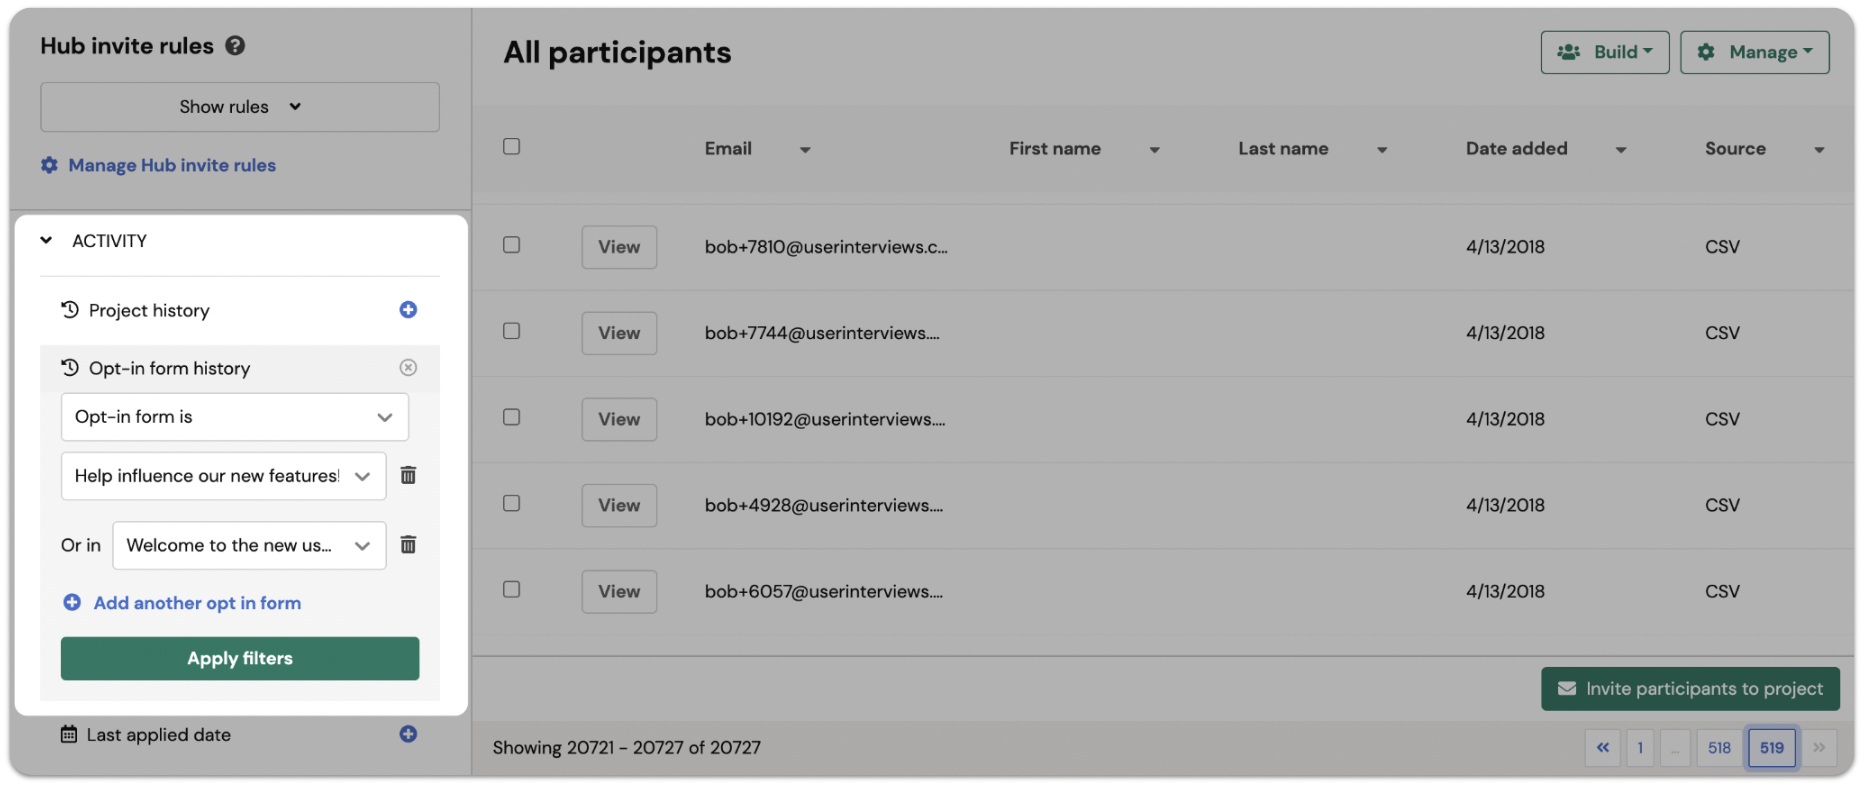
Participants can be added or updated in Hub through a number of sources including a CSV, Opt-in form, API, or a Project. The "First source" filter allows you to filter by the source through which a Participant joined your Hub audience.
.png)
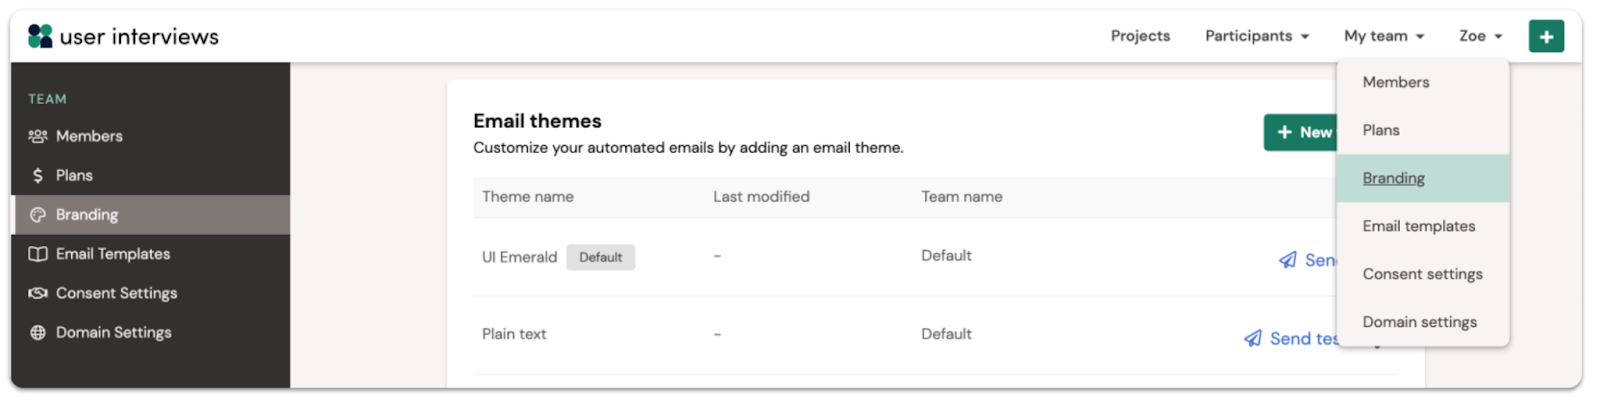
May 17 - ⚙️ Admins can set a default email theme so the whole research team can easily send on-brand emails to participants
Team admins need confidence that researchers are sending professional and on-brand communication when inviting customers to participate in studies.
Research Hub offers branding customization, but until now, there hasn’t been a simple way for admins to provide guidance to their team on how to use these options consistently.
Today, we’re rolling out the ability for admins to set a branding default for all participant-facing emails. Coming soon 👀 we’ll be releasing defaults for email templates and sender profiles.
Why are branding defaults useful:
- Set communication guardrails for your team
- Maintain brand consistency and build trust with your panel of customers
- Free up time your research ops team spends on platform training and manual oversight
While admins can create a default email theme to guide teams toward the best and safest option, researchers are still able to select alternatives if they need to.
Get started from the “Branding” page in the “My Team” dropdown. Click on the ellipsis alongside the email theme you want, and select “set as default”.
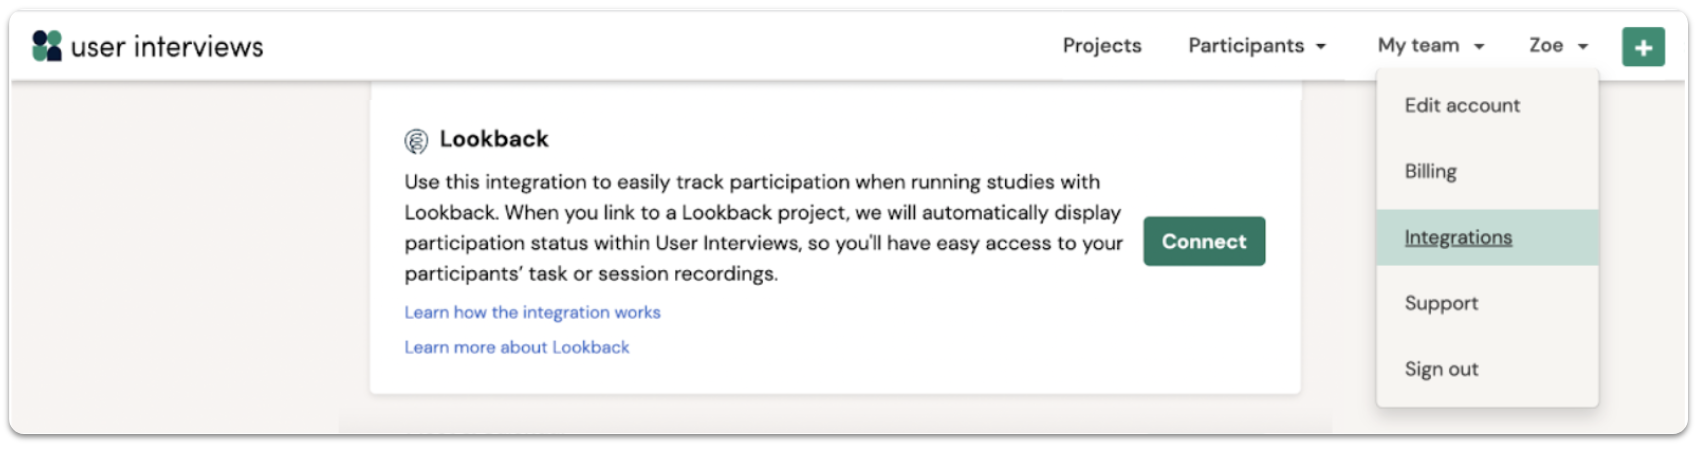
May 11 - 💡 Introducing our Lookback integration! Connect accounts to streamline end-to-end customer research.

With this integration, we’re connecting the dots between two best-of-breed research tools and making it possible to bring real human insight to the core of every product decision.
For hundreds of teams who recruit with User Interviews and conduct research via Lookback, there’s now a simpler way to track your participants and manage their progress in your study.
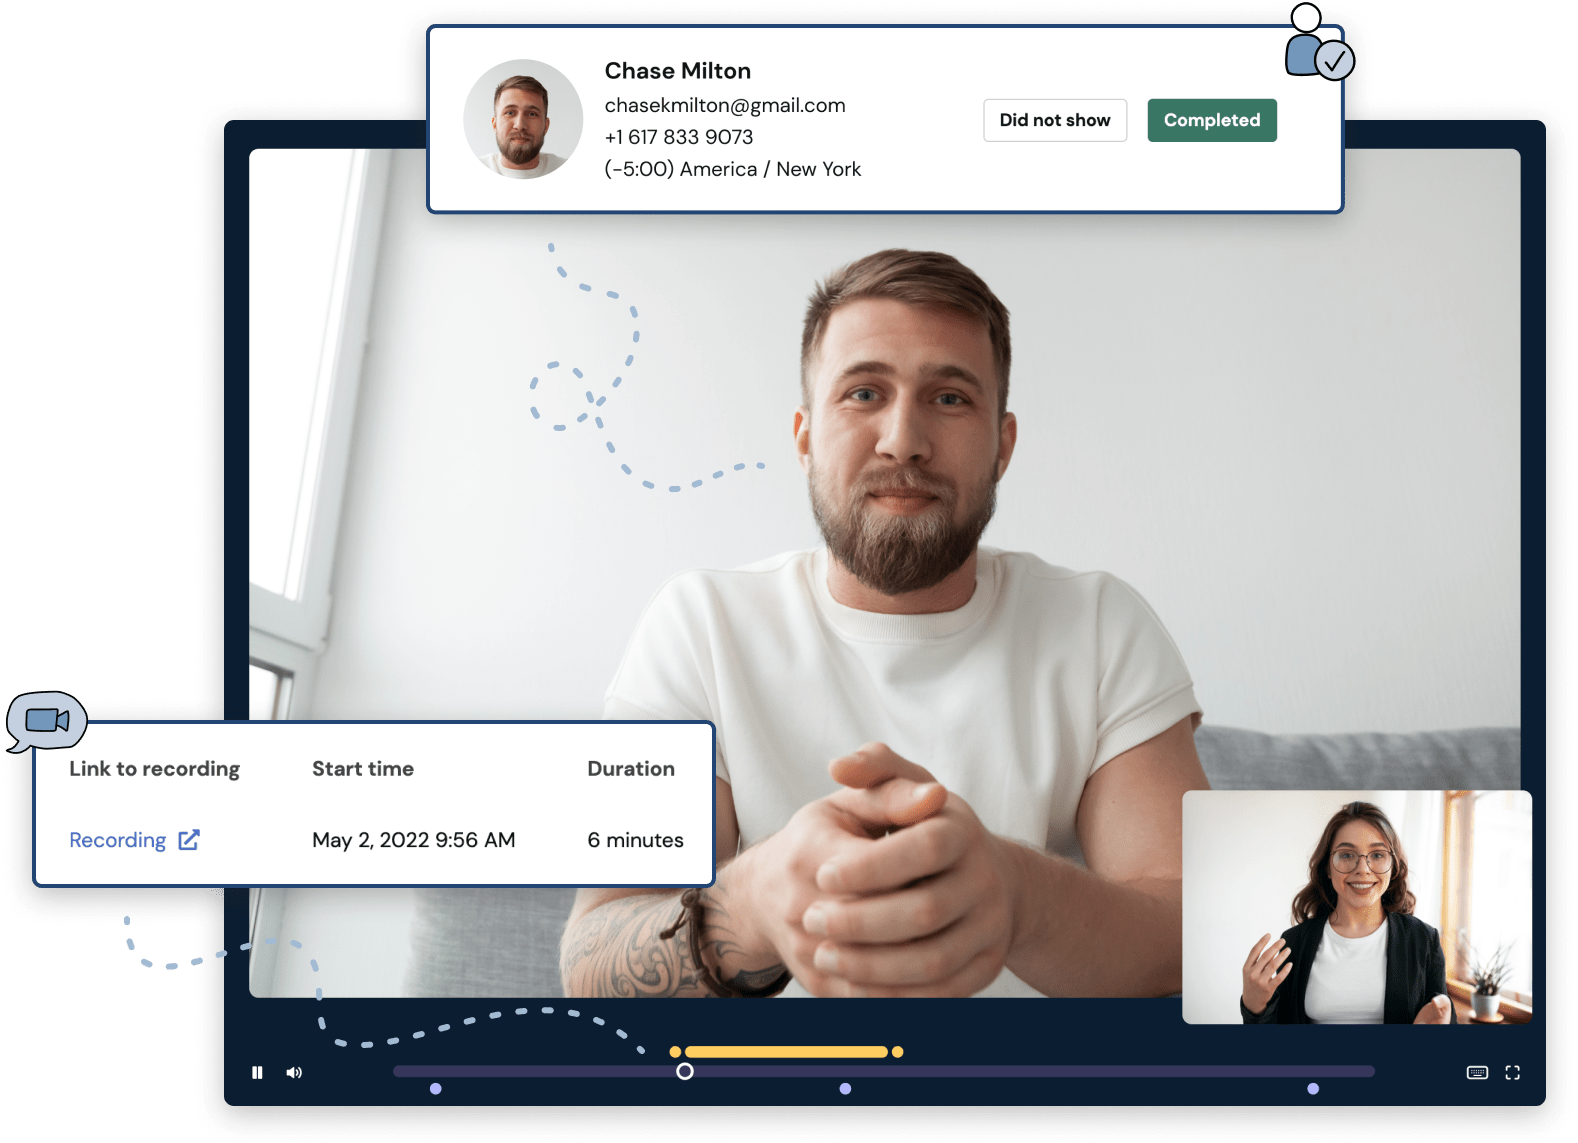
When you connect accounts and link to a Lookback project, we will automatically display Lookback session data within User Interviews, so you'll have easy access to your participants’ recordings and tasks.
You no longer need to flip back-and-forth between tools, use workarounds to identify users across two platforms, or delay project completion because the process of cross-checking participants manually is so painful. Instead, participant records, session links, and session metadata are all easily accessible from your User Interviews project workspace.
Why turn on this integration?
- Access all participant and session information from a single place.
- Let us do the work of identifying your participants across platforms and pulling the most valuable information into your project workflow.
- Streamline participant management for any kind of research study that Lookback supports including moderated interviews, live usability tests, and unmoderated tasks.
- Get access to recording and task links, timestamps, and session data in real-time — it’s all posted to User Interviews as soon as participants complete their session in Lookback.
- Save time on manually cross-checking participants — especially valuable for unmoderated studies with a large audience.
Get started from our integrations page: log into your User Interviews account, click on your username at the top right of the screen, and select “Integrations” from the dropdown menu.
Have questions about our Lookback integration? Read our support guide to learn more.
Not yet a Lookback user? Visit Lookback for all your usability testing and interviewing needs.
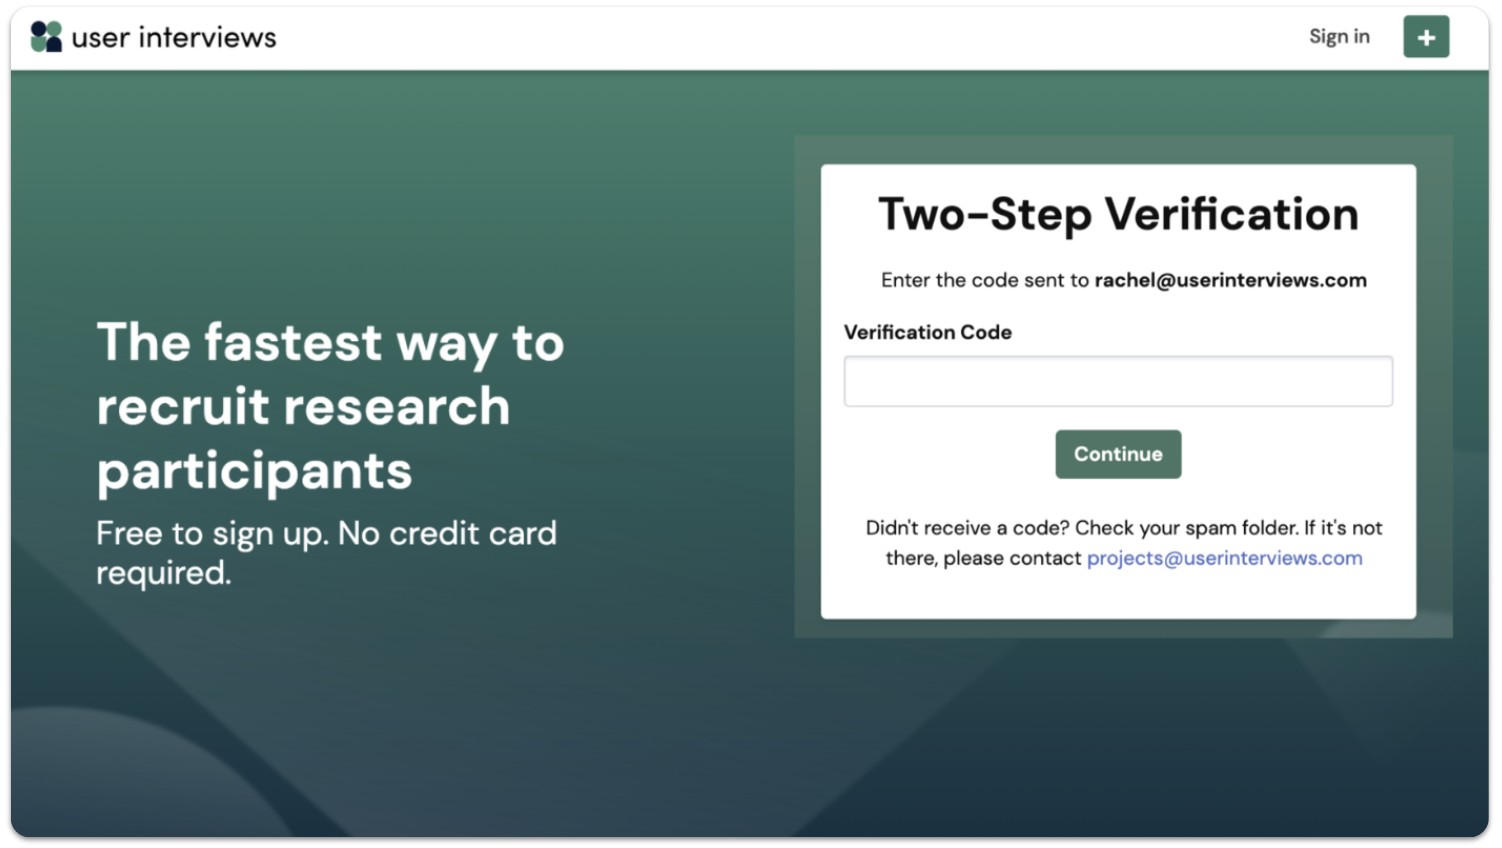
May 11 - 🔐 New security feature: two-factor authentication (2FA) is now enabled on all researcher accounts
We have rolled out email two-factor authentication (2FA) to bolster security on all researcher accounts.
Two-factor authentication is a common security measure that companies implement to protect their users’ accounts. It asks for an additional piece of evidence that the person attempting a login is who they say they are.
Email 2FA is triggered by login attempts from a new device. We will send a one-time verification code to the email address associated with your account, which must be entered in the login process to proceed. Devices will be remembered for 30 days after the last successful login.
What to know about 2FA:
- The one-time verification code expires after 30 minutes. After it expires, go back through the login process to generate a new code.
- If you don’t receive the email with the code from passwords@userinterviews.com, please check your spam folder. If you’re still having trouble, contact projects@userinterviews.com for support.
Learn more about two-factor authentication in our support guide.
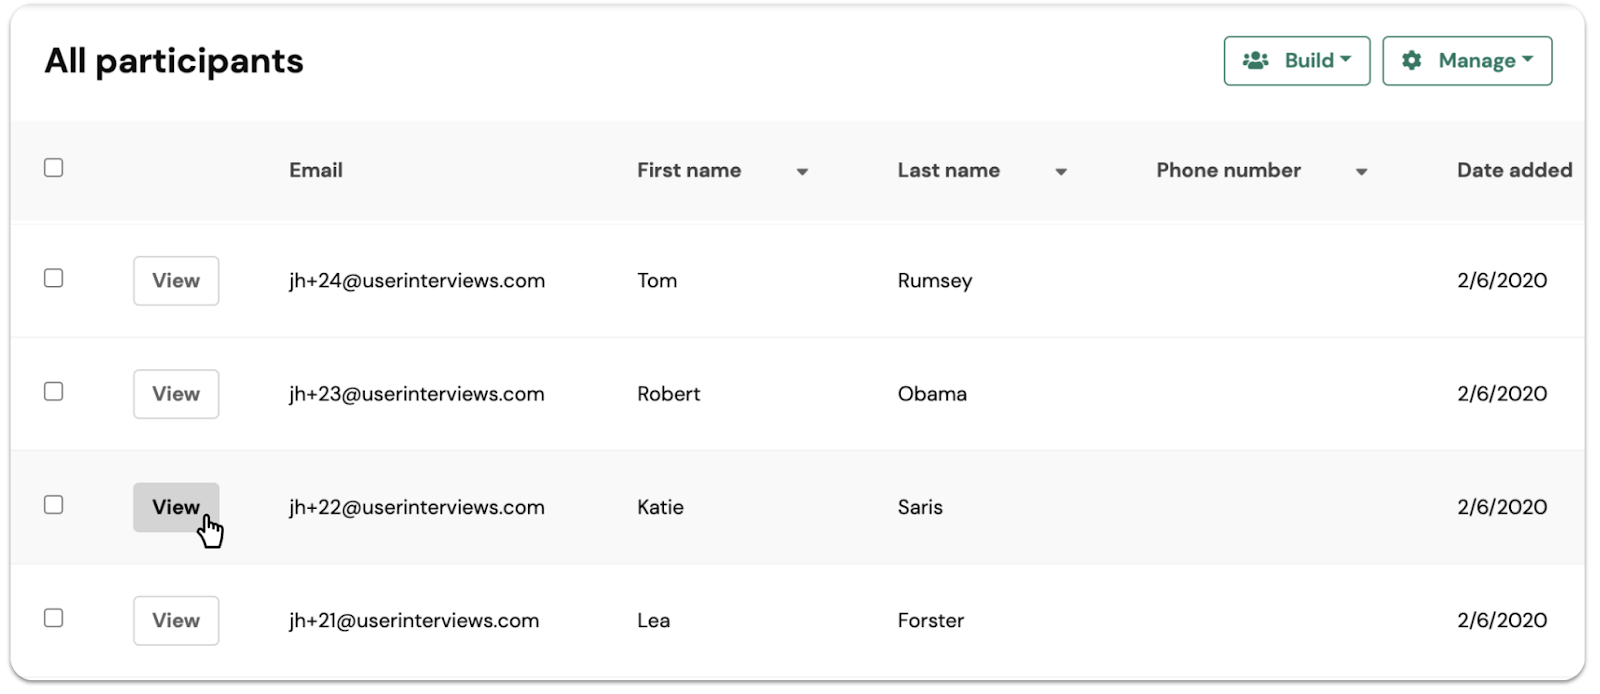
May 10 -👤 View and edit user profiles from the Hub participant table
Did you know that you can click into a participant profile from the Hub table? Many researchers we talked to didn’t realize this was possible, because the old “edit user” icon was so tiny it went unnoticed!
We have replaced this icon with a new “View" button that sits in the leftmost column of your Hub participant table. Click into a user’s profile to view their past activity, edit participant information, or invite them to a project.
May 4 - 🧘♂️ Gain flexibility and control over your Hub participant table: hide and reorder columns to create custom views
As the number of columns in your Hub participant table grows, it can become unwieldy to navigate when trying to narrow down your population to a relevant subset for a study. We’ve heard frustrated researchers tell us that they “have to scroll kilometers to the right” to find the information they’re looking for.
Today, we’re taking one step toward solving that problem by giving researchers the tools to create custom views. This means you’ll be able to pinpoint the right participants faster and easier (and with a lot less scrolling).
You can now hide and reorder columns in the participant table so you can focus on the user data that’s most relevant to your study without being overwhelmed by excess information.
To hide a column, click the arrow beside the column name, and select “hide column” from the dropdown. You can hide as many columns as you like. To reset the table, click on the “manage” button at the top right of the table, and select “show hidden columns” from the dropdown.
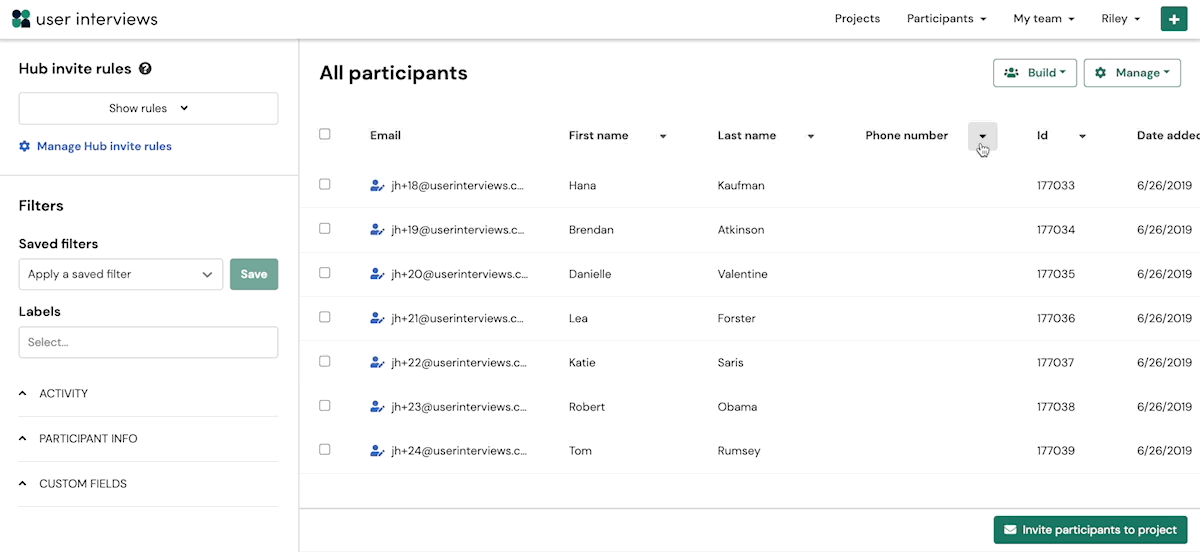
To reorder columns in the table, click and hold the header of the column you’d like to move, and drag and drop it into its new location.
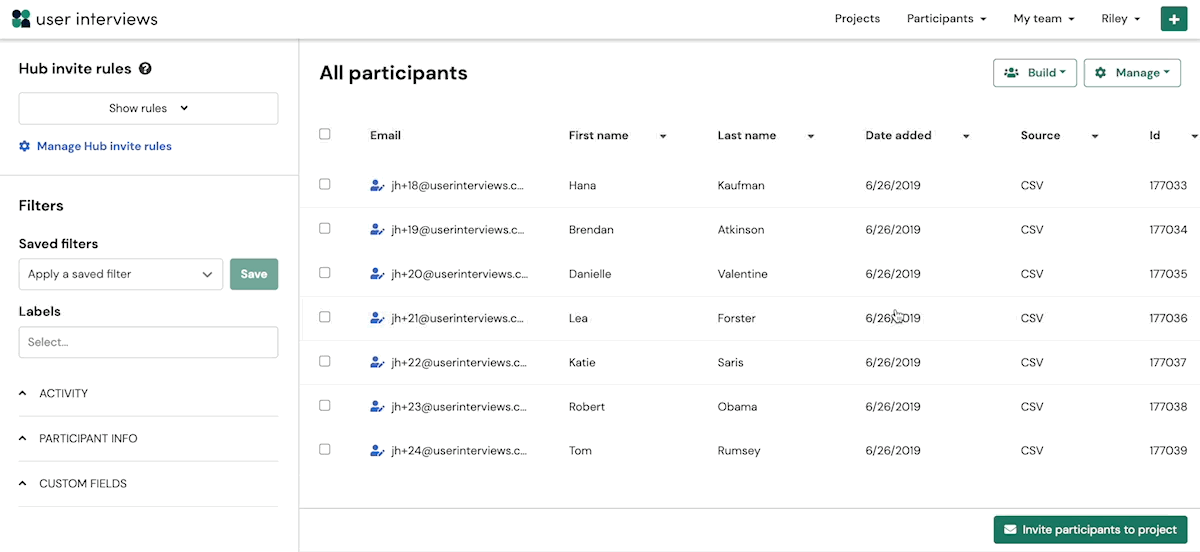
Table preferences are made at an individual user level, and are not saved at an account level. This means that different researchers within the same team can create their own custom views. Preferences are stored locally and will persist across multiple user sessions unless you clear cookies from your browser. If you clear cookies or log in from another device, the table will reset to its original state.
Learn more about how to customize your view of the Hub participant table in our support guide.
April 28 - 🕵️♂️ If you suspect a participant in your study may be misrepresenting themself, you can now report them directly from the app, prompting our team to investigate
If you suspect a participant has misrepresented themself in your study, you now have a way to submit a report to our support team prompting us to launch an investigation.
While fraud is rare on our platform, it’s possible that a bad actor may find their way to your study. To ensure you have an easy way to flag these participants, we’ve introduced an in-app reporting feature to help streamline this process of getting in touch with our team.
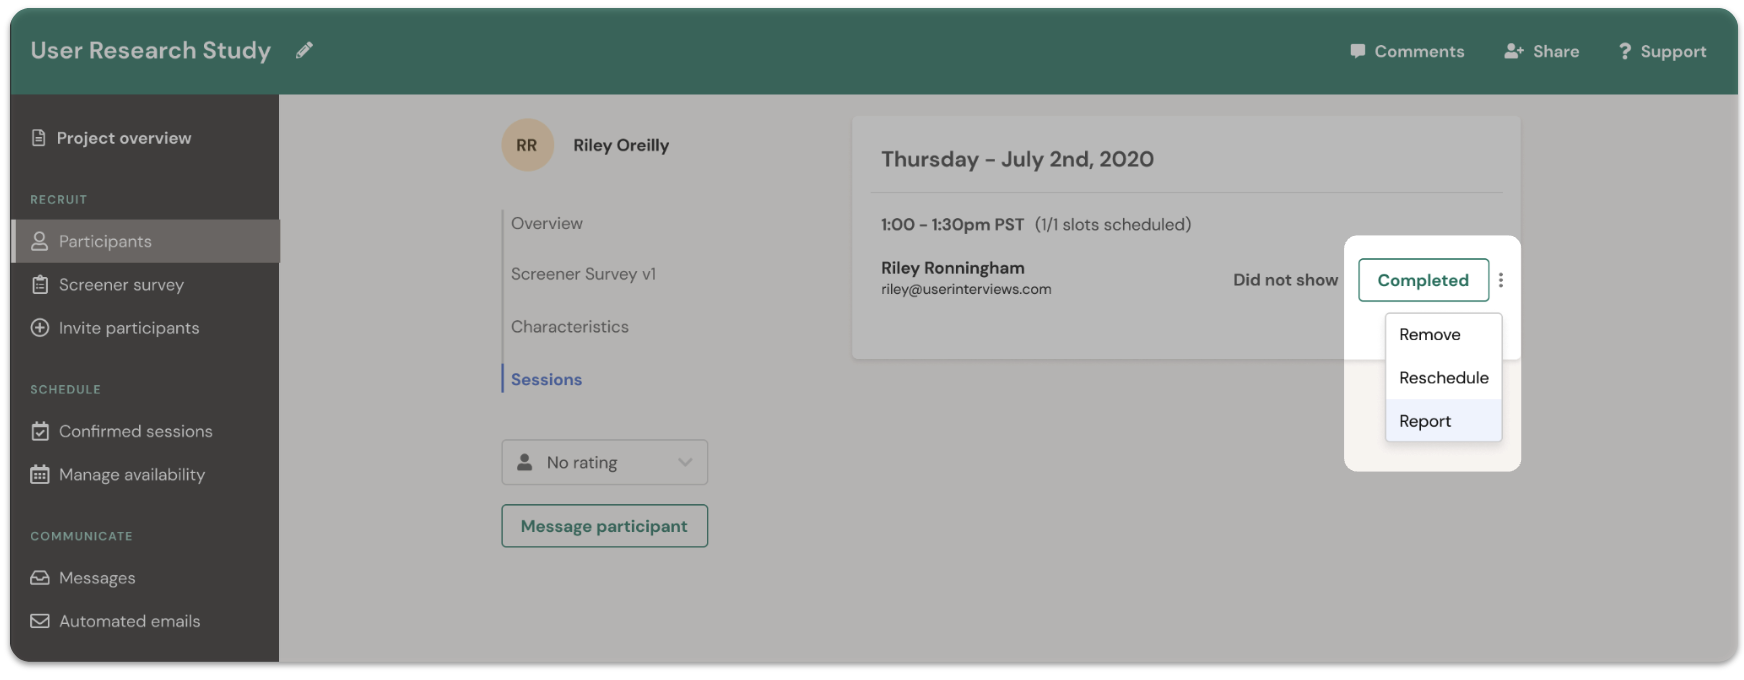
Simply navigate to the “confirmed session” page for the participant you’d like to report, and click the ellipsis beside their attendance status. From there, you’ll be prompted to share feedback about the incident, prompting our support team to launch an investigation.
You will be updated on the status of the investigation in your project workspace, and if necessary, via direct outreach from your project coordinator. If you’ve opted for User Interviews to distribute incentives on your behalf, we will withhold payment to the participant while we investigate. Depending on the result of the investigation, our team will be able to refund recruit fees and work with you to replace the participant with a better-qualified member of our audience.
Learn more about how User Interviews deters fraud in our support guide.
April 6 - 👩🎓 Target participants by their skills or seniority to find closer professional matches from our panel
If you recruit for B2B studies, you now have two new targeting options to source the closest professional matches from our participant community — skills and seniority.
As the amount of B2B research conducted on our platform continues to grow, we’ve been bolstering the structured data we collect on professionals so you can target them more quickly and precisely. We introduced structured job title targeting in the fall, and have since released skills and seniority targeting to help researchers meet their B2B recruitment goals.
In just a few months, we’ve collected seniority data for over 125,000 participants, skills data for over 90,000 participants, and we continue to enrich professional data for around 10,000 additional participants each week.
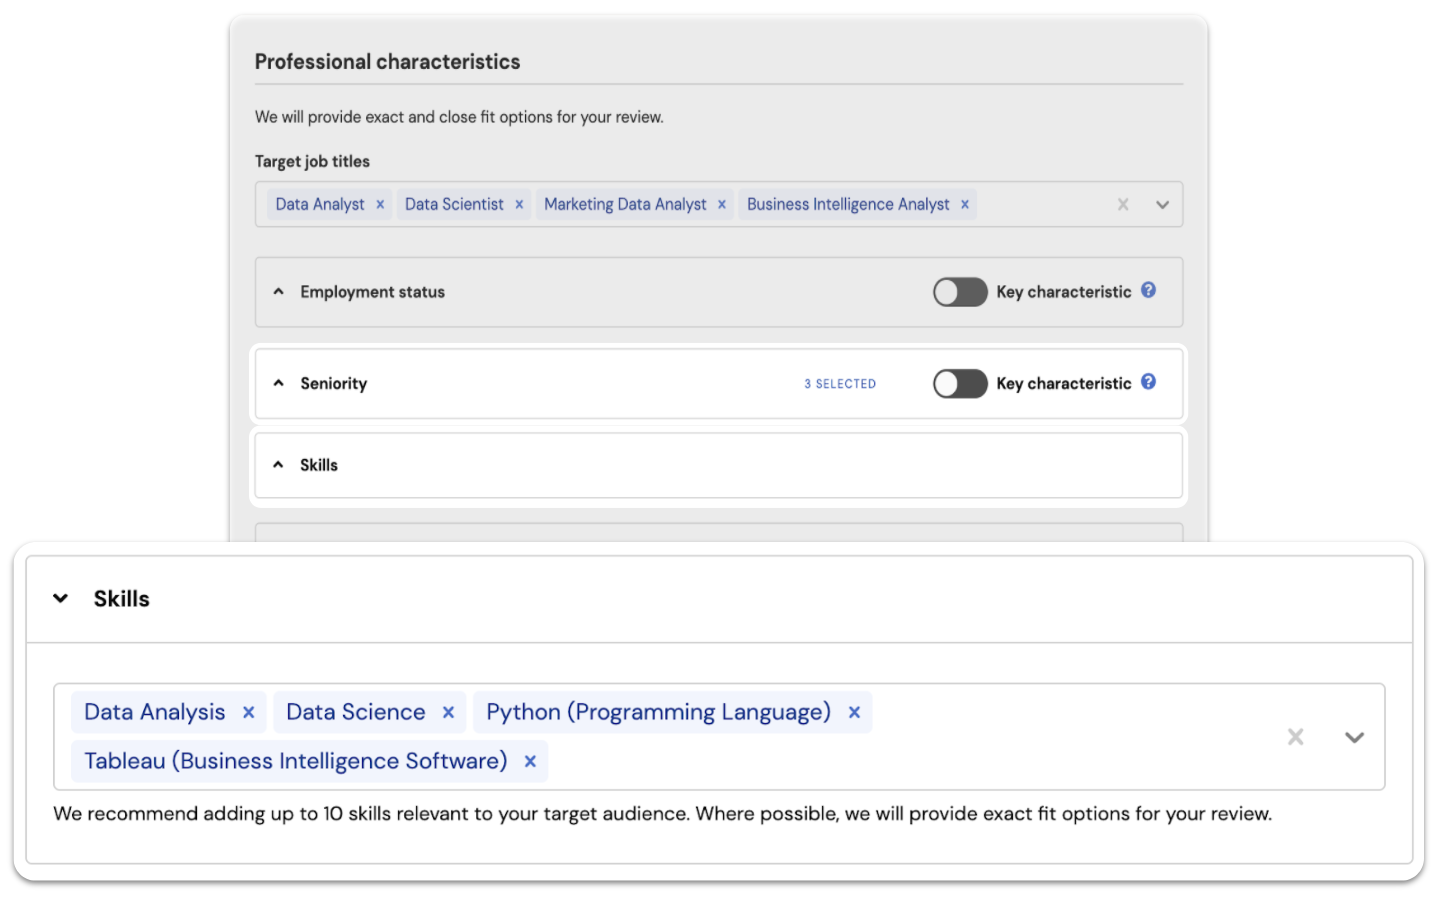
Skills targeting: Researchers can specify any number of relevant skills from a structured list, and our system will prioritize participants who have those skills on their profile. Some of the top skills with hundreds of potential matches amongst our participant community include sales, marketing, customer experience, data analysis, and project management. Another use case is finding participants who use specific software such as Salesforce, Microsoft Excel, Google Analytics, or JIRA.
Note that our system does not treat skills as a “hard filter”, which means that you won’t risk excluding potential strong applicants if they haven’t populated their skills, or your skill request is niche and we can’t find an exact match. We’ll simply prioritize participants for your review where we find a skills match.
Seniority targeting: Researchers can also specify the seniority of participants they’d like to connect with. Use cases include targeting professionals whose job level is director or higher, or filtering out unpaid or entry-level employees.
Skills and seniority can be layered with existing professional characteristics (like job titles, employment status, company size, industry, and type of income) for powerful B2B targeting.
Learn more about recruiting participants based on their skills and seniority in our support guide.
April 1 - 🏁 Close out a project once your study has ended
Kick off the process to close a project once your study is over. Closing inactive projects reduces clutter in your dashboard, prevents over-recruiting, and expedites invoicing and project administration.
Until now, our team has been closing projects on your behalf after all sessions have been completed and participation recorded. However, there are times when you may wish to close a project early, for example, if you decide you have connected with enough participants before reaching your requested number of sessions.
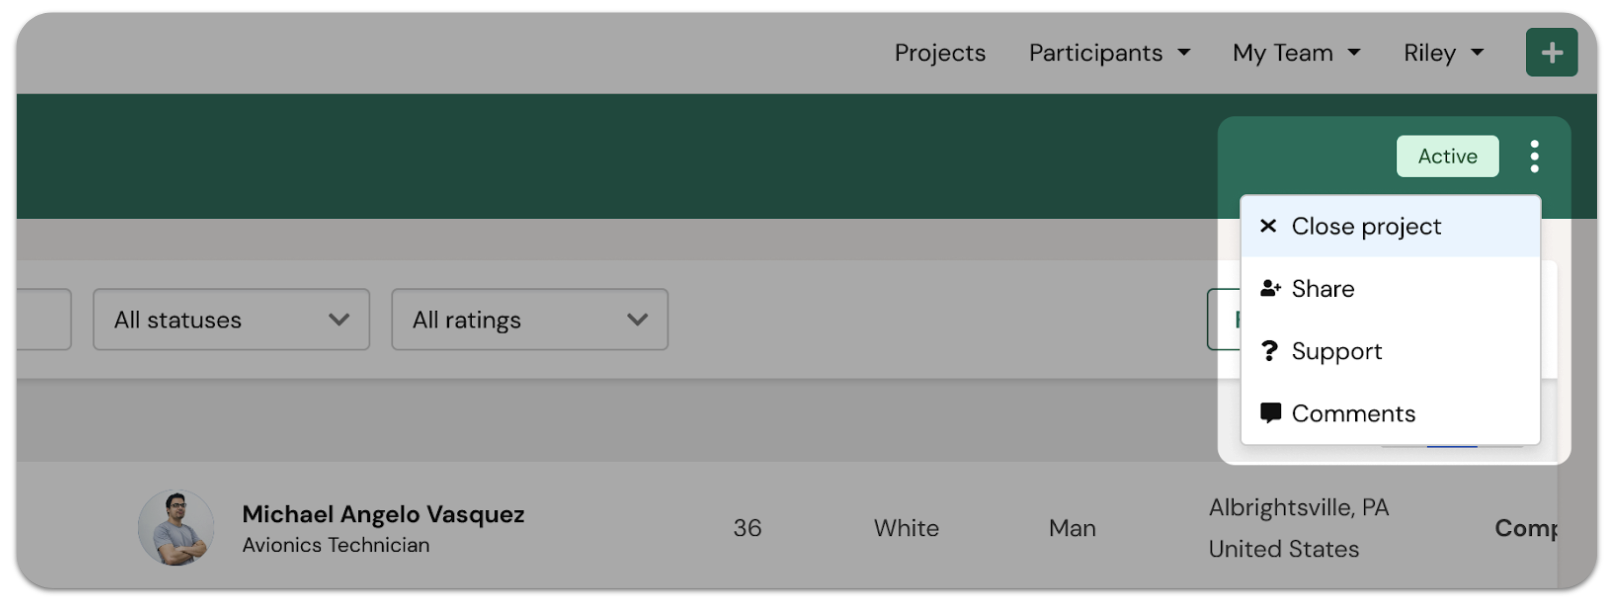
You now have more flexibility to tell us when your project is over by proactively submitting a close request, and from there, our team will review and close out the project for you within a few business days. During this time, project status will show up as “Pending close request”, and once finalized, will change to “Complete”.
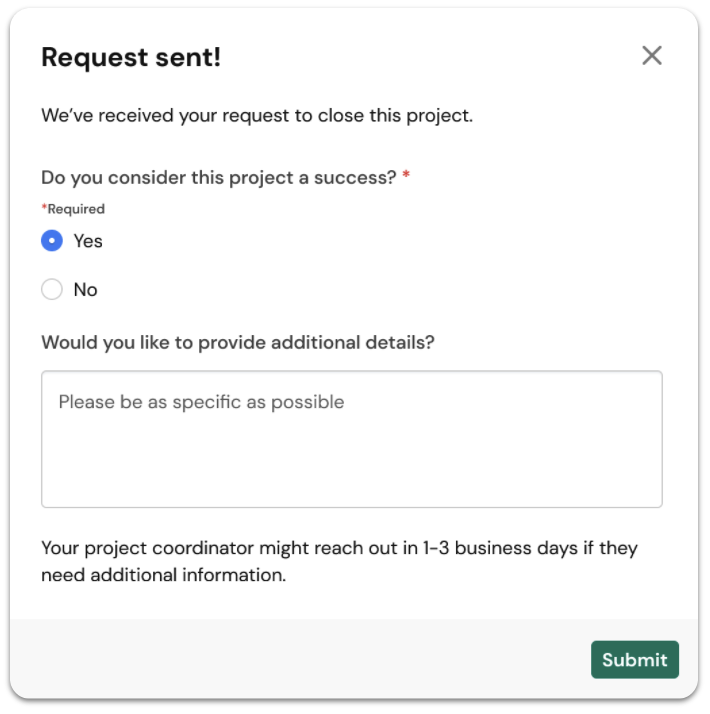
We believe that allowing researchers to close projects themselves will expedite invoicing and project administration, and reduce overall communication back-and-forth with our team. We’re always looking for ways to help teams run efficient studies, and neatly wrap them up, so they can move on to solving the next big thing.
Learn more about the how to submit a close request in our support guide.
March 17 - 🎉 Introducing our new Google integration! Connect your Google account to automatically create meeting links and sync your calendar for easy scheduling.
With our new Google integration, we’re enabling more teams to use their preferred tools to conduct research, and do so seamlessly.
Google Meet is the second most popular tool (after Zoom) that researchers use to connect with participants. Until now, meeting links had to be added manually resulting in wasted time, effort, and sometimes human error.
Using our Google integration, moderators who are owners of a project now have the option to automatically generate unique Google Meet links for their sessions. This is an extension of the same Google integration we’ve historically offered to sync a Google Calendar for easier scheduling.
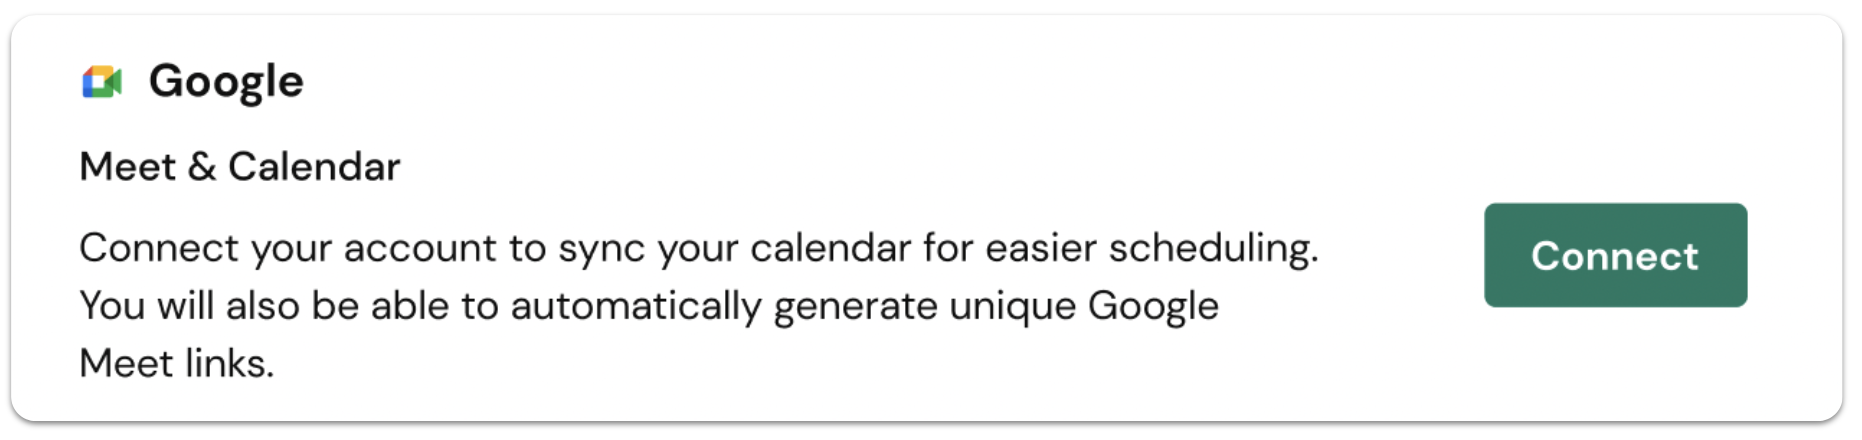
Google Calendar and Google Meet are two tools that we see researchers commonly using, and both are managed through the Google integration:
- Google Meet: Automatically generate unique meeting links for sessions instead of manually creating links. Once you’ve set up the integration, your Google Meet account will appear as an option in the “meeting location” dropdown when you assign yourself as the session moderator.
- Google Calendar: Sync a calendar so your availability is visible in User Interviews as you’re picking time slots. Confirmed sessions will also be automatically added to your calendar.
Get started by connecting your Google account from the integrations page. Click on your username at the top right of the screen when logged in, and select “Integrations” from the dropdown menu.
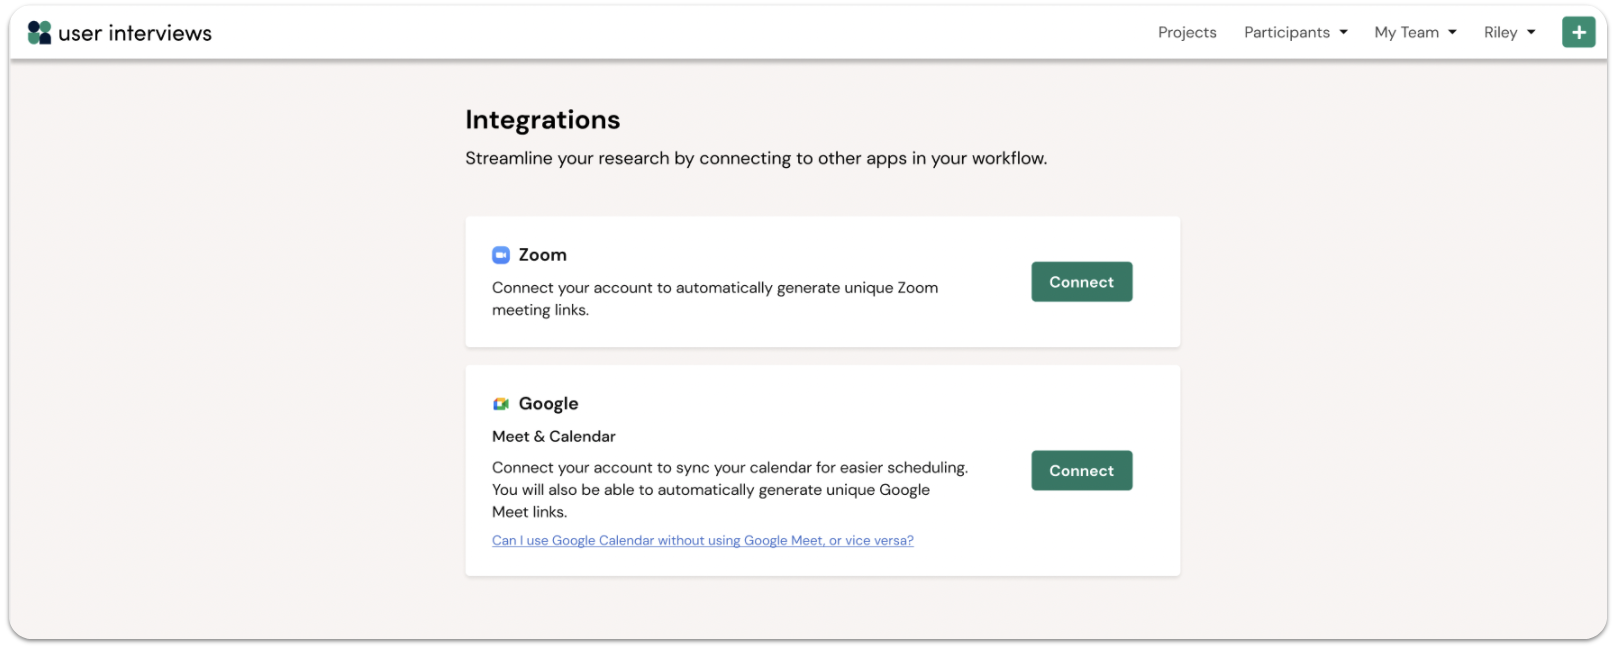
You may also be prompted to connect your account as you’re launching a project and inputting session details and availability.
Have questions about the Google integration? Read our support guide to learn more.
March 15 - 🔗 We’ve introduced a “task link” field for unmoderated studies. Researchers can now provide participants with a clearer way to access the task.
Over the next few months, we’ll be making a series of improvements to the unmoderated workflow. The first one is small, but meaningful.
When you next create an unmoderated project, you’ll see that the second step in the project builder has been relabeled from “Session details” to “Task details”, to better align with the type of study you’re launching.
Under task details, you’ll see a new field called “Link to task”. Copy and paste in the URL that participants should use to access the task. Note that you will be able to edit this link after launching your project, if the task location changes.
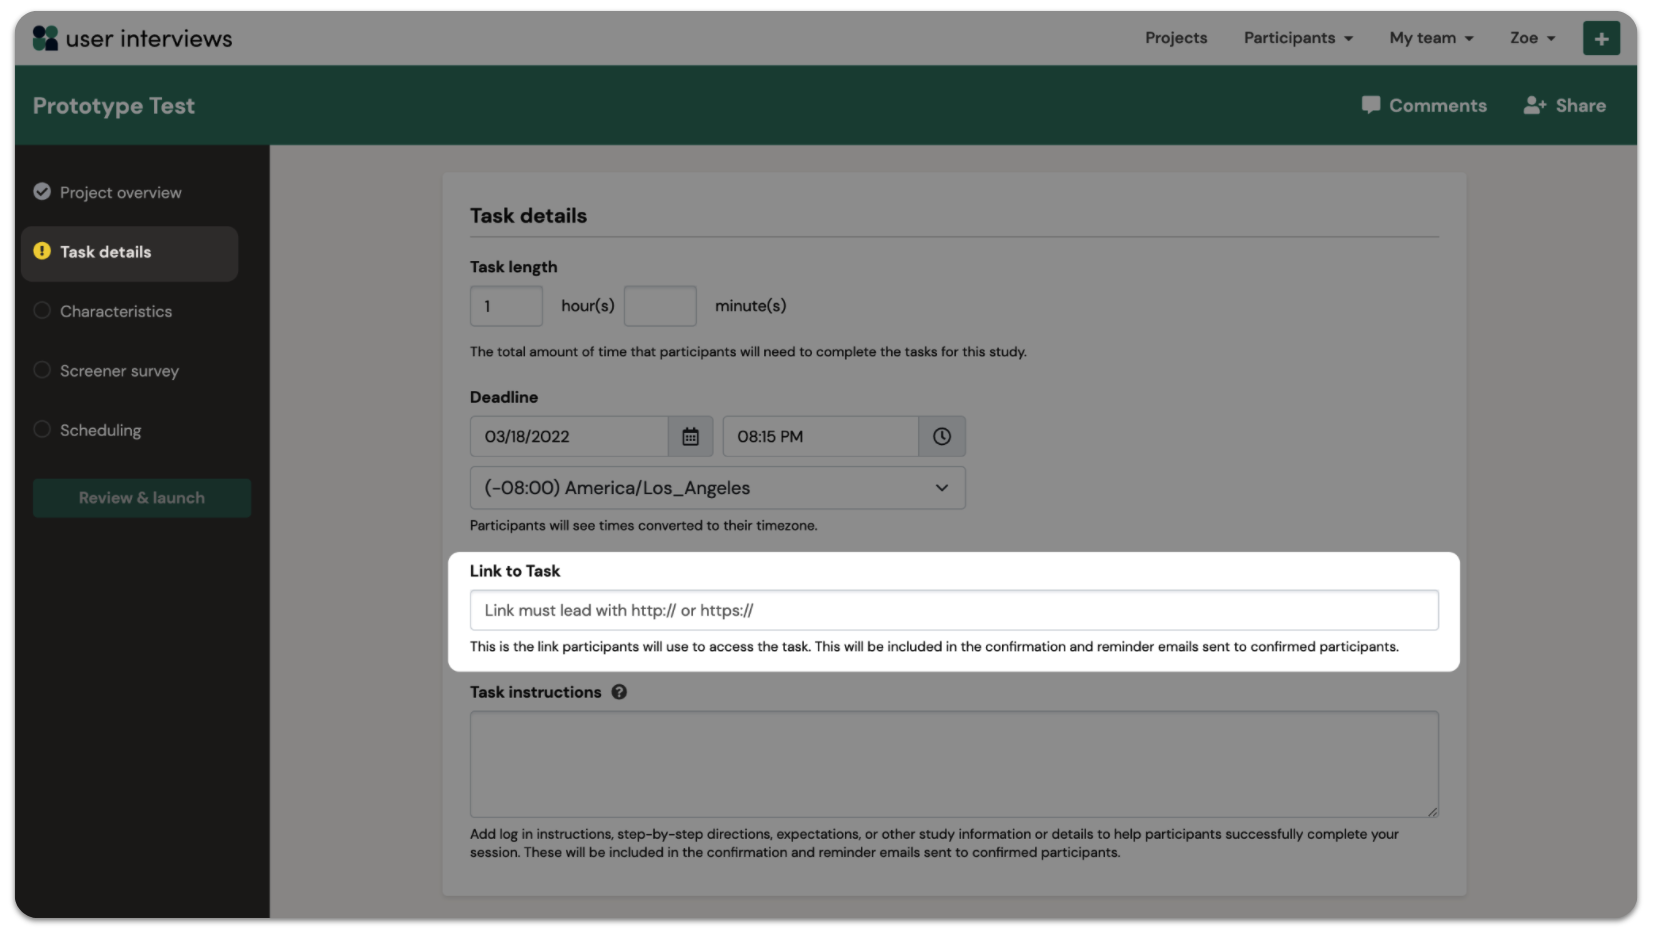
You might recall that previously, the only way to add a task link was to include it in the “Task instructions” field. This sometimes resulted in links getting lost amongst other directions provided to the participant, so we wanted to create a clearer way to send participants to the task location.
Next up, we’ll be making the task link much more prominent in participant emails, so there is no confusion as to where to complete the task. Then, we’ll be announcing further optimizations to the unmoderated research workflow — including integrations with popular tools. Stay tuned!
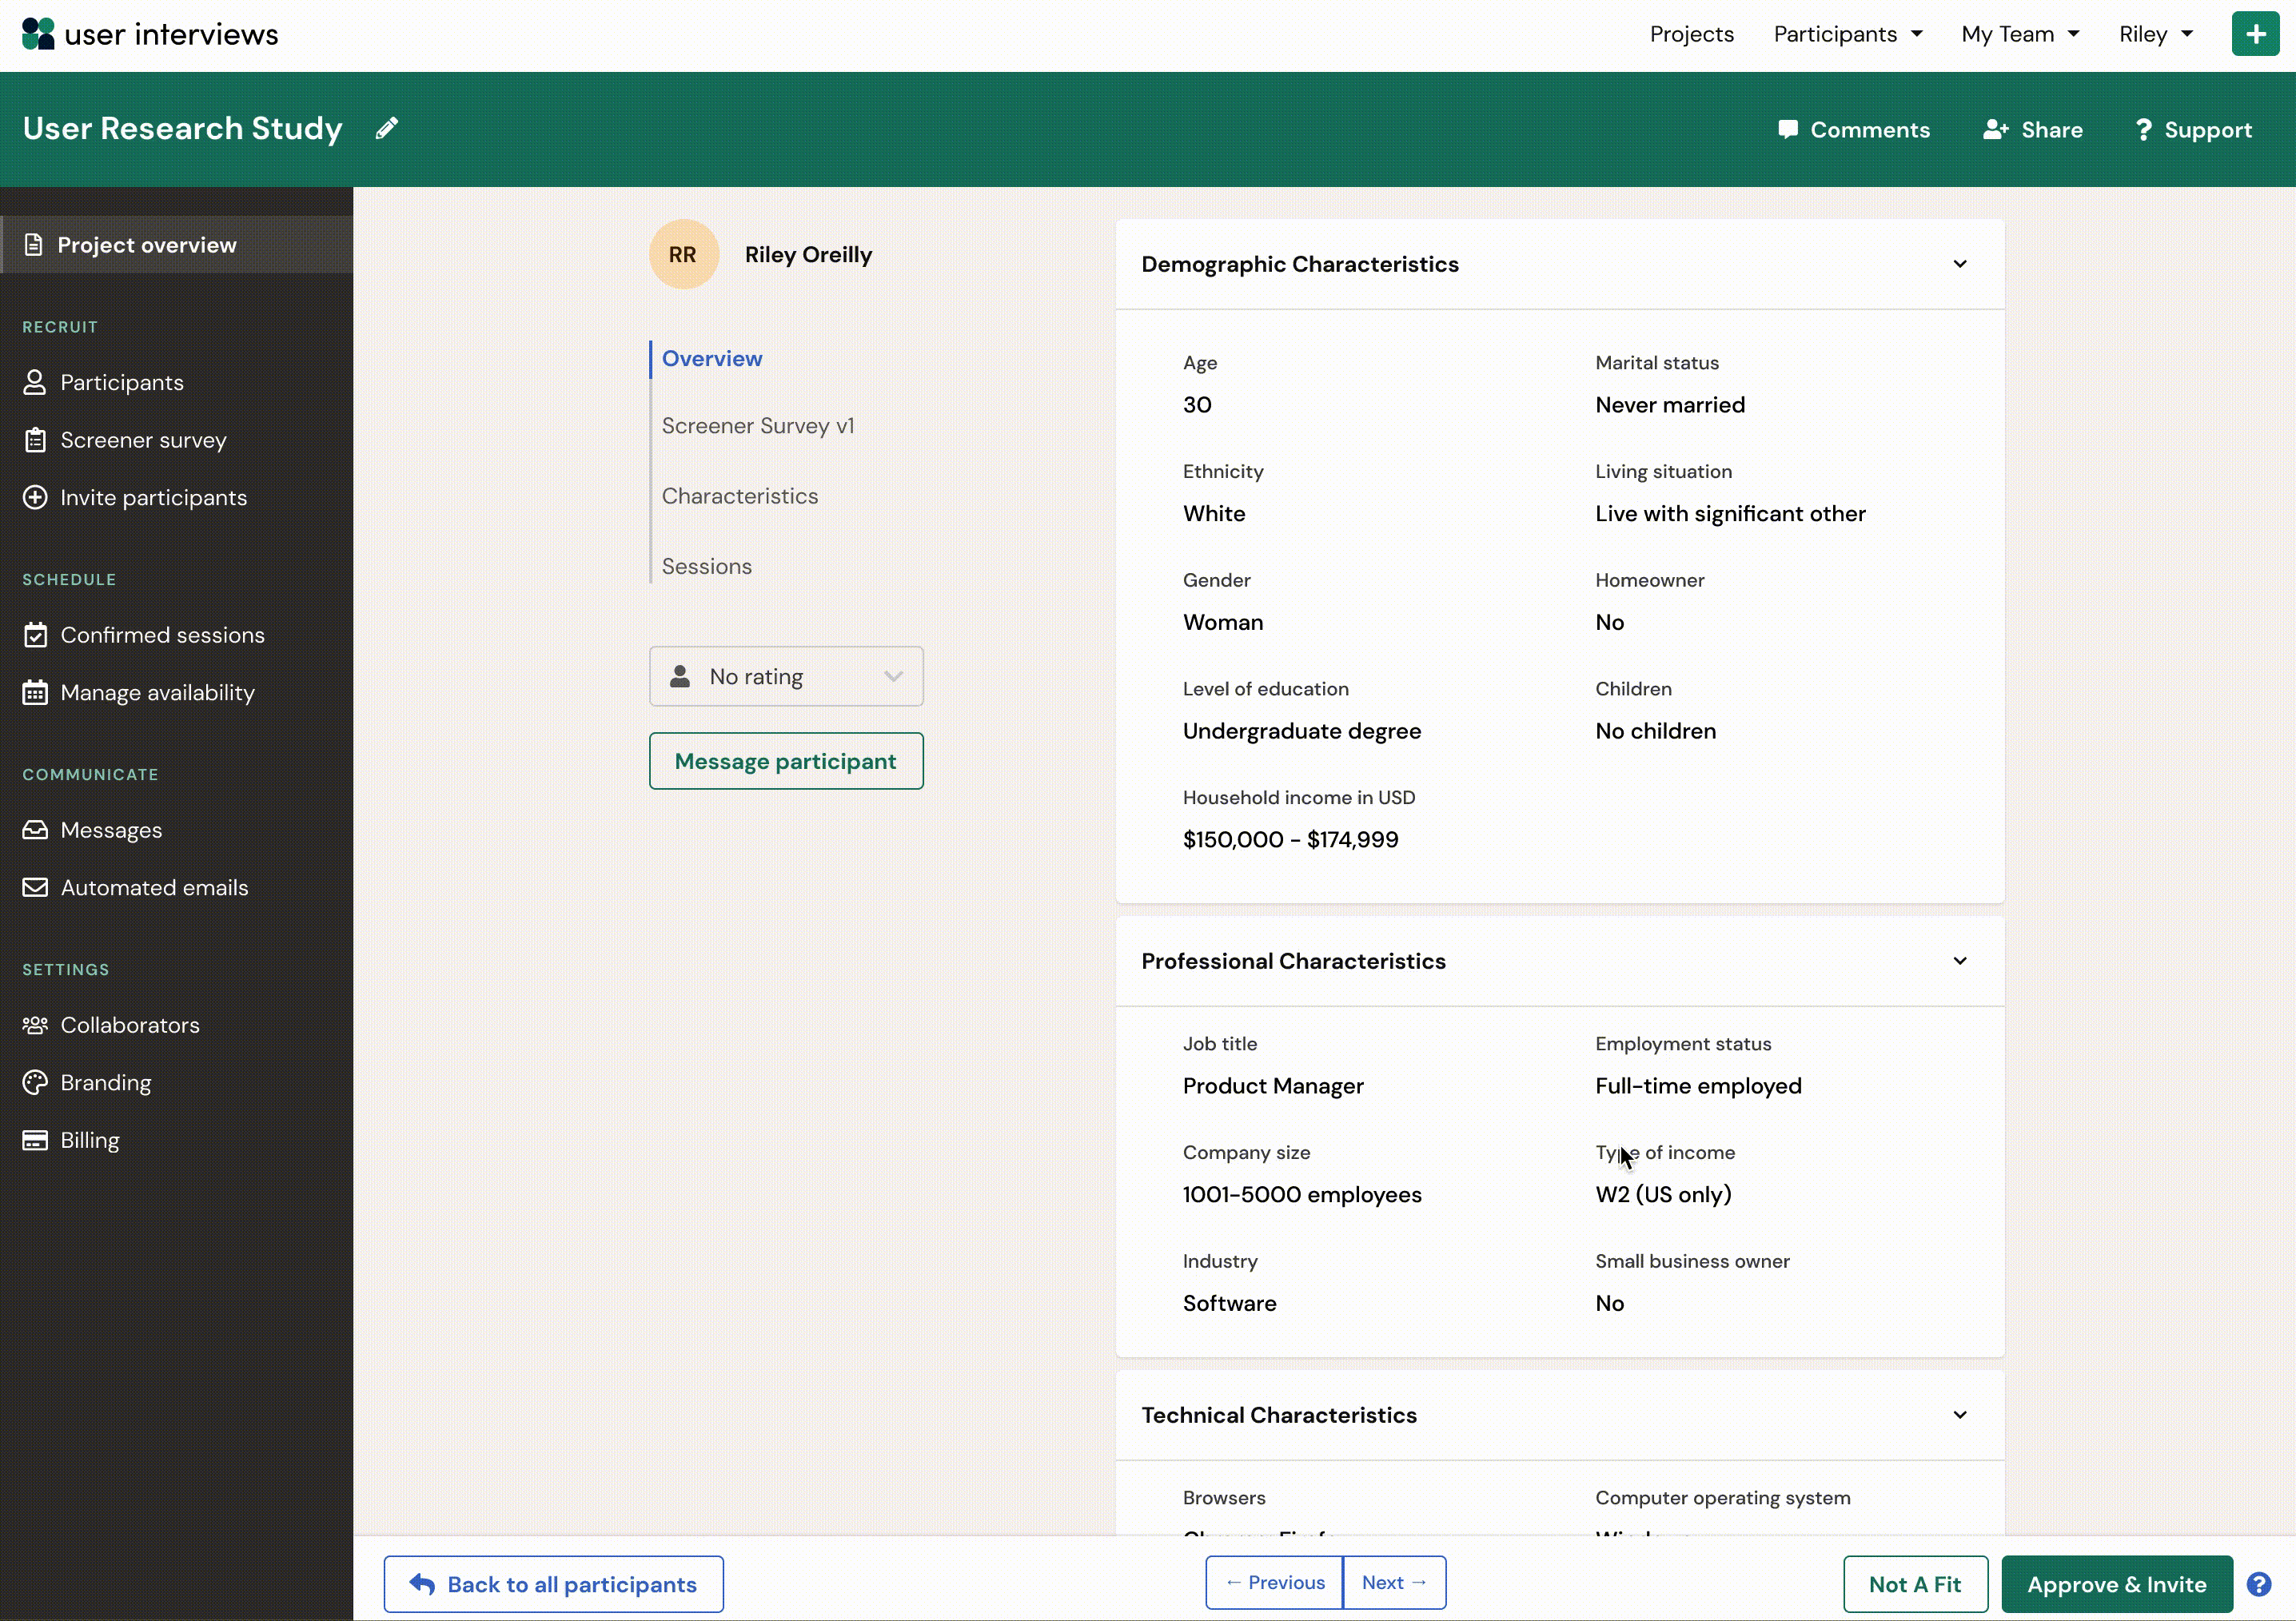
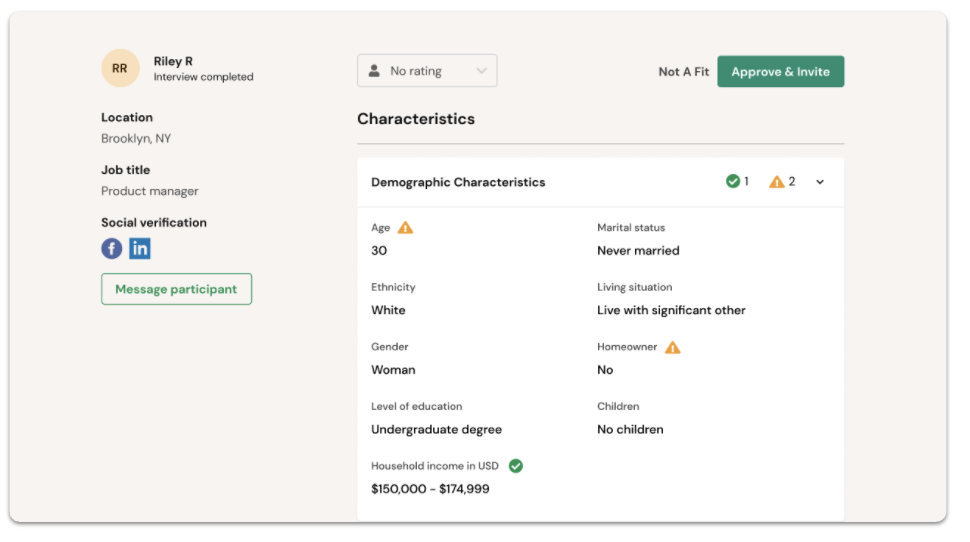
March 7 - ⏱️ The new participant summary view helps you to scan profiles and make recruiting decisions 30% faster
Last month we introduced the concept of setting “key criteria” for your project — now we’re taking it one step further by pulling your key characteristics and key screener questions into a summary view for every participant in your queue.
We’re introducing an overview of the participant profile that summarizes the key information you need to make recruiting decisions for your project. The overview includes useful information like participant status, match percentage, and contact details, as well as any characteristics or screener questions you’ve marked as “key criteria” in the project builder.
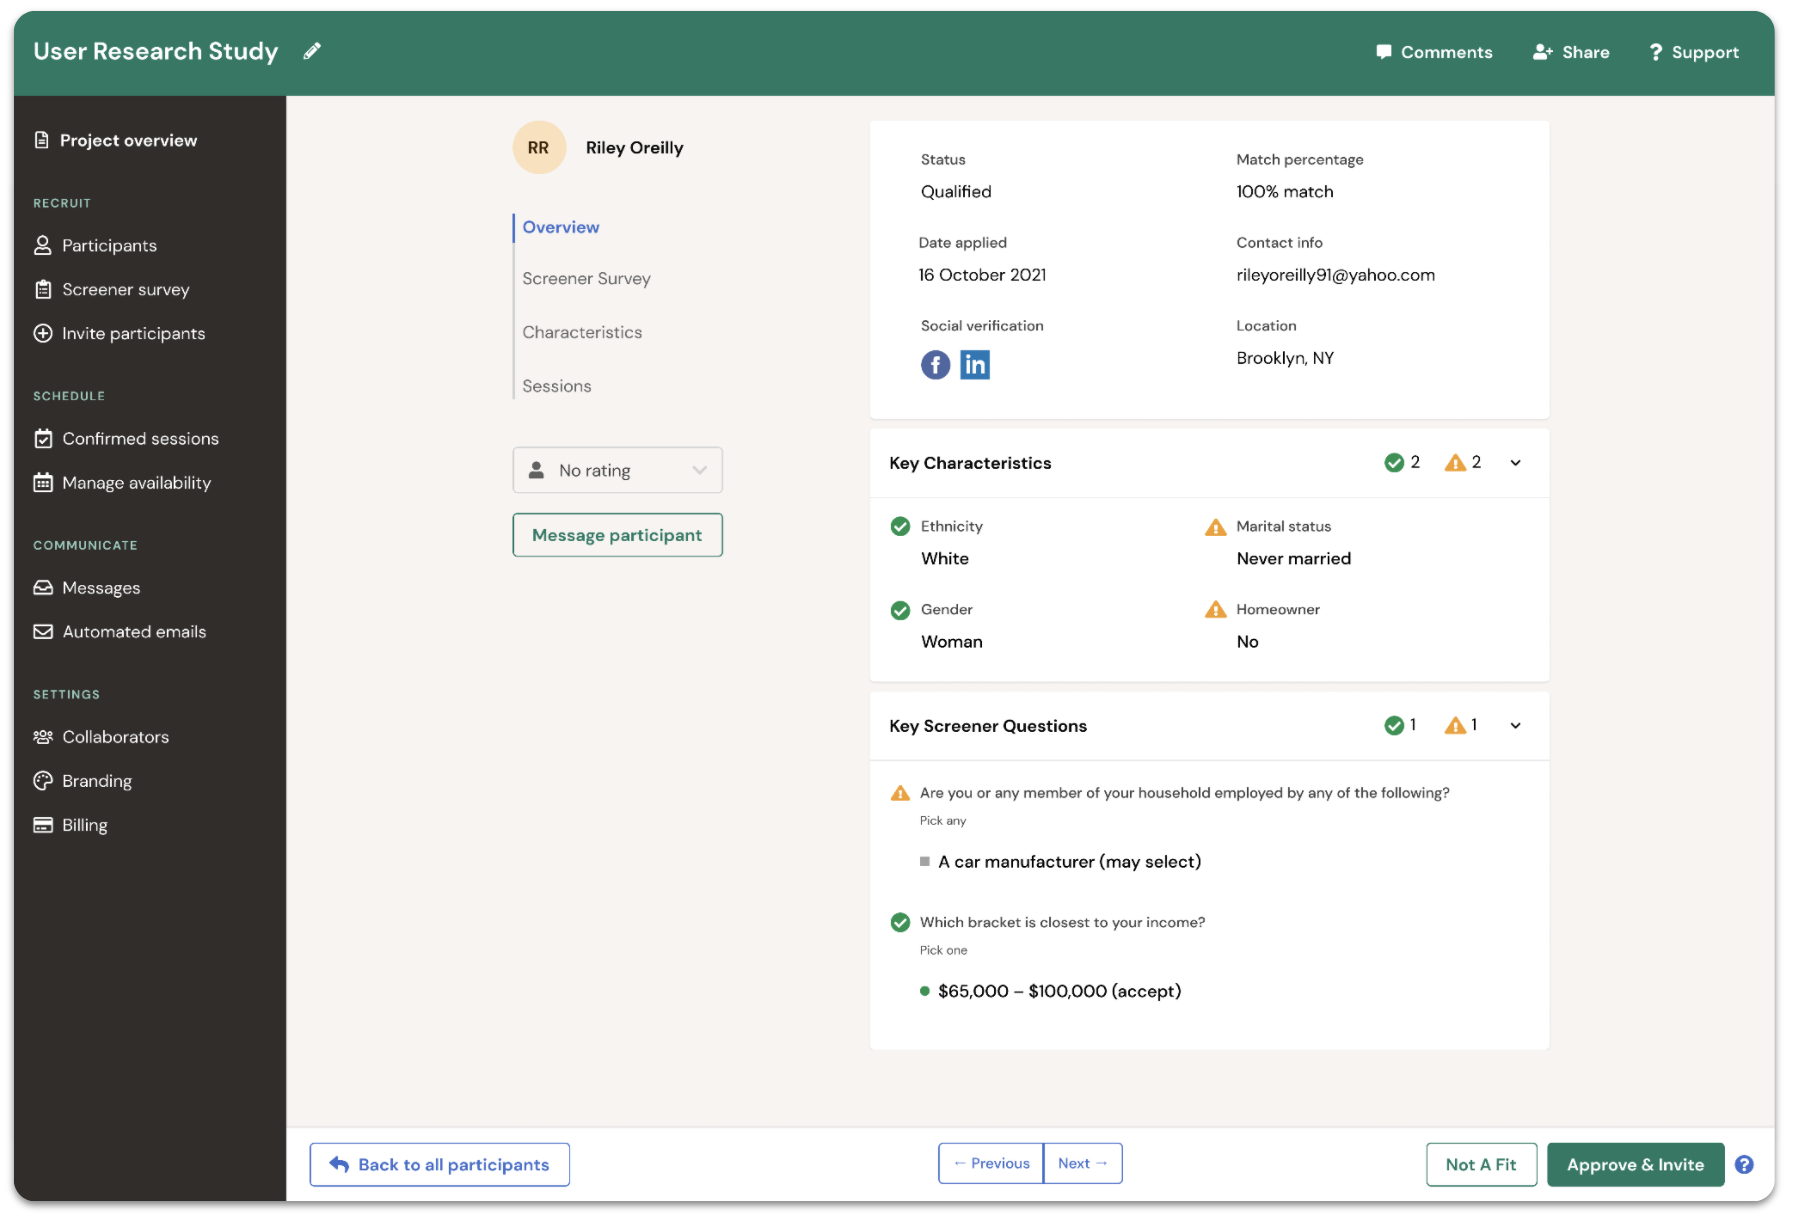
As part of this release, the old single-page profile is being split into several new tabs: Overview, Characteristics (for Recruit projects only), Screener Survey, and Sessions. If you need more detail on any participant beyond what is shown in the overview, simply tab over to view all their characteristics, all their screener responses, and any session-related activity.
We ran a test of this new layout, and found that it made participant reviews a lot faster. Researchers in our test group spent 30% less time reviewing each profile page before taking an action.
We believe this is because the overview surfaces the most valuable participant information, minimizing the need to scroll through lengthy profiles, and allowing you to make a quick and informed assessment on fit.
This design update wraps up our work on the participant review experience — at least for now. Over the last two months, we’ve been iteratively refining how participant information is presented on the profile page. We’ve given researchers control and flexibility to set their own key criteria, while making UI enhancements to simplify and speed up the review process.
Have questions about the new profile or how to set key criteria for your project? Read our support guide to learn more.
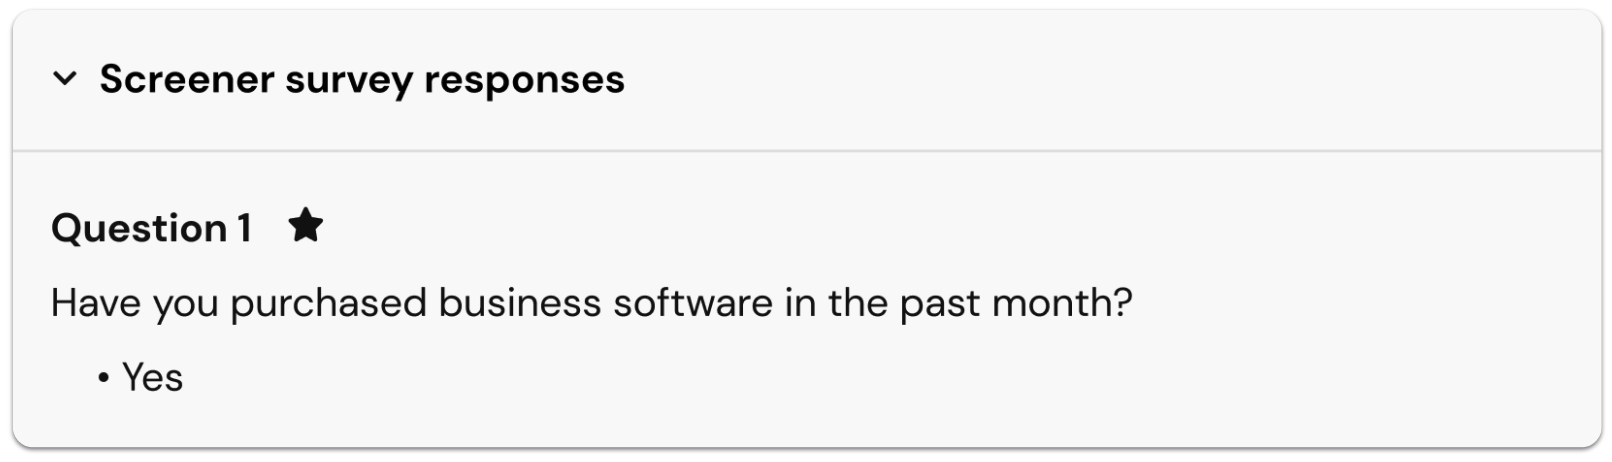
January 24 - 🔑 Identify key decision-making criteria and we’ll highlight it on participant profiles
Identify your key decision-making criteria and we’ll highlight it for you during participant review. Any characteristics or screener questions marked as “key” in the project builder will be starred on participant profiles, making it easier to pinpoint the most important information while considering participants.
When building a project, researchers can now specify which information is key to making recruiting decisions. Both characteristics and screener questions can be marked as key criteria with a simple toggle in the project builder.
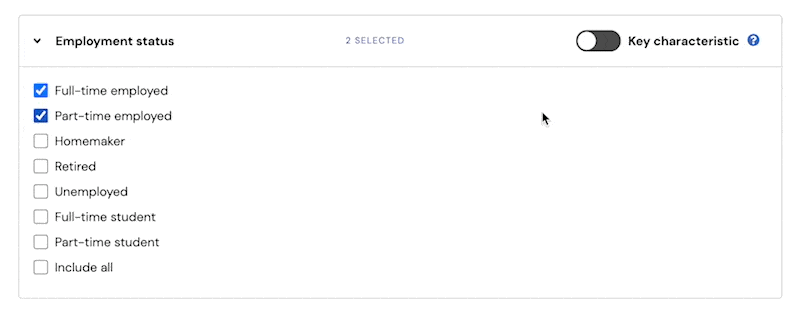
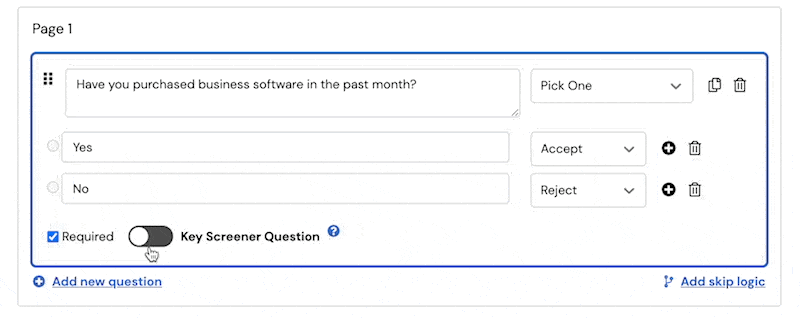
During participant review, key criteria will be highlighted with a star icon on the participant profile, helping researchers to pinpoint the information that matters most to them, and speeding up the review process.
This is just one of the enhancements we’re making to improve the review workflow for researchers. Stay tuned for our next update, in which key criteria will evolve into a summary view of the participant profile that displays starred information front and center — to be released in February.
January 14 - 🚫 Mark unqualified participants as “not a fit” to manage your applicant queue, and signal to us that we need to keep recruiting
Language on the participant reject button has changed from “Pass” to “Not a fit,” with a tooltip to clarify what this button does.
Marking unqualified applicants as “not a fit” moves those applicants to the bottom of the queue — out of sight, but still accessible if you need to review those profiles. Additionally, using the “not a fit” button gives a signal to our system and our team to continue recruiting for you until your project is fulfilled.

January 14 - 👉 Take action instantly with a “sticky” action bar on the participant profile
Scrolling can be satisfying — but not when you’re trying to get somewhere fast! We’ve created a “sticky” footer on the participant profile to house the most common actions a researcher takes during participant review. Make a determination on suitability, or navigate to view other participants, from any point on the profile page.
Profiles can get lengthy with in-depth characteristics data and detailed screener surveys. With this update, we’re enabling you to take action the instant you’re ready to move on, without needing to scroll all the way back to the top of the page. The “sticky” action bar remains visible as you explore the participant profile for quick access to key actions.
Use the profile action bar to instantly “Approve and Invite” a participant, mark them as “Not a Fit”, or else move on to reviewing other profiles using the “Previous/Next” buttons, or returning “Back to All Participants”.
This is the latest enhancement to help researchers speed up participant review and make a quick and informed assessment on fit.
January 11 - ✨ The redesigned “skimmable” profile speeds up participant review
Participant profiles have a new look. Scan profiles quickly, pinpoint the criteria that matters to you, and drill down where you need more context. You can now review, assess, and approve, all within the participant profile — no complex navigation or file exports needed.
The new participant profile uses information hierarchy and visual cues to improve the review workflow. By making it easier to scan and pinpoint key decision-making criteria, researchers will be able to review faster, consider more profiles, and approve better-fit participants for their studies.
Why we redesigned the participant profile
“Skimmable” profiles help researchers to speed up participant review and make a quick and informed assessment on fit. From our own user research, we learned that reviewing participants has historically been a point of friction for time-constrained researchers. We’ve observed them resort to workarounds like opening many tabs, displaying windows side-by-side, and exporting participant data to filter and sort off-platform.
Some of the benefits for researchers:
- Identify at a glance whether a participant meets your target criteria.
- Drill down where more context is helpful for your decision.
- Digest participant information in a way that mirrors the project builder.
- Control which information is displayed as you navigate between profiles.
- Collapse information that’s not relevant to stay focused and minimize distractions.
- Get the context you need on screener responses without navigating to survey settings.
- Review and approve from within the profile without resorting to complex navigation or data exports.
What has changed in the new participant profile
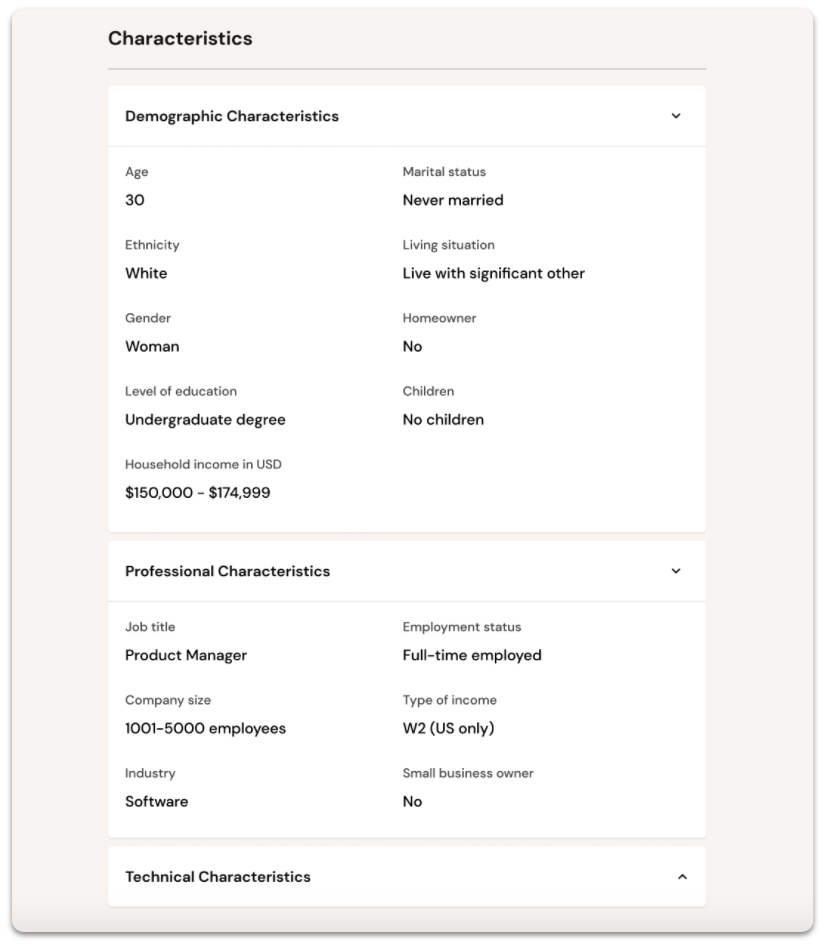
We’ve made some changes to improve readability within the Characteristics section of the profile:
- Characteristics have been organized in three sub-sections: Demographic Characteristics, Professional Characteristics, and Technical Characteristics.
- Each sub-section can be expanded or collapsed, and selections will persist while navigating between profiles.
- Demographic Characteristics and Professional Characteristics are expanded by default; Technical Characteristics is collapsed by default.
We’ve also made some changes to the Screener Survey section of the profile:
- Each question is treated as a distinct sub-section and given its own space.
- Only the participant’s selected response is visible by default.
- Unselected responses are collapsed by default, but can be expanded for reference.
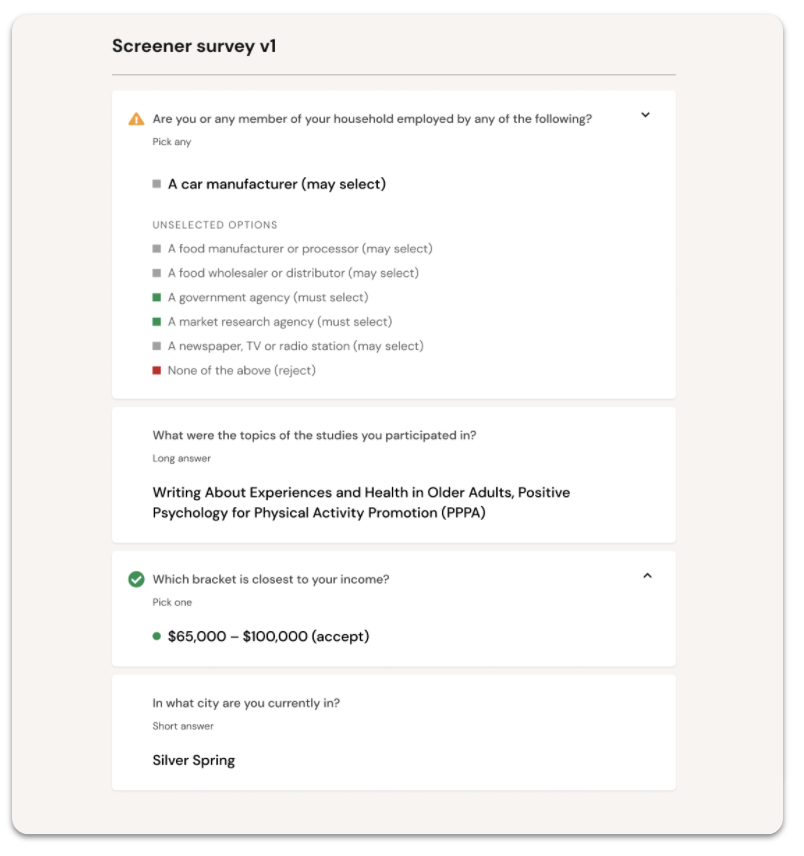
Lastly, we’ve added visual cues for target criteria:
- Green checkmarks acknowledge when target criteria have been met.
- Orange alerts flag when target criteria have not been met.
- A summary of checkmarks and alerts is included within each Characteristics sub-section.
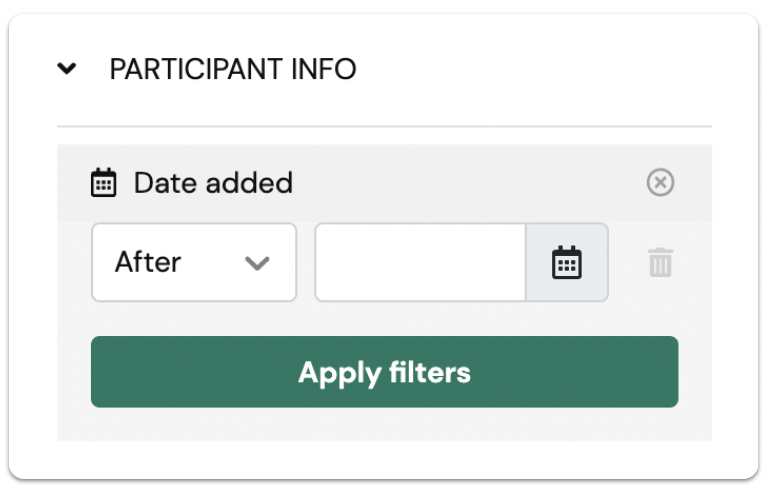
January 11 - 📆 Filter your Hub panel by <date added> to get more precise with targeting
It’s now possible to filter participants in Hub based on when they joined your panel.
Use the <date added> filter to find participants who joined between specific dates, pinpoint recently added participants, or pair with other filters to more precisely target your study invitations.