Automate it: How to turn GitHub releases into Mixpanel Annotations

Annotations in Mixpanel offer context about time; they are “comments” within your project’s timeline and add helpful hints for all time-series charts in Mixpanel.
We can automate the creation of Annotations by bringing in data from GitHub’s REST API; this means analysts will have greater visibility into which of our app’s releases or versions may have impacted specific metrics.
In this tutorial, we will go from this:

To this:

Let’s go!
Annotations?
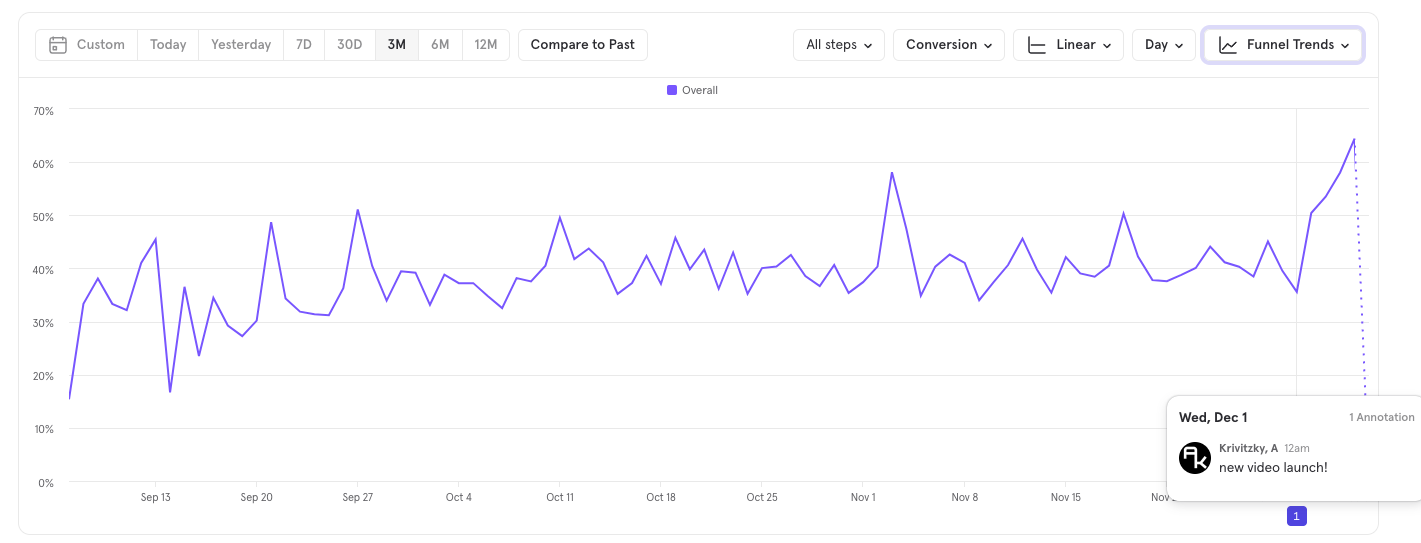
In most Mixpanel reports, time is (usually) represented by the X-axis:

In the default state, all units of time (weeks, days, months, hours) are equal—no single day is given precedence over the others.
You can add context to any time series by clicking on the plus sign, near the X axis, and typing in a (brief) note:

The neat thing about Annotations is that they persist across all reports!
The Annotation I just added about our new video launch is also visible to all users across all charts that include that moment in time.
For example, when looking at conversion-over-time of a key product funnel, the same Annotation is called out:
Neat, right?
The value of contextualizing time
Because Annotations help contextualize time across a veritable bevy of metrics that can be built in Mixpanel, their value proposition is threefold:
Annotations emphasize key product updates
The primary reason companies adopt product analytics tools is to quantify a set of key customer behaviors as commensurable metrics, then make changes to improve those metrics, and finally see if those changes had an impact.
Annotations are one way you can document product initiatives on the same timeline as your most important end-user metrics.
Annotations chronicle data outside Mixpanel
In general, Mixpanel keeps track of how your users behave. It does not keep track of the changes you have made to your app or marketing initiatives you have implemented.
While there are ways to keep track of these things (app versions, utm parameters, custom tags, etc), the semi-structured nature of key:value pairs often aren’t enough to fully encapsulate the scope of a major change. By contrast, Annotations are free-form text, therefore a bit more open in how they can be used to describe new features, releases, and bug fixes you’ve made to your app.
Annotations facilitate better collaboration and communication
When we notice a dip or spike in the data, the very first question we’ll ask is “what changed?” For teams larger than one person, this is often a question that needs to be crowdsourced—and, admittedly, our memories of exact dates and times are usually pretty fuzzy. Annotations can act as a type of changelog, so we never have to again ask “what changed?” because it’s right there for us to see!
In short, Annotations make all the best parts of Mixpanel even better. But they are not without some challenges!
The schema problem
While it’s helpful to have point-and-click functionality in a user interface—to solve communication and collaboration challenges—the open-ended, free-form nature of Annotations present some less obvious problems:
Nomenclature and consistency
Annotations are metadata; they represent moments of interest over time. But they are still data, therefore difficult to use if they are completely unstructured! If one Annotation says “v2 by AK” and another says “fixed broken links,” it’s difficult to reason about these: “What features were in V2? Who fixed the broken links?”
Free-form text inputs, typed manually by humans, will never be consistent. Having consistent names and structured messages is a table stakes best practice for any type of analytics.
Correctness
The only thing worse than no data is incorrect data.
Mixpanel’s UI is awesome, but it’s important to understand that when we click on the X-axis in Mixpanel to create an Annotation, we are clicking on a precise month/day/hour/minute. When eyeballing this, it’s easy to create our Annotation at a slightly offset hour/minute than we intended to and end up annotating the wrong time.
Ideally, Annotations are not an approximate time, they are an exact one.
Completeness
Annotations are most useful when they are both comprehensive and up-to-date. If someone forgets to add an Annotation for a major release or milestone, the state of our Mixpanel timeline diverges from the versions of our app. While this “completeness” gap is tolerable and fixable—we can always add or modify Annotations later—it can quickly become a feature that no one updates, which burns its function as a source of truth for how the app has changed.
The good news is that both GitHub and Mixpanel have well-designed REST APIs for repo history and Annotations (respectively), and so, with a little bit of code, we can glue these two things together to automate and standardize the creation of Mixpanel Annotations on GitHub milestones and add value to every Mixpanel chart without any of the downsides!
Glue them together!
For this article, we’ll take a look at GitHub releases in conjunction with Mixpanel Annotations, although these code examples could easily be adapted to work with commits, merges, pull requests, or any other type of event on GitHub.
The repo I’m using in this example has two releases:
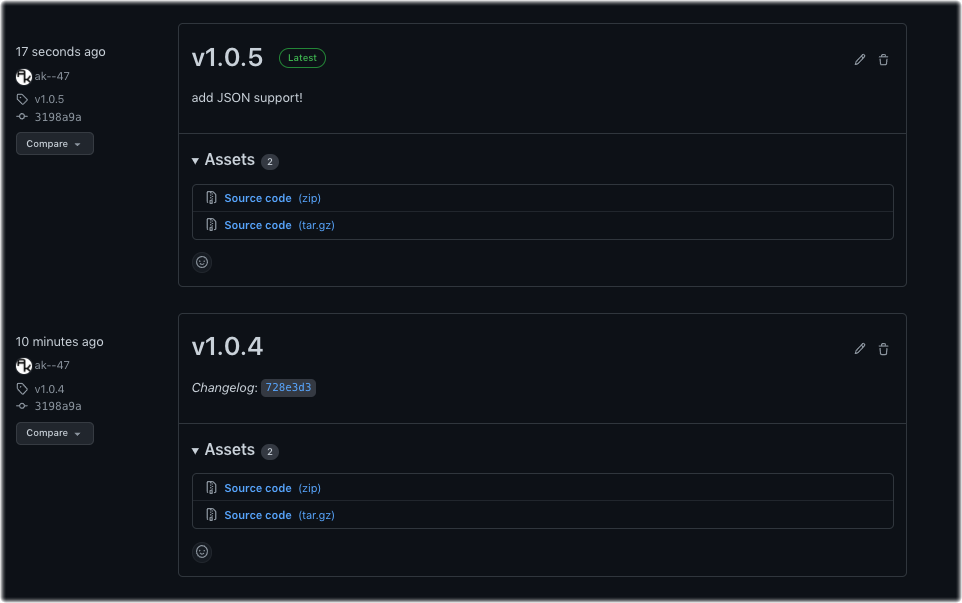
Let’s take these releases, their structured metadata, and observe how we can import this data into Mixpanel as Annotations.
First we’ll grab a list of all our repositories:
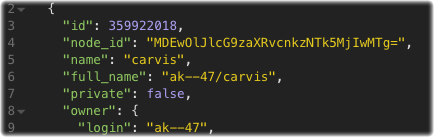
curl https://api.github.com/users/ak--47/reposAnd find the repository i’m interested in:
Then, let’s look at the releases available for that repository:
curl https://api.github.com/repos/ak--47/carvis/releasesWhich gives us back a JSON array of objects that have two releases:
[
  {
    "id": 54817830,
    "author": { ... },
    "name": "v1.0.5",
    "published_at": "2021-11-29T00:00:00Z",
    "body": "add JSON support!"
  },
  {
    "id": 54817350,
    "author": { ... },
    "name": "v1.0.4",
    "published_at": "2021-11-19T00:00:00Z",
    "body": "fixed nested columns"
  }
]
(The full results are truncated for readability.)
The particular fields that are interesting to us are:
name
published_at
body
We’ll have our Annotation string look like this:
${name} - ${body}And used the “published_at” date as the timestamp for the Annotation.
Now we have all the information we need from GitHub! Let’s look at how Annotations can be created programmatically in Mixpanel using the Annotations API.
The params needed for a Mixpanel Annotation are simple:
{
	"workspace_id": "87371",
	"date": "2021-11-29 00:00:00",
	"description": "foo bar baz"
}
Constructing the request is simple. These values go in the body of a “POST” request:
curl 'https://mixpanel.com/api/app/workspaces/{{workspace_id}}/annotations/' \
--data-raw '{"date":{{timestamp}},"description":{{description}} }'
The “workspace_id” is accessible from the URL of any Mixpanel report:

Using Mixpanel Service Accounts for authentication, we can easily create an Annotation programmatically:
curl --request POST \
  --url 'https://mixpanel.com/api/app/workspaces/87371/annotations' \
  --header 'Authorization: Basic <<redacted>>' \
  --data-raw '{"date":"2021-11-29 00:00:00","description":"v1.0.5 - JSON support"}'
This request returns the following 200 response:
{
    "status": "ok",
    "results": { ... }
}
And we can see our Annotation in our Mixpanel project right away!

As a one-off script, this works fine, but it still requires a human to run it. In the next section, we’ll automate the creation of these Annotations using GitHub’s webhooks and a cloud function!
Automate it!
For most automations projects, there are two basic strategies:
- Run a job/script/program every X hours/days/weeks
- Listen for changes and respond to a notification by running a job/script/program
For the former, we might use scheduling tools like cron or jobber. While being simple to use, scheduled automation will always suffer from some kind of latency.
For the latter, we might use technologies like webhooks or message brokers (PubSub, Kafka, etc) coupled with an on-demand runtime environment (like cloud functions or lambdas). The advantage of this setup is that it offers near real-time performance, and we don’t have to provision any complex infrastructure.
For this particular use case, I like listening for changes and then performing our action since we don’t expect releases to occur every single day, and it would be nice to have Annotations populate in real-time.
Our data stack is pretty simple:
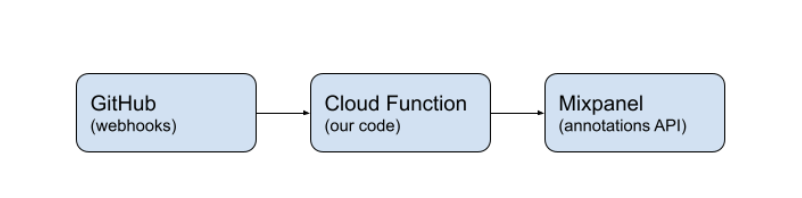
(We could substitute other automation platforms like Zapier, Pipedream, or Tray.io for the cloud function.)
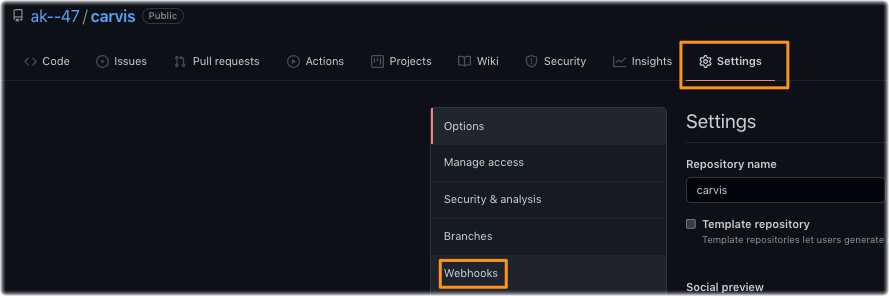
Let’s start in GitHub! We’ll go to the repository settings and find the webhooks option:
And add a webhook!

GitHub has lots of options for the types of notifications it can send. Since “releases” is the only event that’s in scope for this project, I’ll set up my webhook like this:
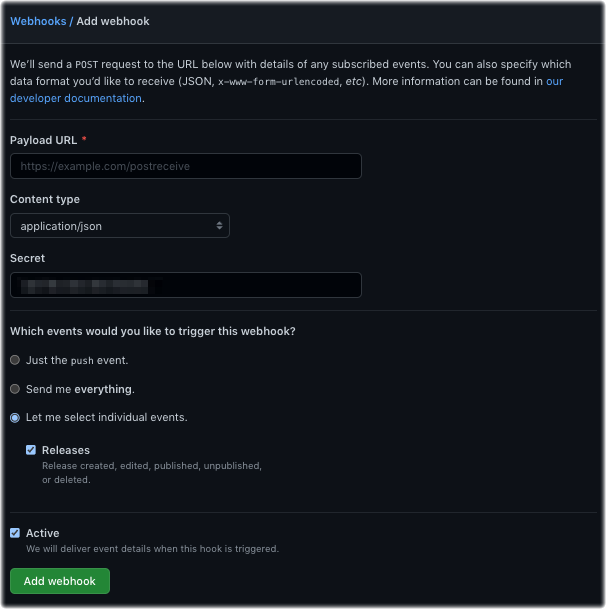
(It’s a best practice to include a Secret here; this is just a value your code can check against to verify that it is GitHub who sent the message)
But what do we put in the Payload URL? Enter cloud functions!
I won’t describe the full setup for creating a cloud function here (directions are ubiquitous), but I created a cloud function in GCP with the following setup:
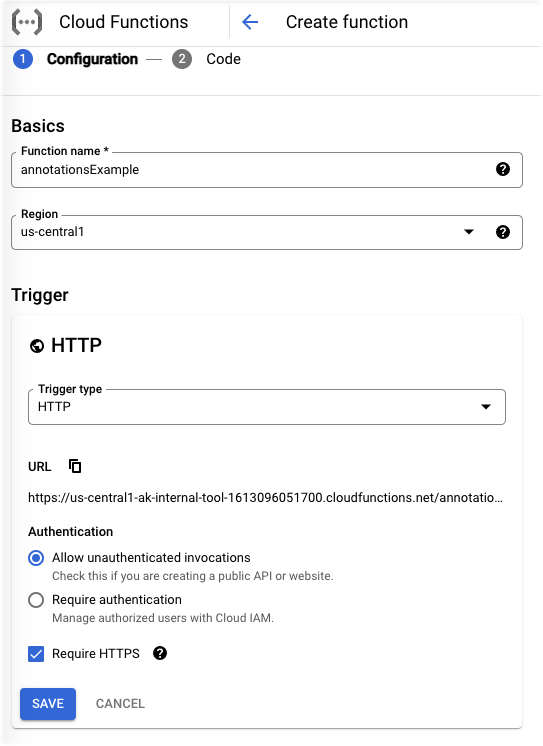
This gives me a unique URL that other services can “POST” messages to!
https://{{myCFproject}}.cloudfunctions.net/{{myCFname}}So we’ll plug that into github.
As for the cloud function code itself, I’m writing in Node.js. Here’s what I came up with:
https://gist.github.com/ak–47/80a5065787f484574596e6e0e6af7555
A few notes on this code:
- As indicated by the comments: Do not store Secrets in code. This is just done for illustrative purposes.
- This code could be made shorter by using external libraries (fetch for requests, Dayjs for date conversion).
- We could do something smarter with the description, like including who published the release, links to GitHub commits, or add any other useful metadata we may wish to see in our Annotation.
And there we have it! Enjoy!