Minimum Viable Onboarding: Your Go-To Guide To User Activation
Getting user onboarding right is critically important for any SaaS. In this article, we’re going to explore the powerful concept of minimum viable onboarding.
We’ll start by looking at what user onboarding is, then look at why minimal viable onboarding is valuable, and finally how to implement it in your product.
Ready to get started? Let’s dive in!
TL;DR
- User onboarding is all about helping your audience realize value whatever stage they’re at, whether they’re completely new users or experienced customers discovering a new feature. It’s not just about customer acquisition (getting users to sign up).
- The ultimate goal of any user onboarding experience should be to get users to experience the core value your product offers, help them reach the activation point, and from there, boost retention.
- Minimum viable user onboarding takes the concept of the ‘minimum viable product’ from the world of startups and applies it to onboarding: how do you meet your onboarding goals with the smallest amount of effort and expense? By focusing on primary onboarding and getting users to activate.
- Minimum viable onboarding doesn’t just mean launching a basic product tour (long-winded, not targeted, not engaging). Instead, it should be focused and personalized based on the needs of distinct user segments to help them experience value as quickly as possible.
- User onboarding is important because it’s core to the business model of any SaaS company: you need to meet your users’ expectations by delivering on their expectations of what value they’ll get.
- So, what’s the process of implementing minimum viable onboarding? First, you’ve got to choose the right tool. Next, you should define your users’ key activation points (and which features correspond to them).
- From there, segment users to understand what the fastest route to activation is and use what you’ve learned to personalize the onboarding flow that gets them there.
- To know if your onboarding flow is bringing the results you’re aiming for, you need to analyze its performance consistently. To improve metrics, A/B test parts of your flow instead of overhauling your entire onboarding process.
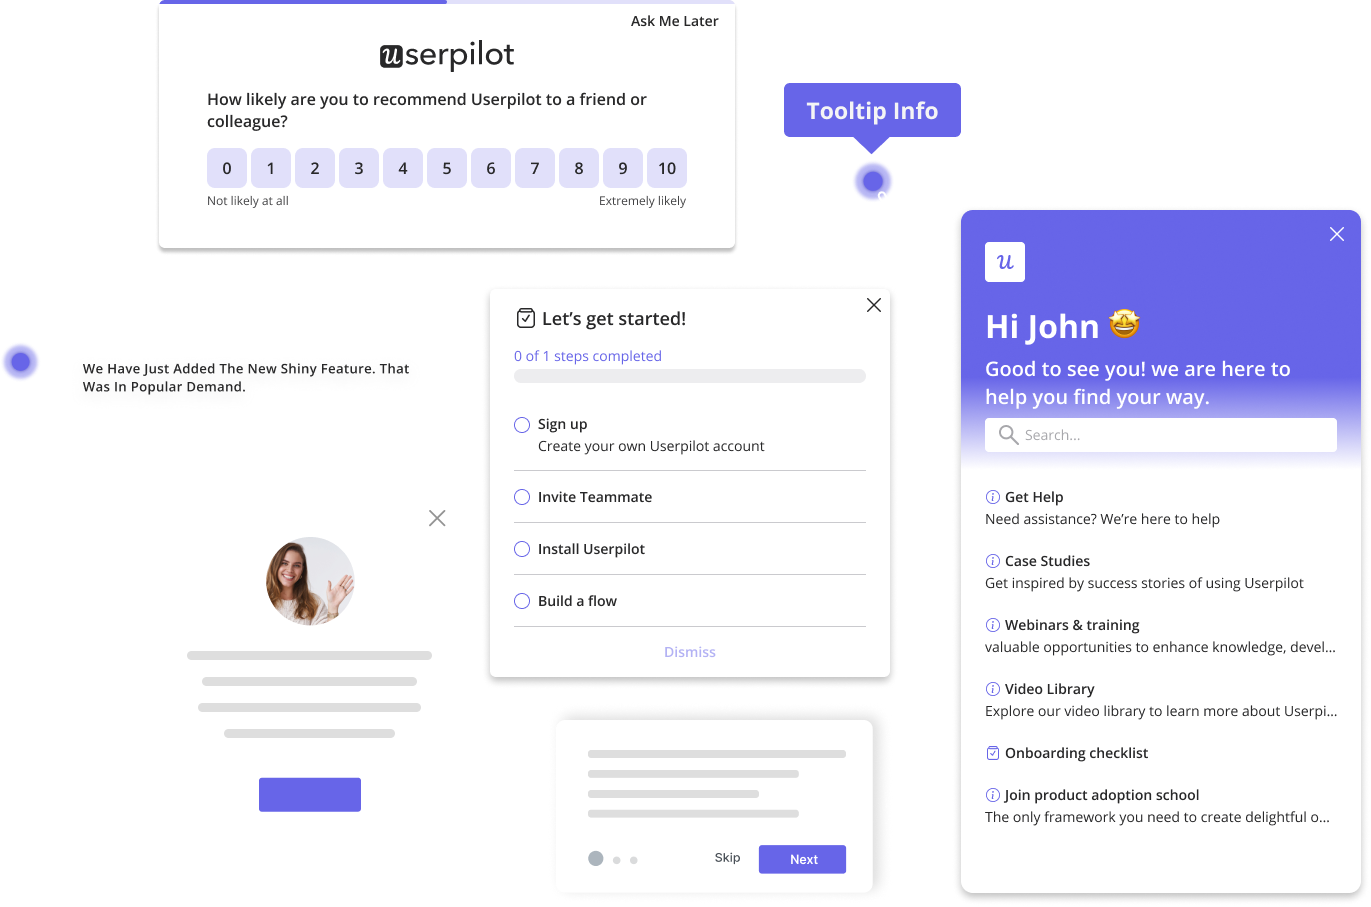
- You should utilize a range of flows to help get onboarding right: checklists to drive users forward, in-app messages to help users unlock value, step-by-step guides demonstrating how features work, and support options to help solve their problems.
- Ready to build your minimum viable onboarding flow? Userpilot can help. Get a demo now.
![]()
Optimize Your Onboarding Flow With Userpilot
What is user onboarding?
A common misconception is that user onboarding is simply about getting users to sign up for your product or service. That couldn’t be further from the reality: great onboarding happens at every stage of the user journey.
In a nutshell, great user onboarding is all about helping your audience realize value at whatever stage they’re at, whether they’re potential customers exploring your freemium plan or experienced customers discovering a new feature.
Check out our MVO webinar below for a detailed breakdown.
What is the goal of user onboarding?
The ultimate goal of user onboarding is to help users experience the core value your product offers repeatedly and dependably. In turn, that boosts retention and drives ‘stickiness’ (a propensity to use and keep using your product).
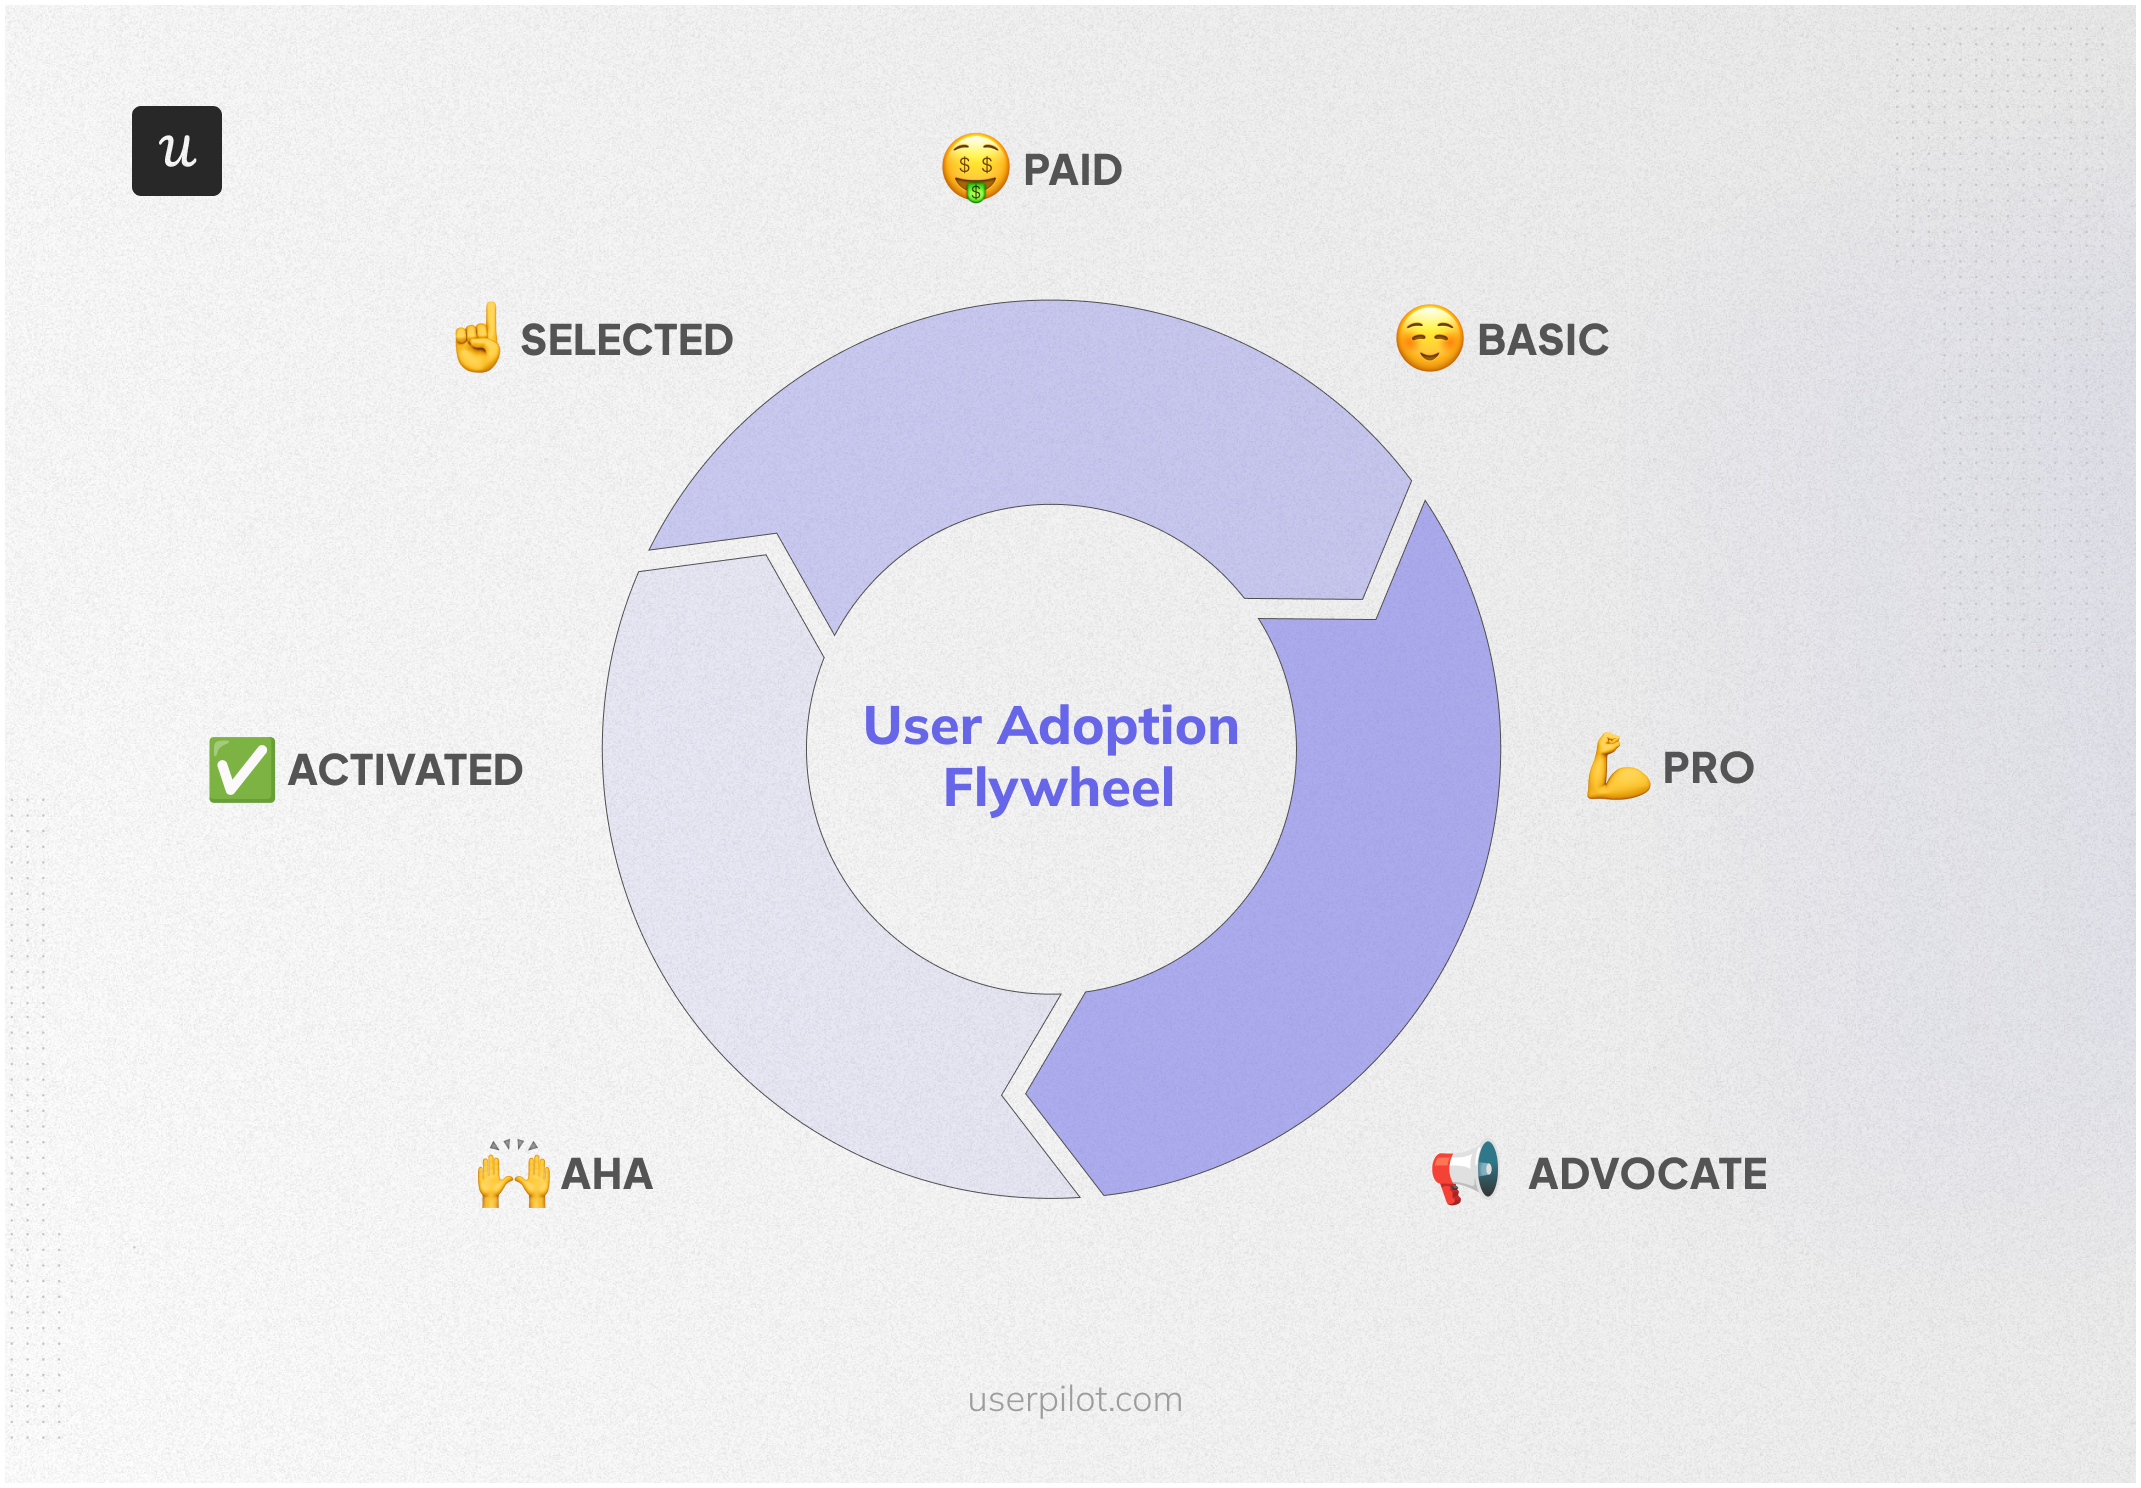
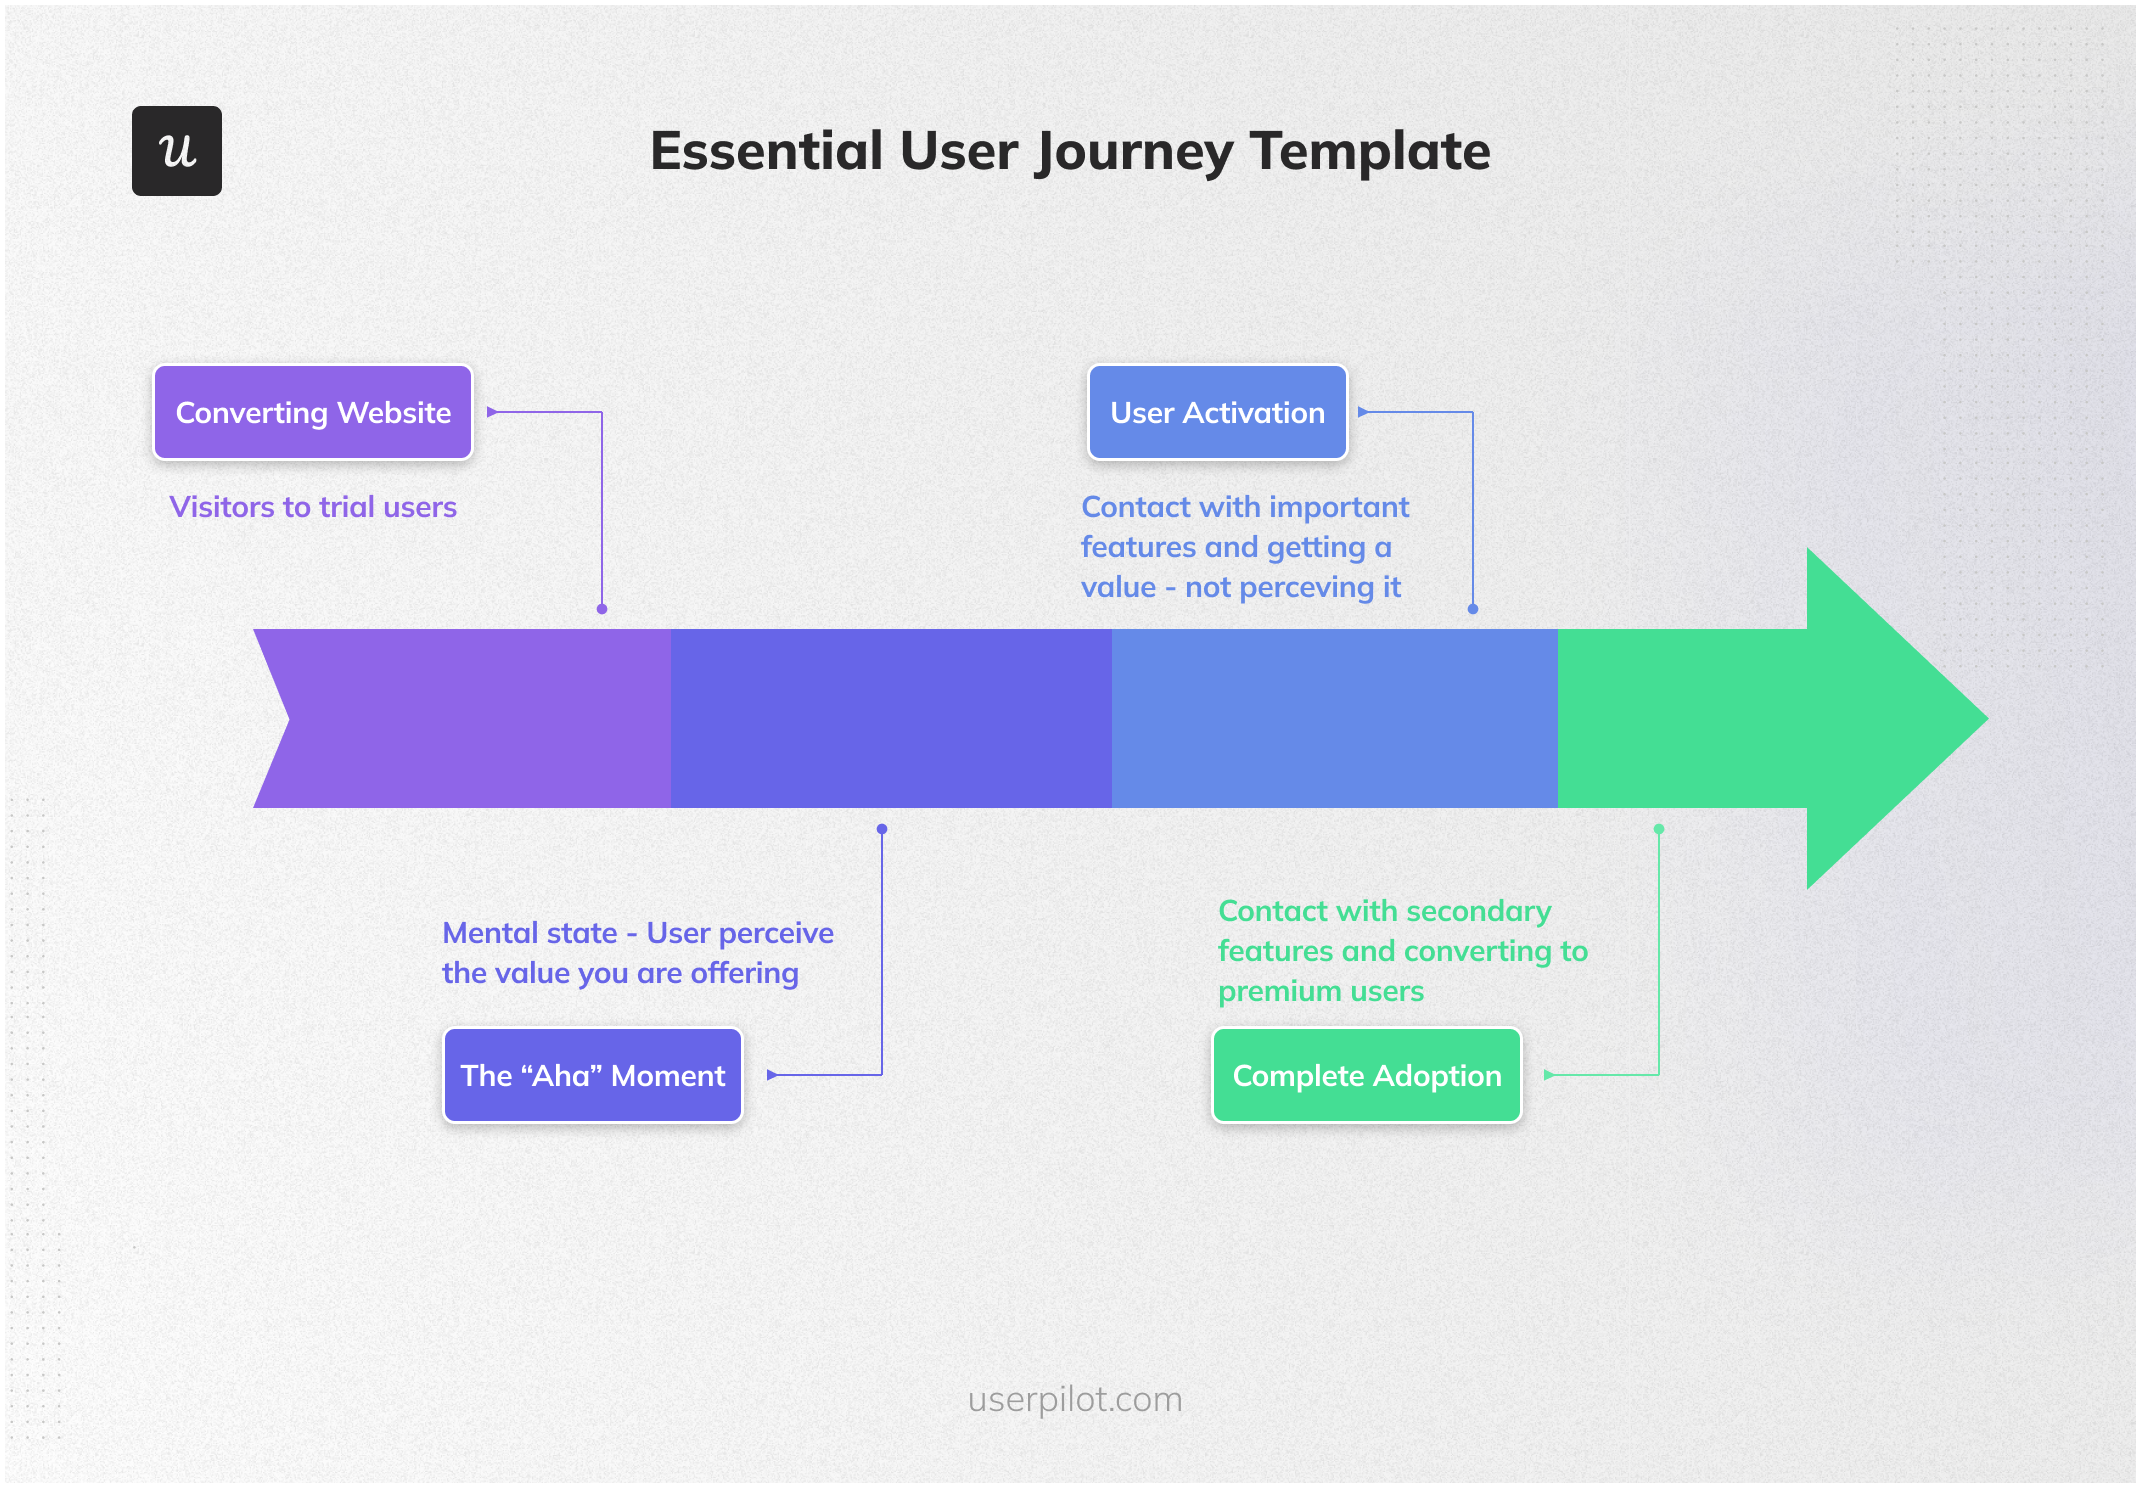
User adoption flywheel
Onboarding should drive users through the different stages of the flywheel above: from an initial aha moment to activation, then from more basic accounts to premium features, and finally to engaged advocates evangelizing the merits of your product.
What is minimum viable onboarding?
You might be familiar with the concept of a minimum viable product. The idea is this: what’s the smallest ‘slice’ of a product that will deliver value?
Minimum viable onboarding takes that idea and applies it to the world of user onboarding.
What activities give you the most ‘bang for your buck’?
Minimum viable onboarding should focus on the primary onboarding flows. That means getting users to the activation stage as quickly as possible: where they are engaging with your core features and starting to experience value.
There can be several key activation points to focus on and harness. Get those right, and you’re more likely to convert users to paying customers.
Activation is distinct from the ‘Aha moments’ a user might experience along the way. Rather than just perceiving value, it’s critical they actually start to derive value for onboarding to be a success.
Interested in Minimum Viable Onboarding? Check our webinar to learn more!
Minimum viable onboarding (MVO) is not the same as a product tour
You might be thinking, ‘Surely the fastest way to onboard users is just to show them the product?’
Unfortunately, that’s not the case.
Product tours (step-by-step, typically quite long walkthroughs that take a user through every aspect of your product in one go) are not the solution to speedy and impactful onboarding.
Your users are busy: product tours encourage passive behavior, and in reality, most people skip or ignore them because they struggle to see how they’re relevant.
A minimum viable onboarding process is an entirely different beast: they aim to personalize the user onboarding flow, motivate users, and direct them down a path that helps users reach experience value fast.
To do that effectively, you need to understand your users and what drives their behavior. That’s the only way to discover what’s relevant for them and tailor the onboarding experience accordingly.
Why should you care about user onboarding?
For one overriding reason: a SaaS with no paying customers will fail.
Onboarding is an essential part of helping demonstrate to your users why they should sign up and use your product (particularly if you use a freemium model). That means meeting expectations and delivering promised value as quickly as possible.
In a competitive marketplace, getting the initial user experience right is critically important.
Minimum viable user onboarding process step-by-step
So, we’ve covered what minimum viable onboarding is and why it matters. How do you introduce it in your own SaaS?
In this section of the article, we’re going to break it down.
1. Before anything, you’ll need a user onboarding tool
First things first, you need to make sure you’ve got the right tool for the job.
Of course, you could build something bespoke – but it takes a huge amount of development time and effort, without the suite of features available with many of the onboarding tools on the market.
Good user onboarding software should offer you:
- In-depth user segmentation options
- Multiple UI patterns to craft your own user onboarding flow
- Powerful integrated analytics to measure performance against KPIs
- Insights on user behavior to track how users engage with the product
There are multiple tools out there to choose from – but we’ve narrowed it down for you. Userpilot is the tool that offers the best value for money, enabling you to quickly create in-app experiences targeted toward the right user groups with advanced segmentation. It also offers advanced analytics and user feedback capabilities.
Craft a range of product experiences with Userpilot
2. Define your product’s activation point
As we discussed earlier, a minimum user onboarding flow means getting users to the activation point as quickly as possible.
User journey template
But for your onboarding to be successful, you need to know where your activation points are.
Depending on your user base and use cases, you could have several throughout your product: a useful rule of thumb is to map out the moments users experience promised value.
This typically happens when they start to engage with key product features (your product’s core value proposition) and see how your product can help them get the job done.
This will look different depending on what your SaaS does:
- For a social media tool, it could be when they send a message to their friend or schedule their first post.
- For Userpilot, it’s when users build their first flow.
One easy way to find your activation point is by monitoring the onboarding journey behavior of your power users via path analysis. Track the steps they take and when they experience value. You can also conduct interviews with them to further supplement your insights.
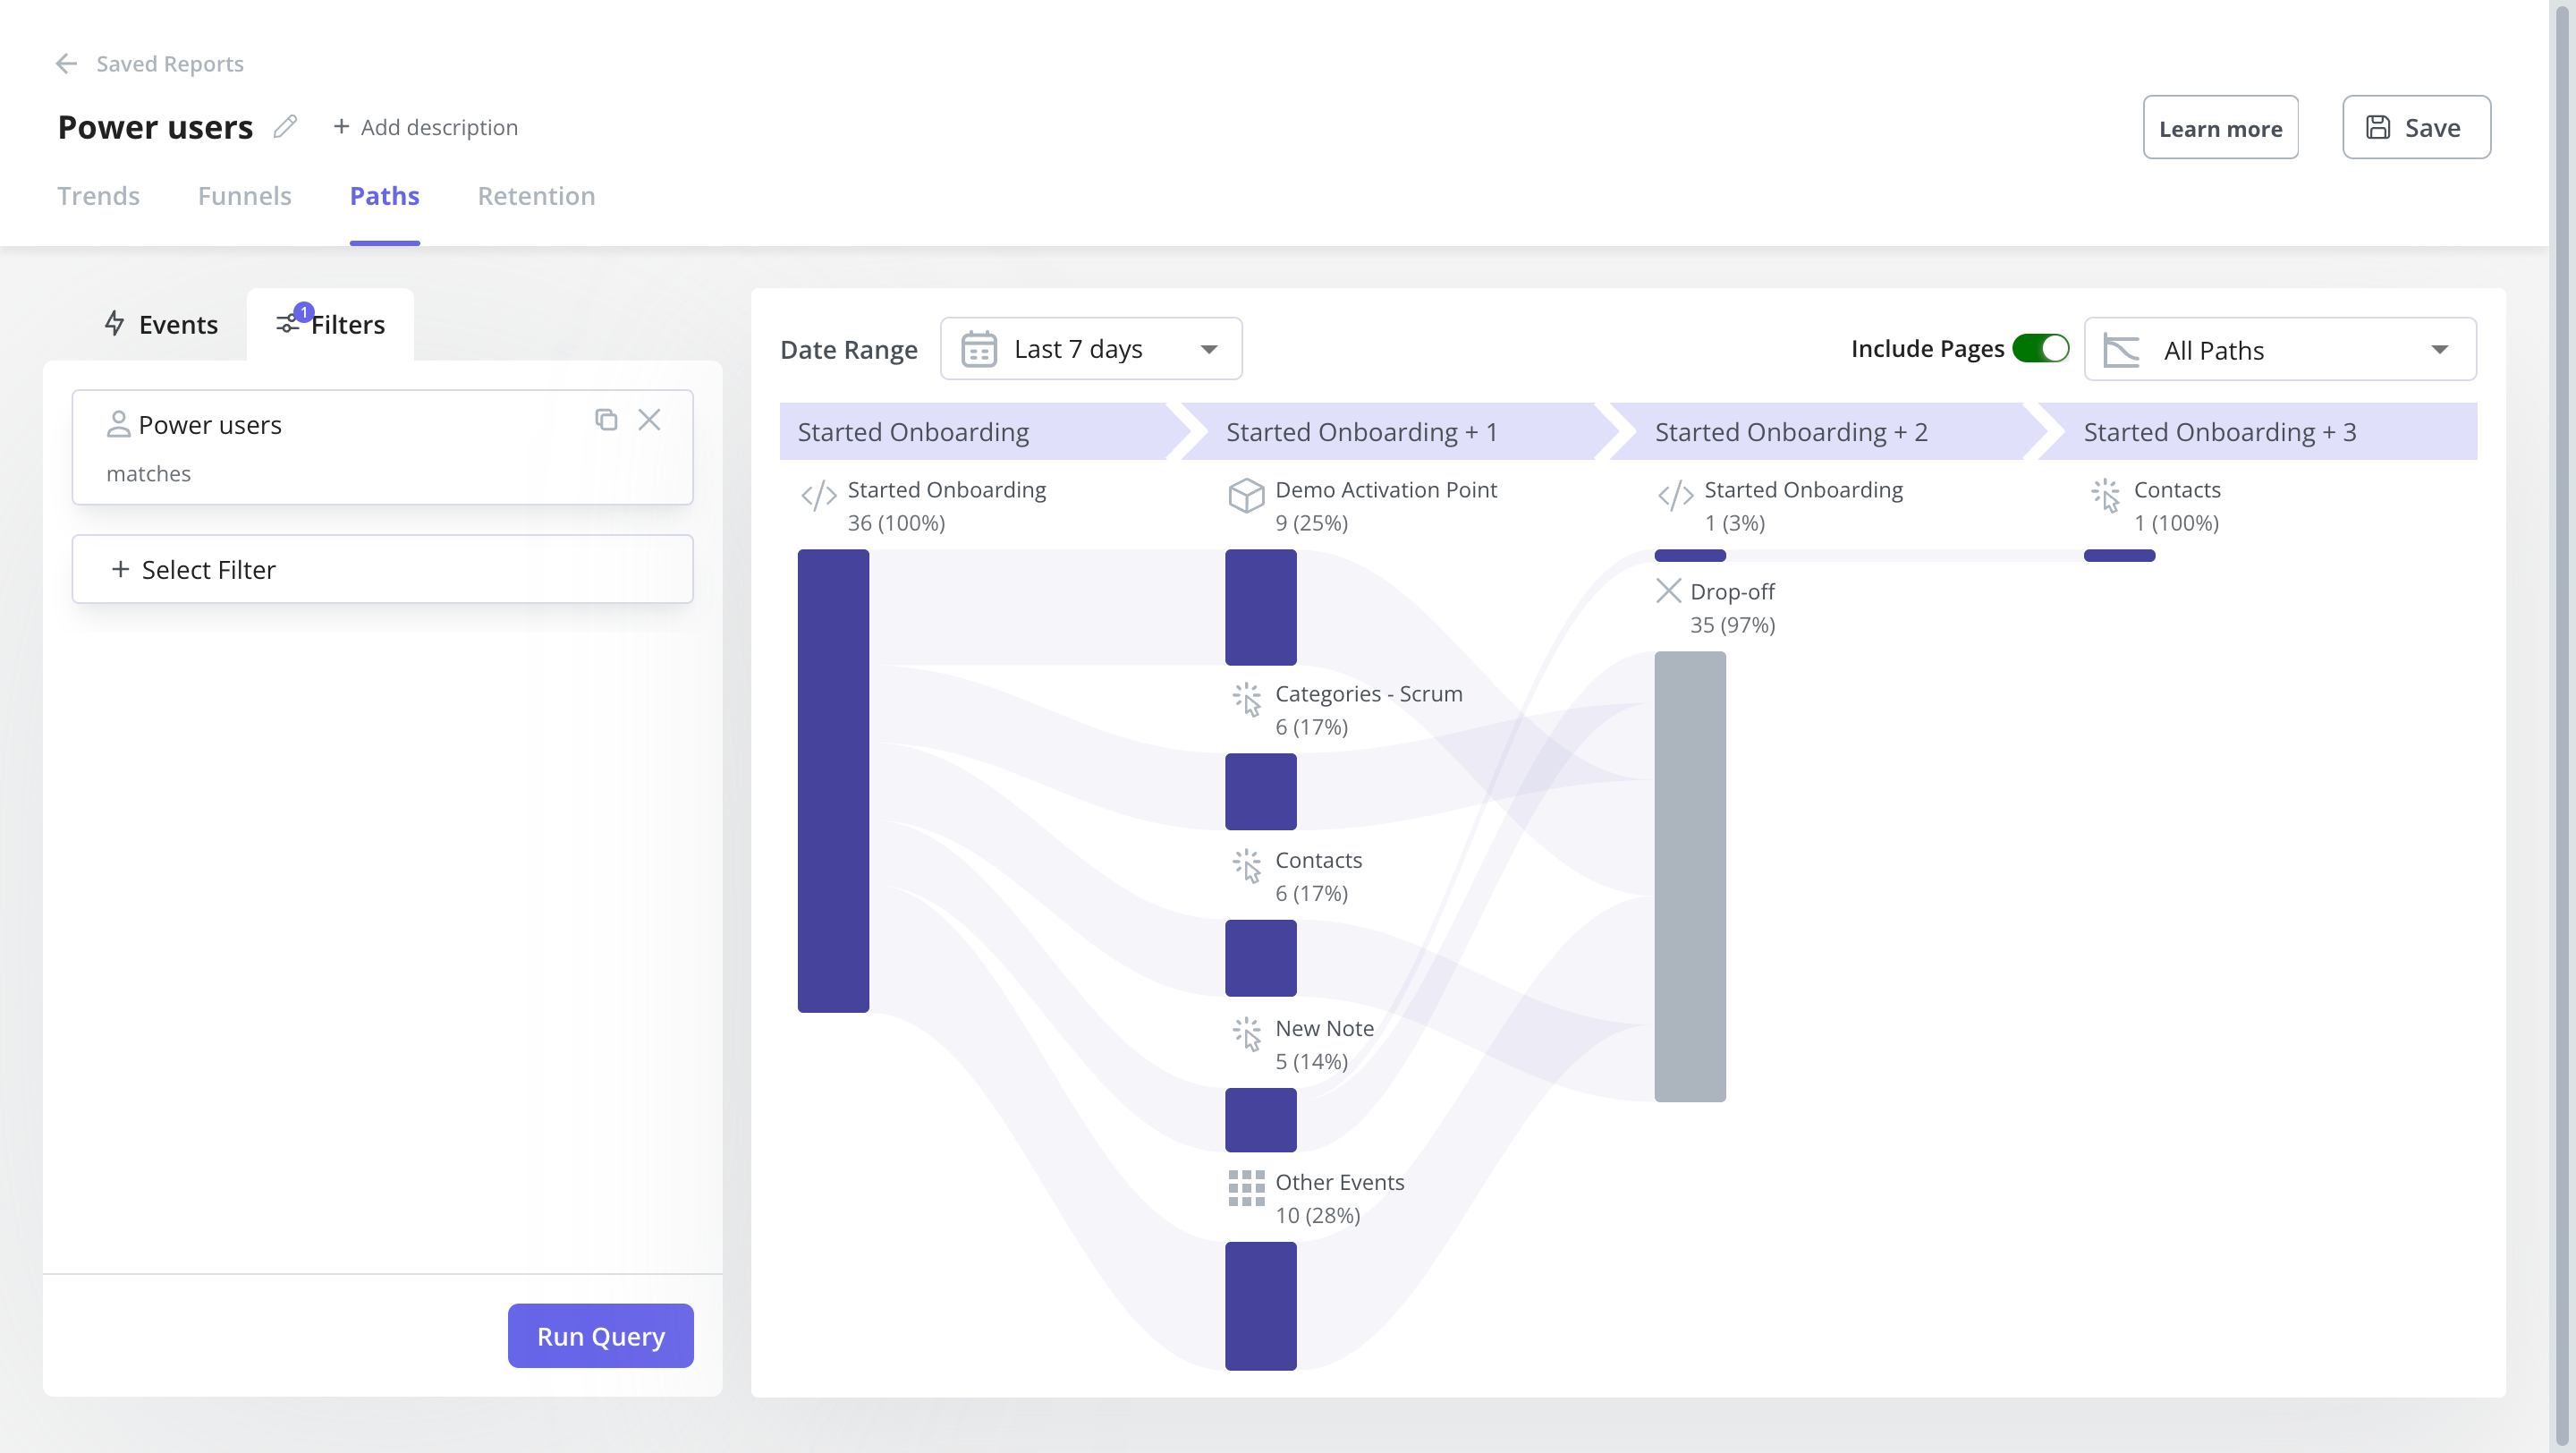
Path analysis of power users in Userpilot
3. Segment new users based on their jobs to be done
You’ve chosen your tool and defined the activation points you need to reach (and the core features that will help meet your users’ needs). The next step is to guide users on the most direct route to that objective.
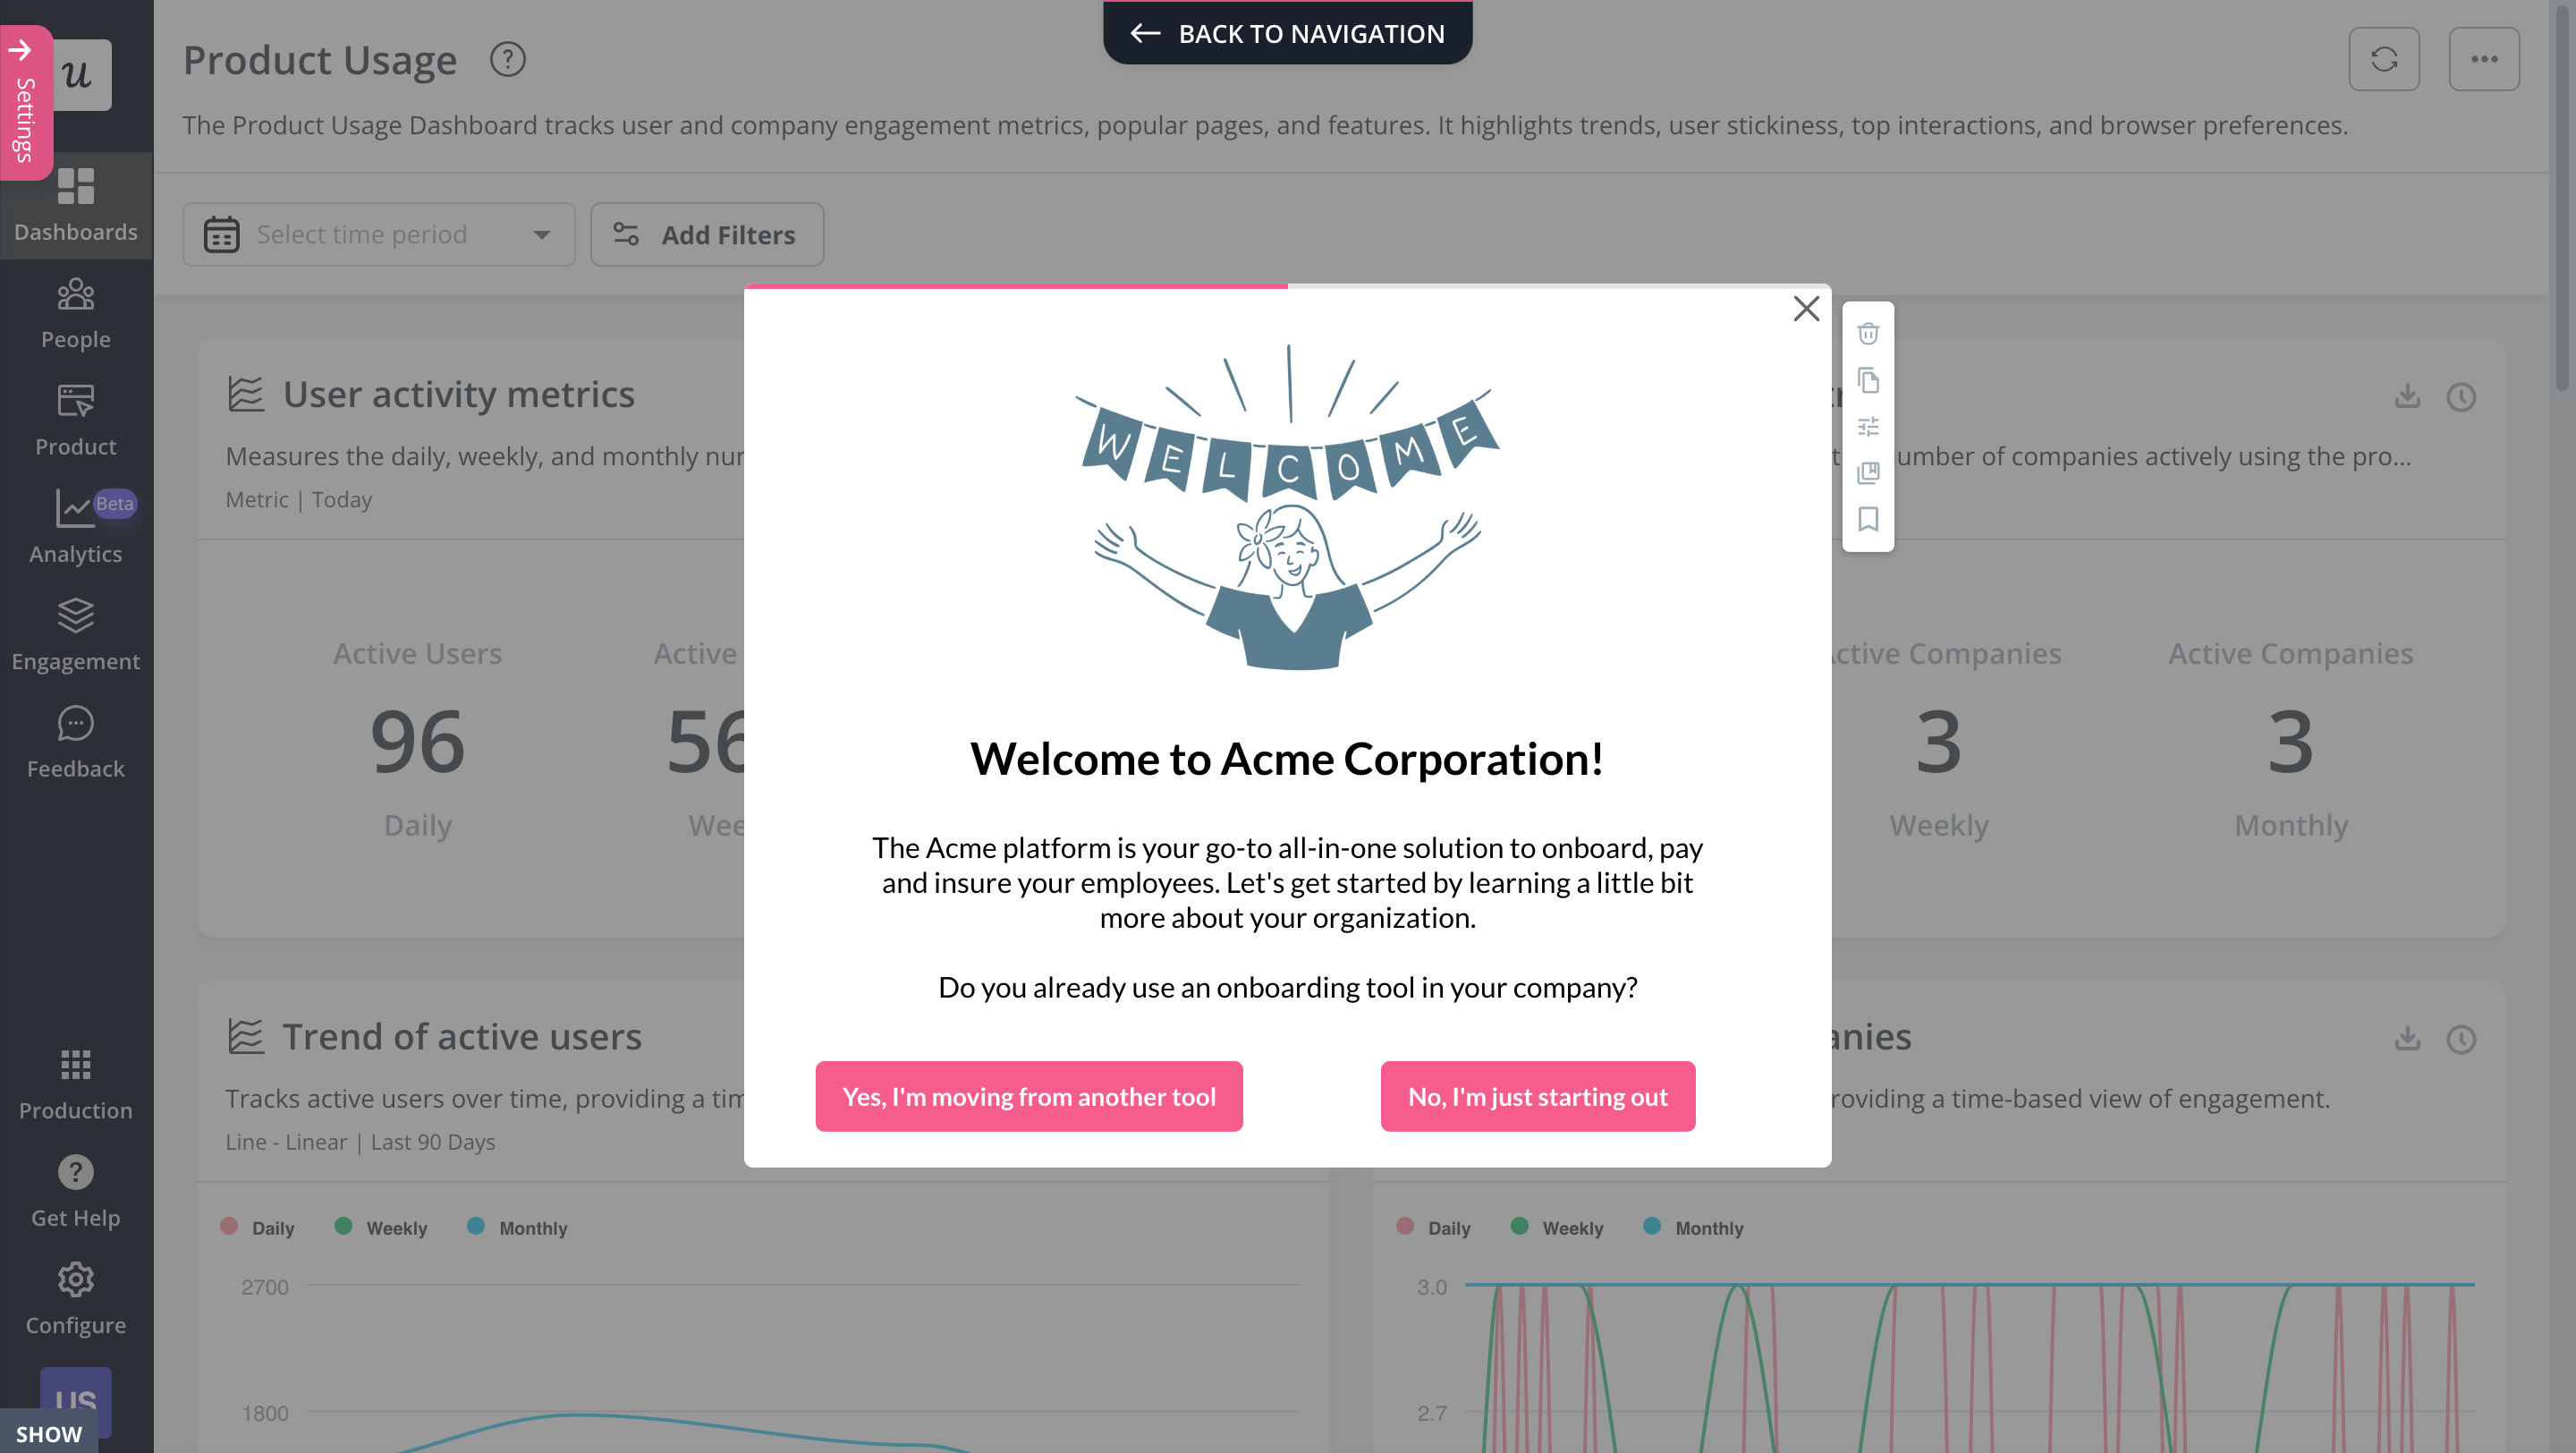
You can use your welcome screens to gather valuable data about the user’s main goals with your product.
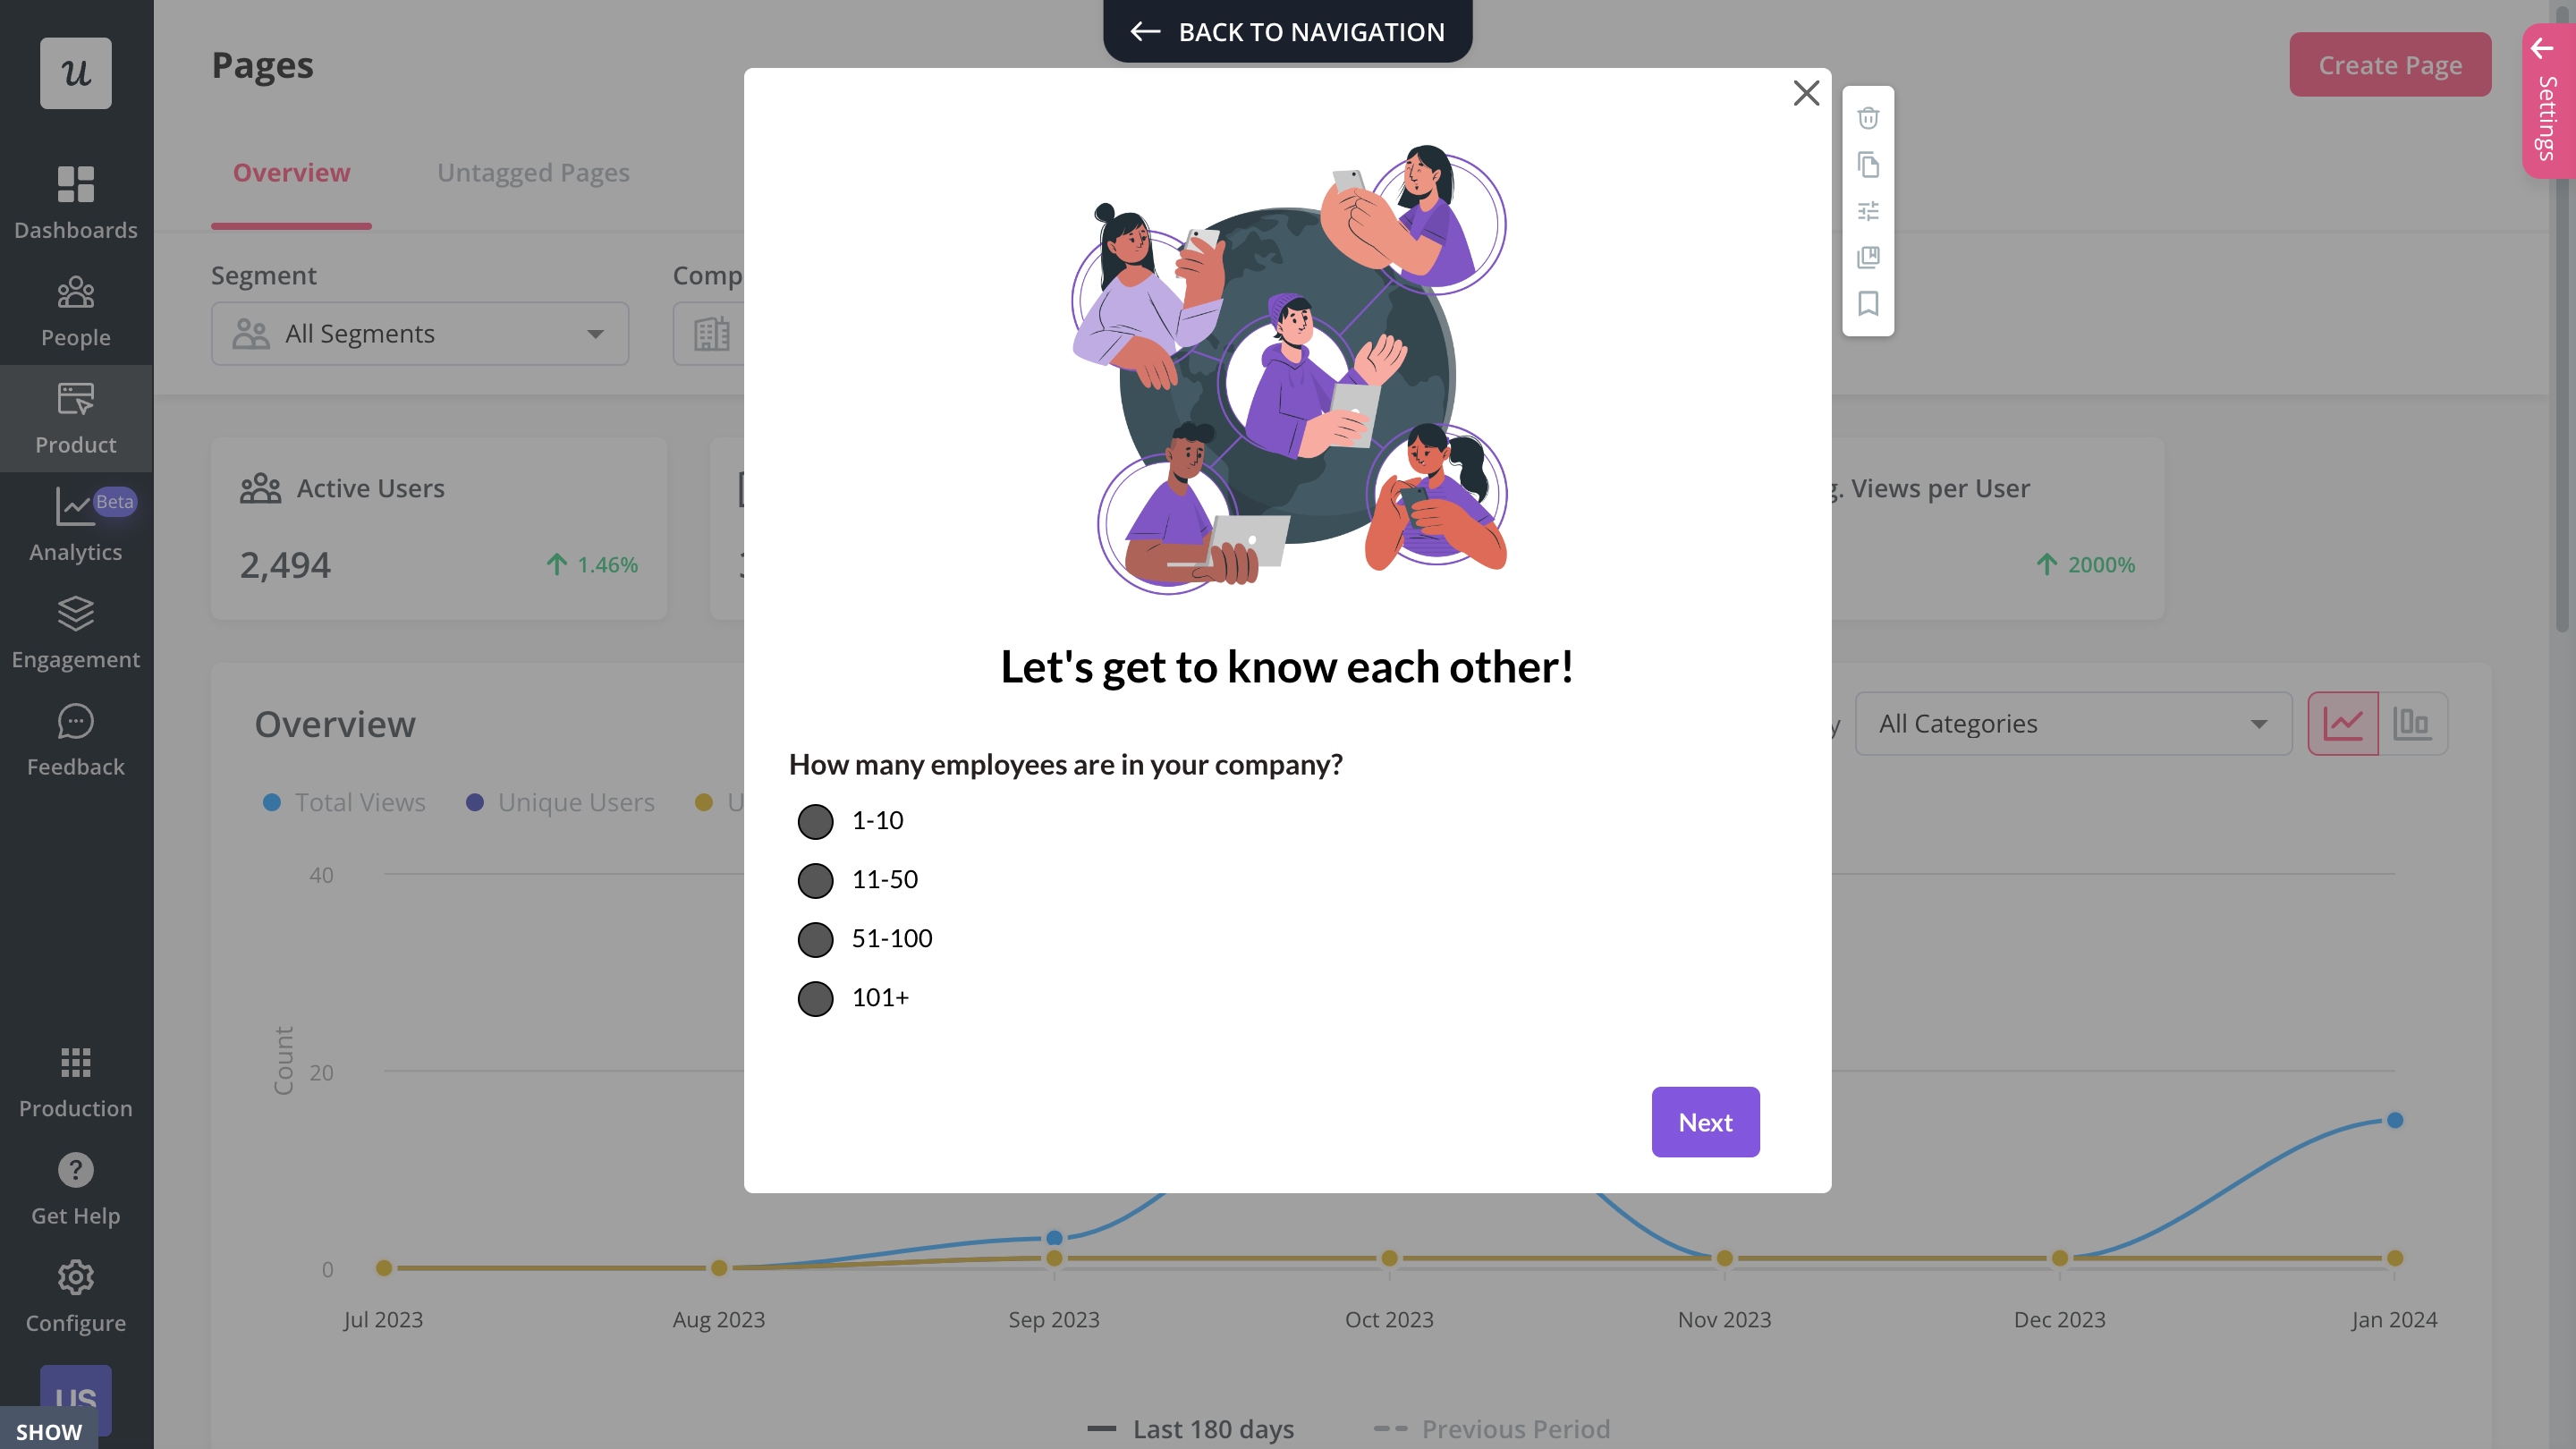
Capture insights about your users from the very first stage with a welcome survey
Then, this data will help you segment and personalize the onboarding experience from that point on.
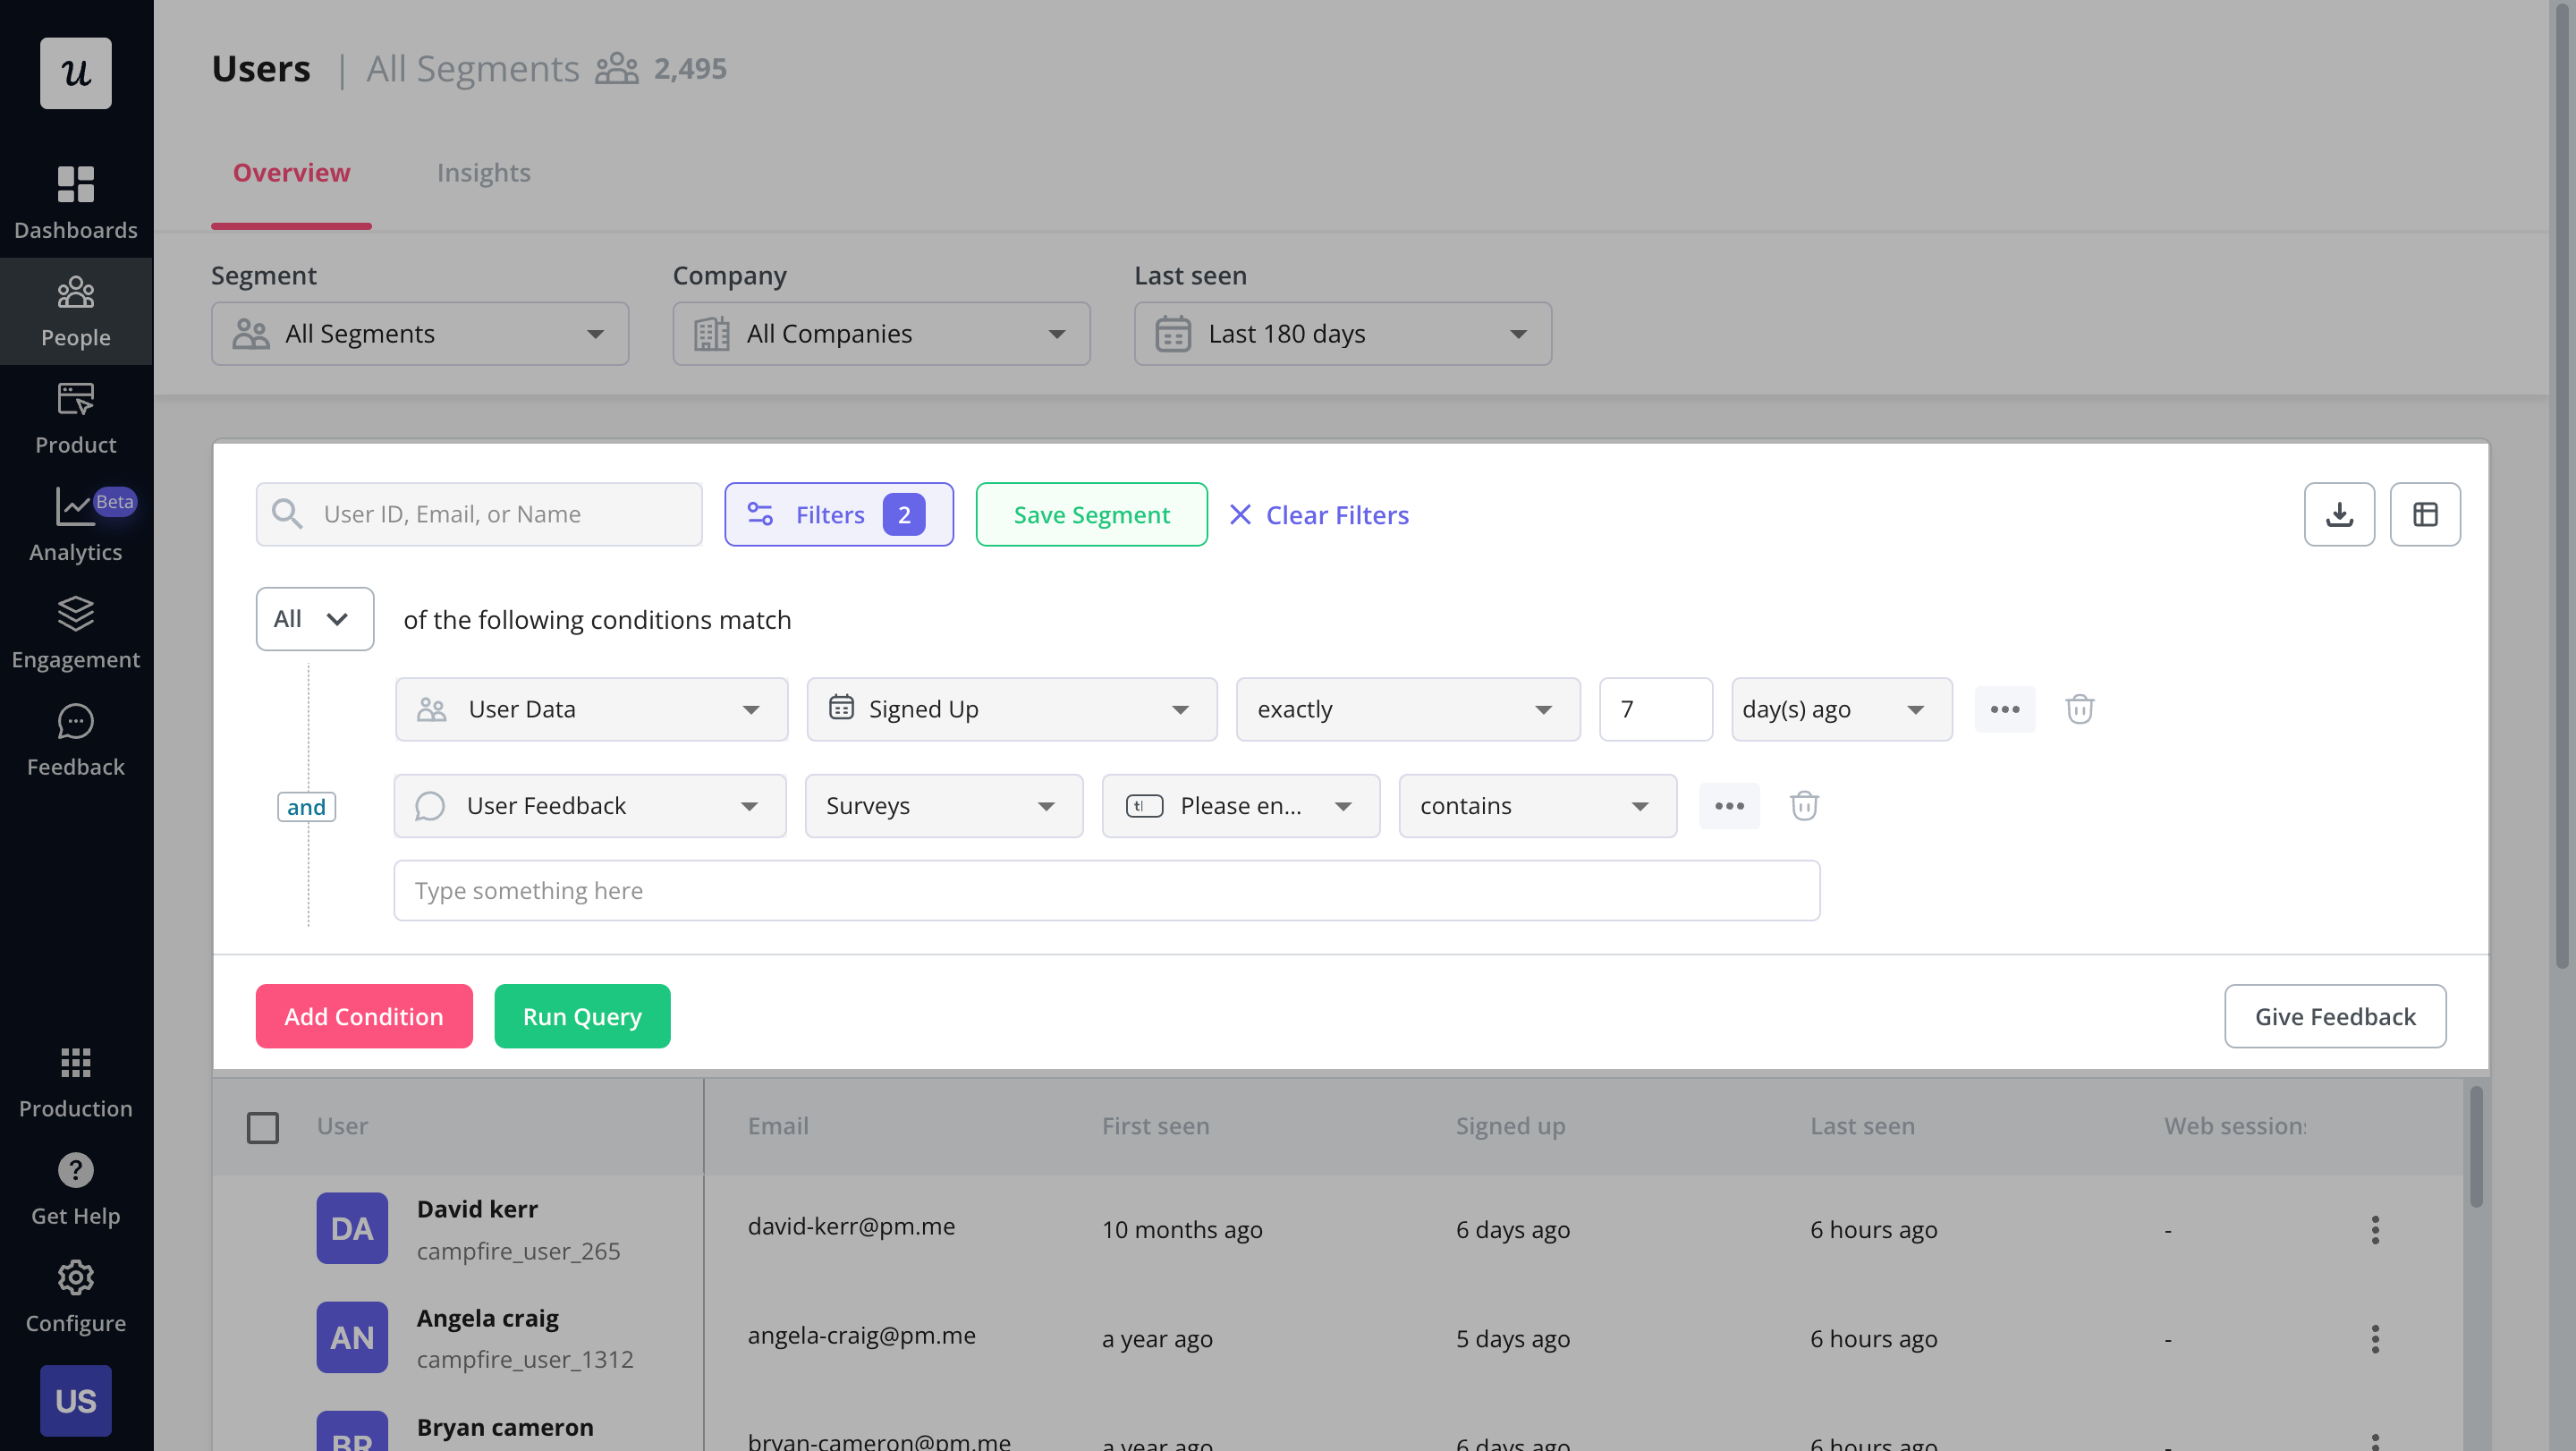
Segmentation in Userpilot
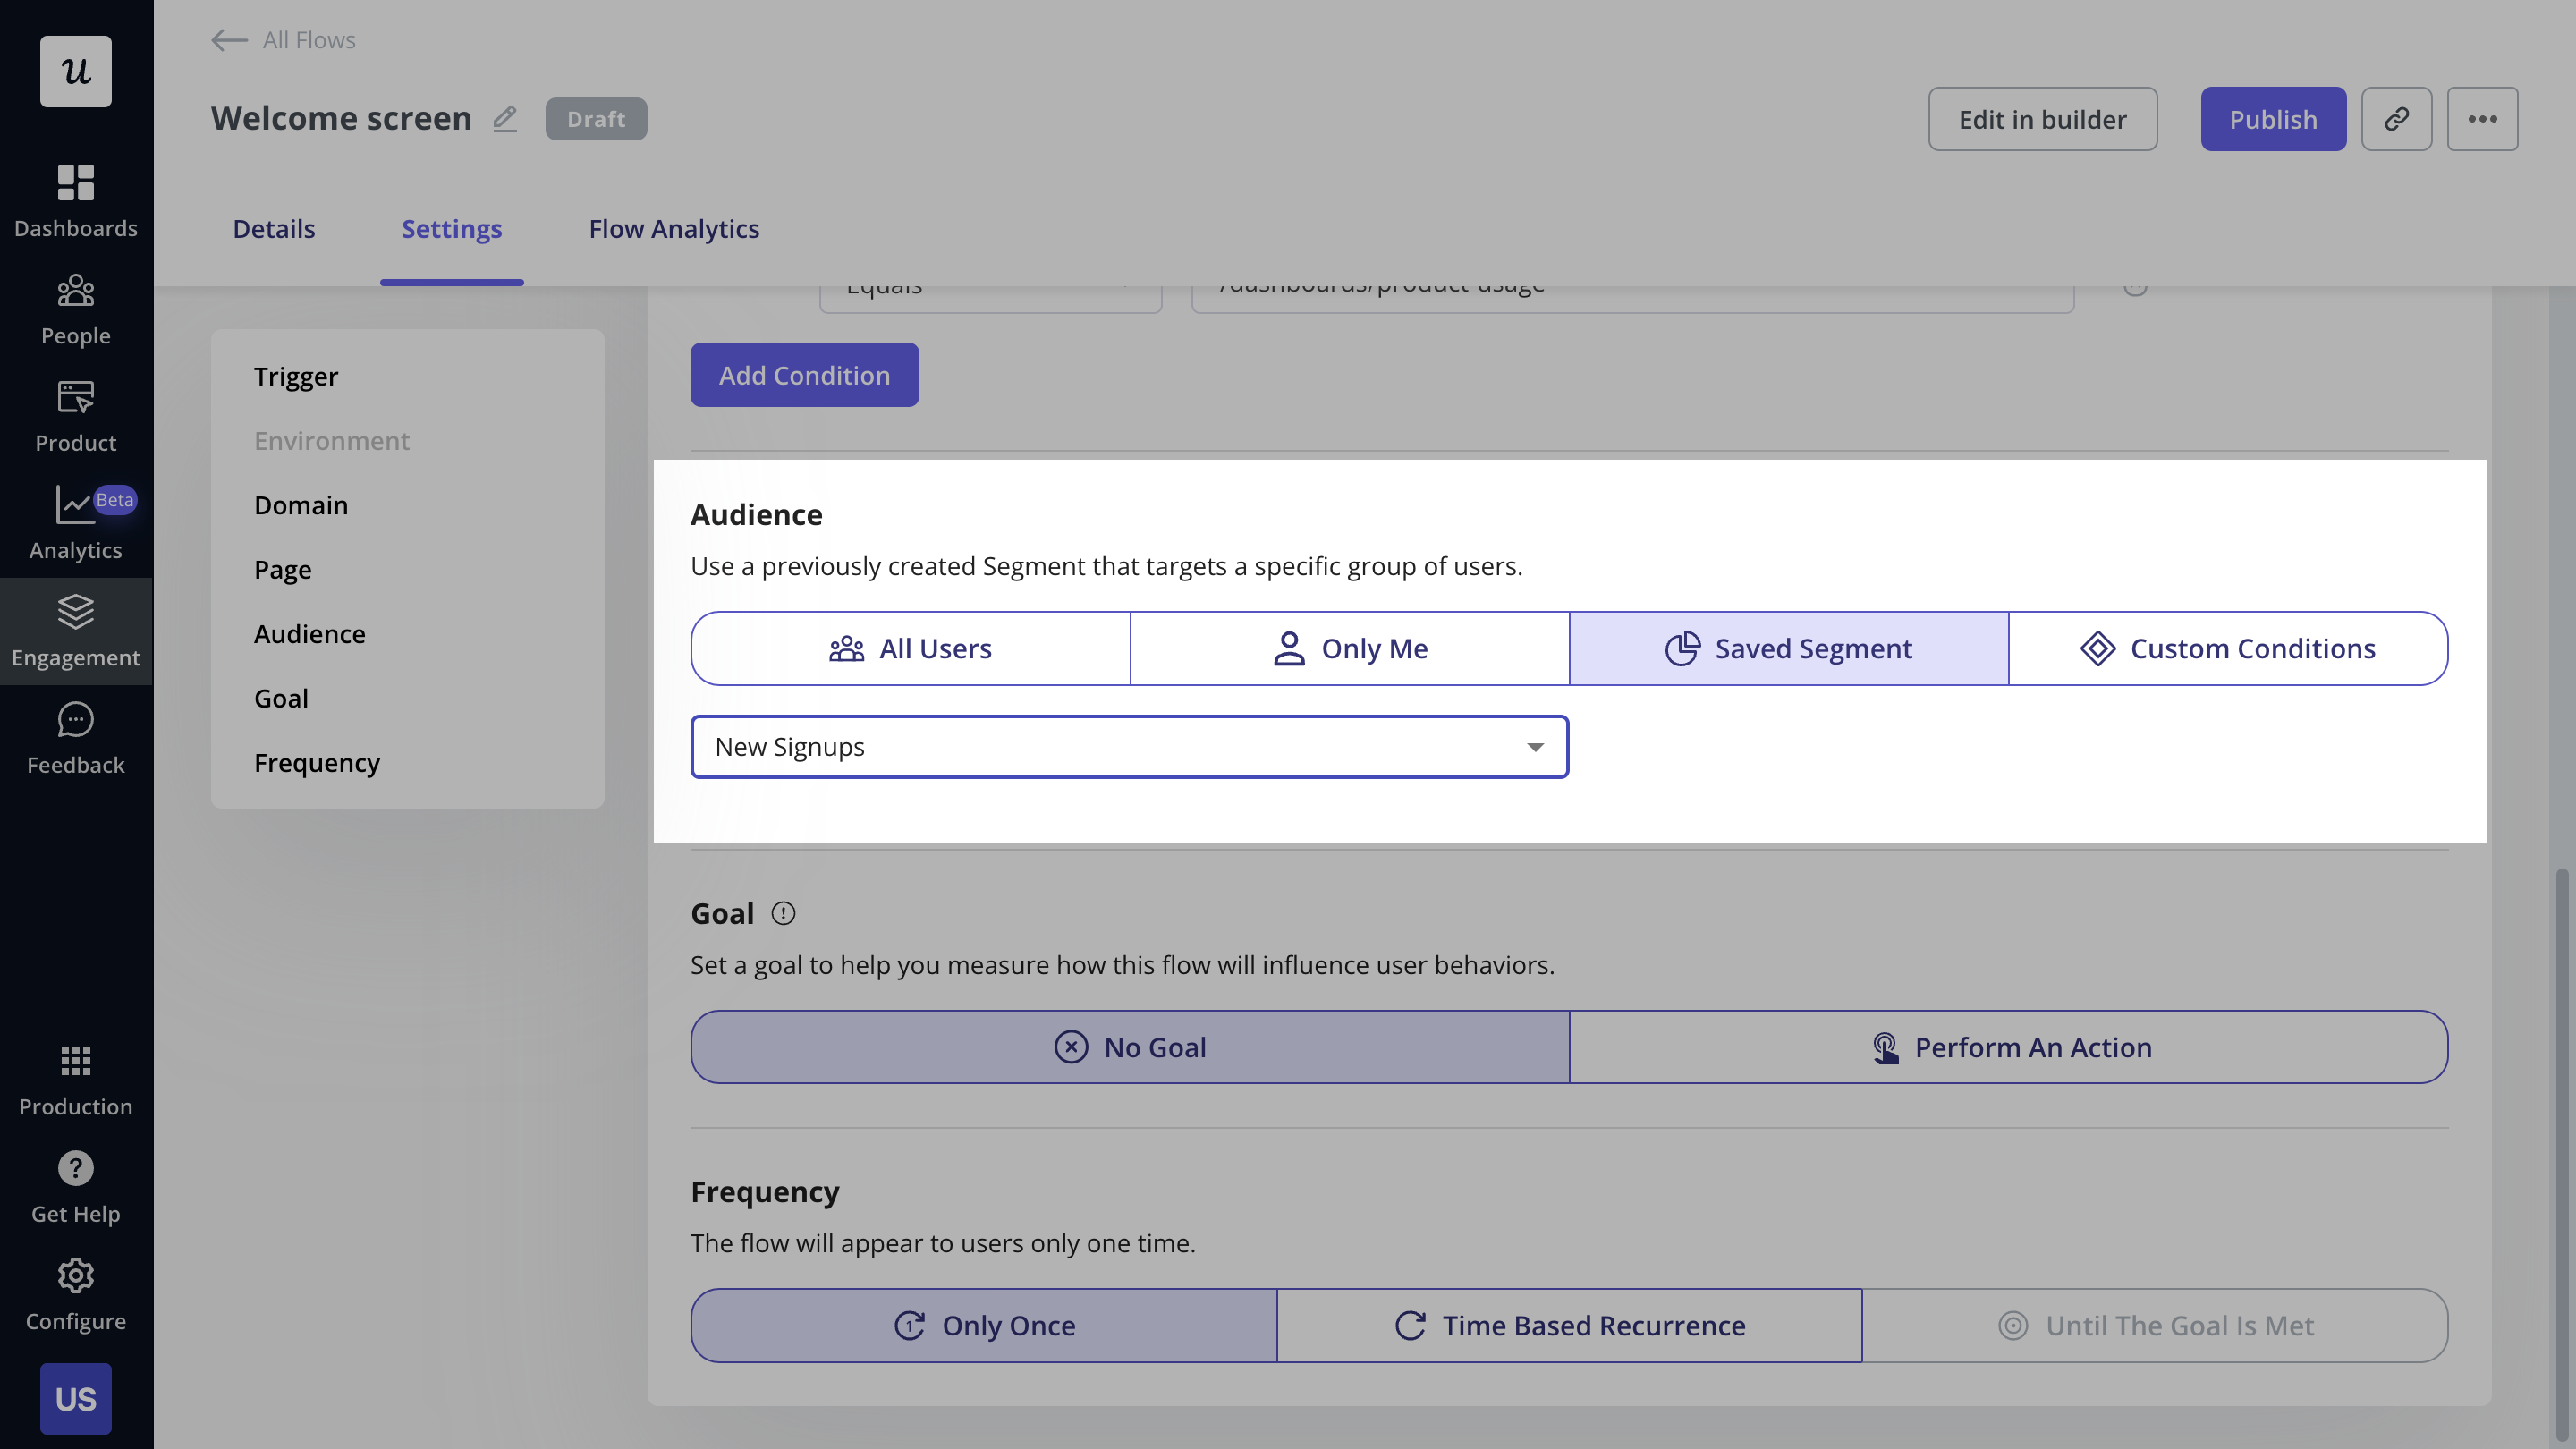
Another tactic is to put control in the hands of your users.
Let them choose their own route through the onboarding experience, and they will navigate their own path to value.
Let your users decide how to navigate through onboarding
4. Personalize the user onboarding flow to shorten time to value
Now you know a little more about your users, their needs, how those map onto your core product features, and the fastest route to value, it’s time to utilize a range of in-app experiences to get them there.
Start by using the data you’ve gathered to build segments so you can craft tailored experiences.
Userpilot boasts a range of fine-grained segmentation offerings
Now, think about what types of experience could help shorten the time to value:
- Checklists are fantastic for prompting action
- Tooltips are a useful aid for feature discovery
- Interactive walkthroughs help teach users how to unlock value
There are many more options at your disposal: it’s about choosing the right combination to meet the needs of your users.
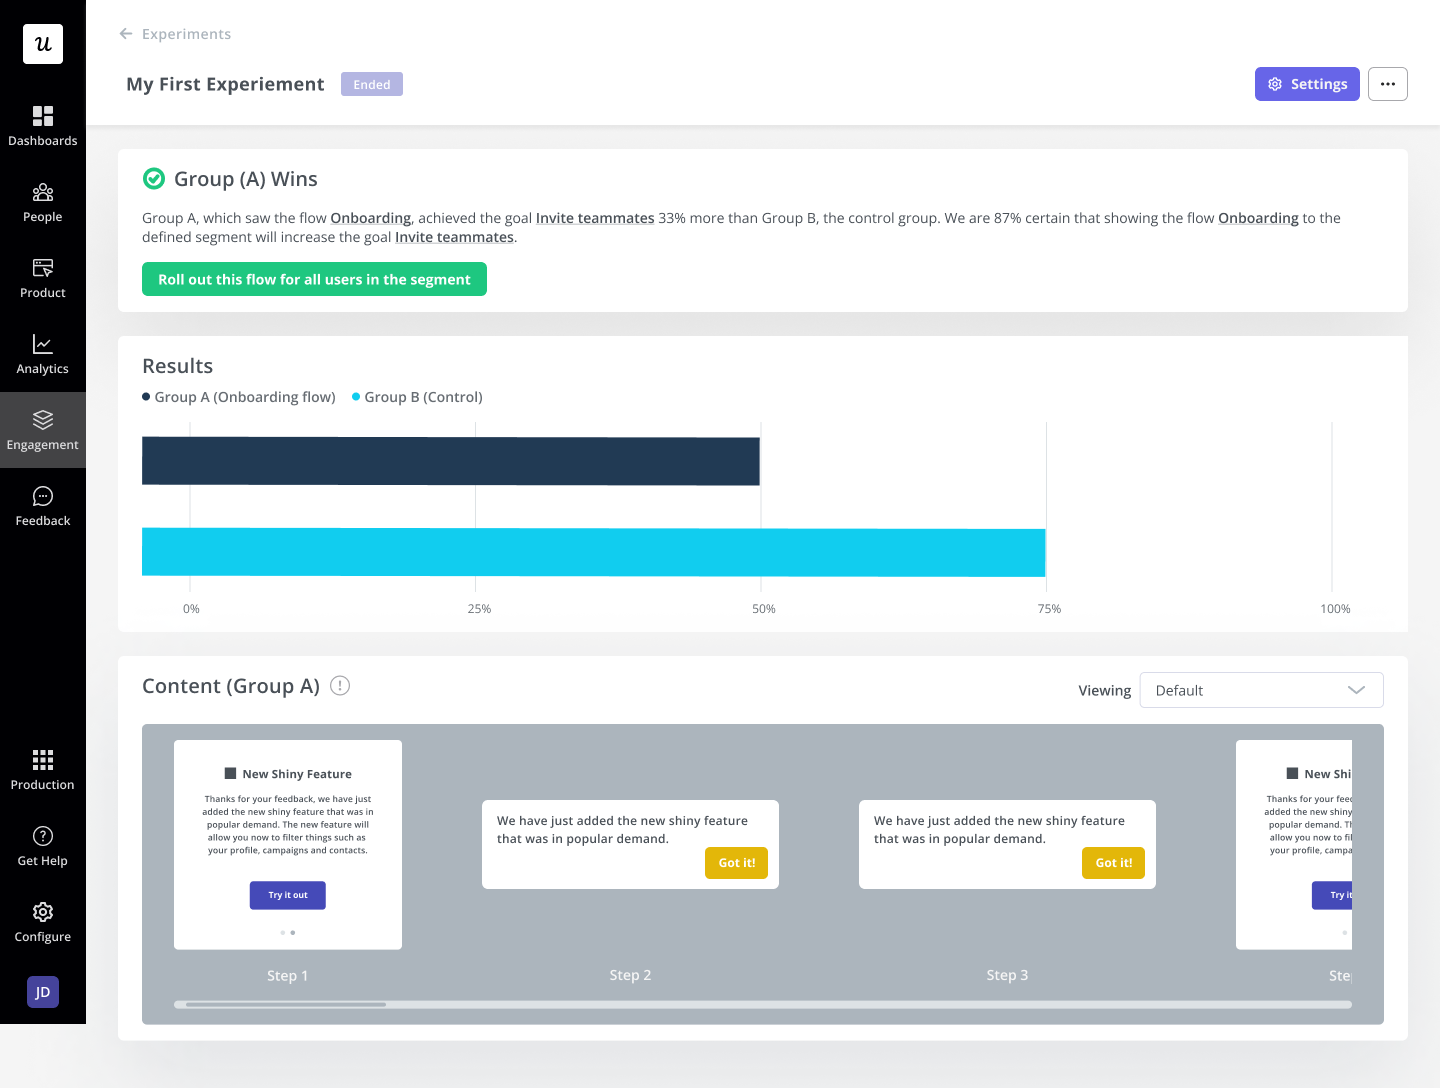
5. Analyze the performance of your minimum viable onboarding flow
You can create an intuitive onboarding flow to the best of your abilities but it still may not improve your activation metrics. Hence, it is important to analyze the performance of your MVO flow to spot friction points and areas of improvement.
You can use funnel funnel analysis for this purpose. Simply tag all the important events that contribute toward activation and then monitor how users progress through them. If the funnel drop-off rate is high, it’s time to go back to the drawing board.
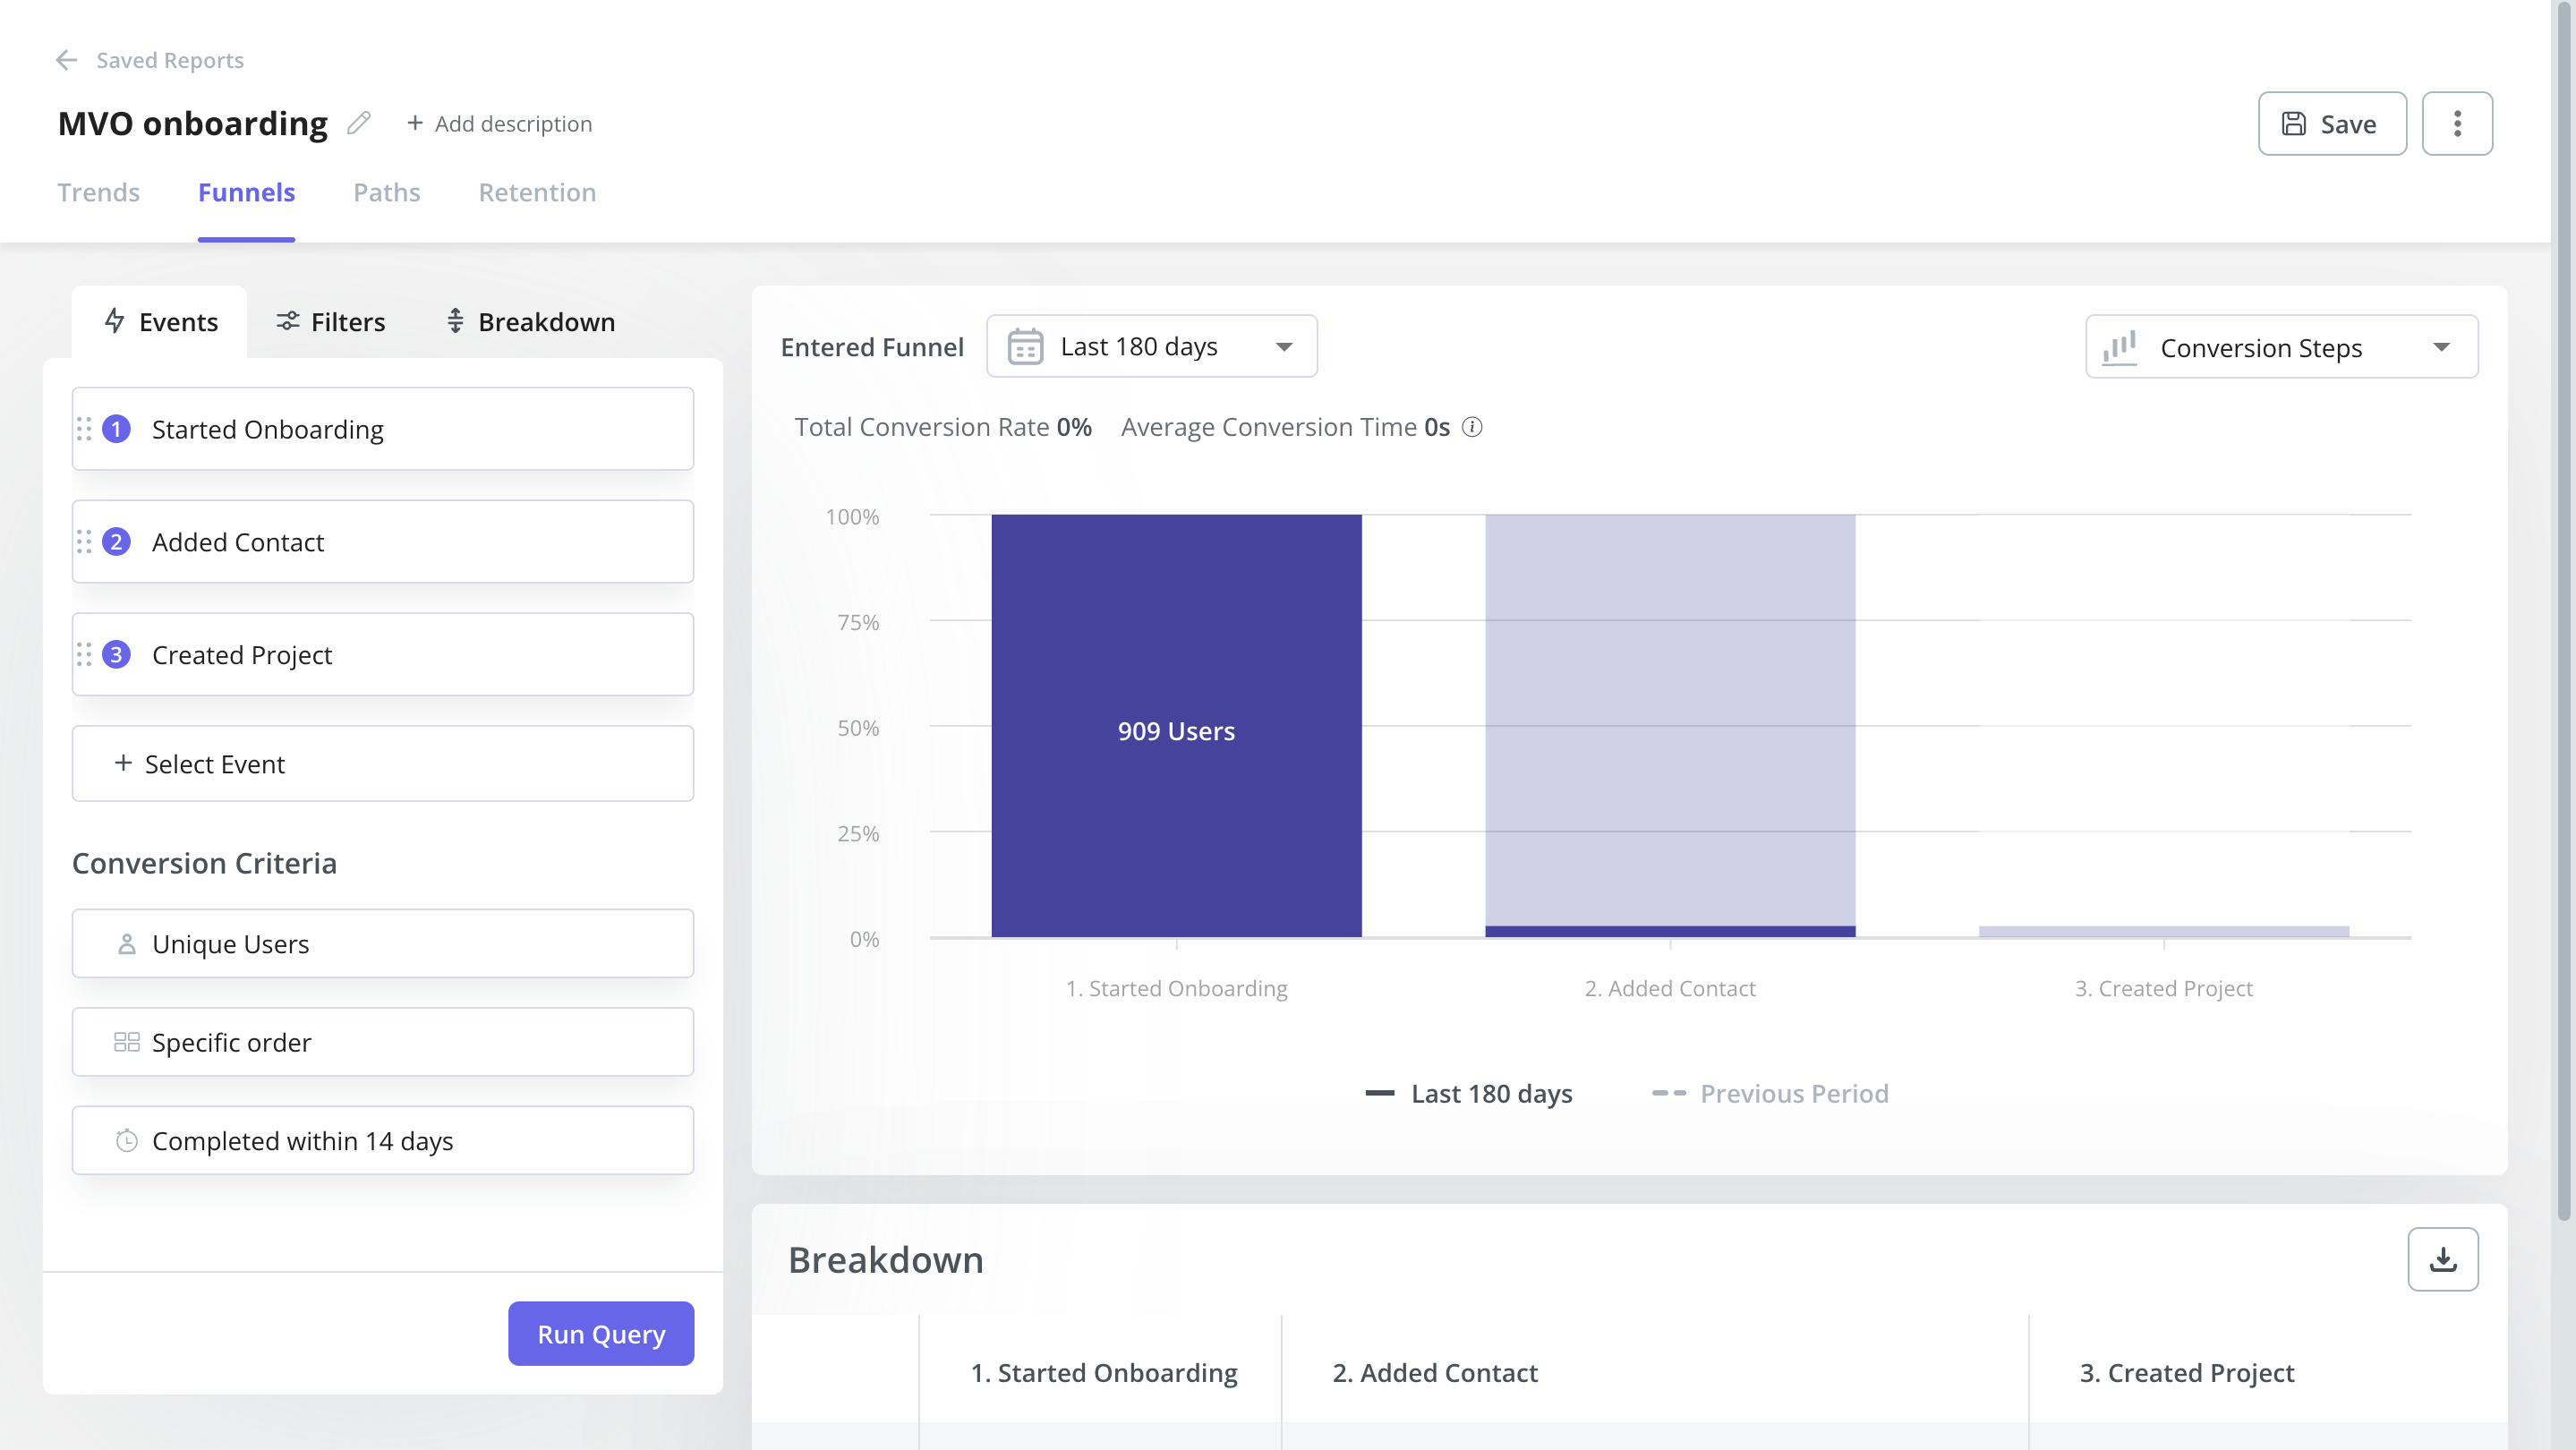
MVO funnel analysis in Userpilot
6. A/B test in-app experiences to improve activation
If you notice that an improvement is needed to boost user activation, a better approach than completing overhauling your onboarding experience is to take it step by step.
Take one element of your flow, say the welcome survey, and then A/B test it to see if tweaking it will optimize your metrics or not.
You can create a head-to-head A/B test in which you compare two welcome surveys, one with 2 form fields and the other with 4. Check which survey results in higher performance and then incorporate that into your onboarding process.
A/B testing in Userpilot
Types of onboarding experiences to include in your MVO
Great user onboarding experiences don’t happen by accident. They’re a combination of careful planning and execution.
Let’s break down some engaging product-led onboarding experiences that could form part of your MVO process.
Use an onboarding checklist to drive action
We know that onboarding is all about driving users towards activation. Checklists are a fantastic method for encouraging users to take the necessary steps to get there.
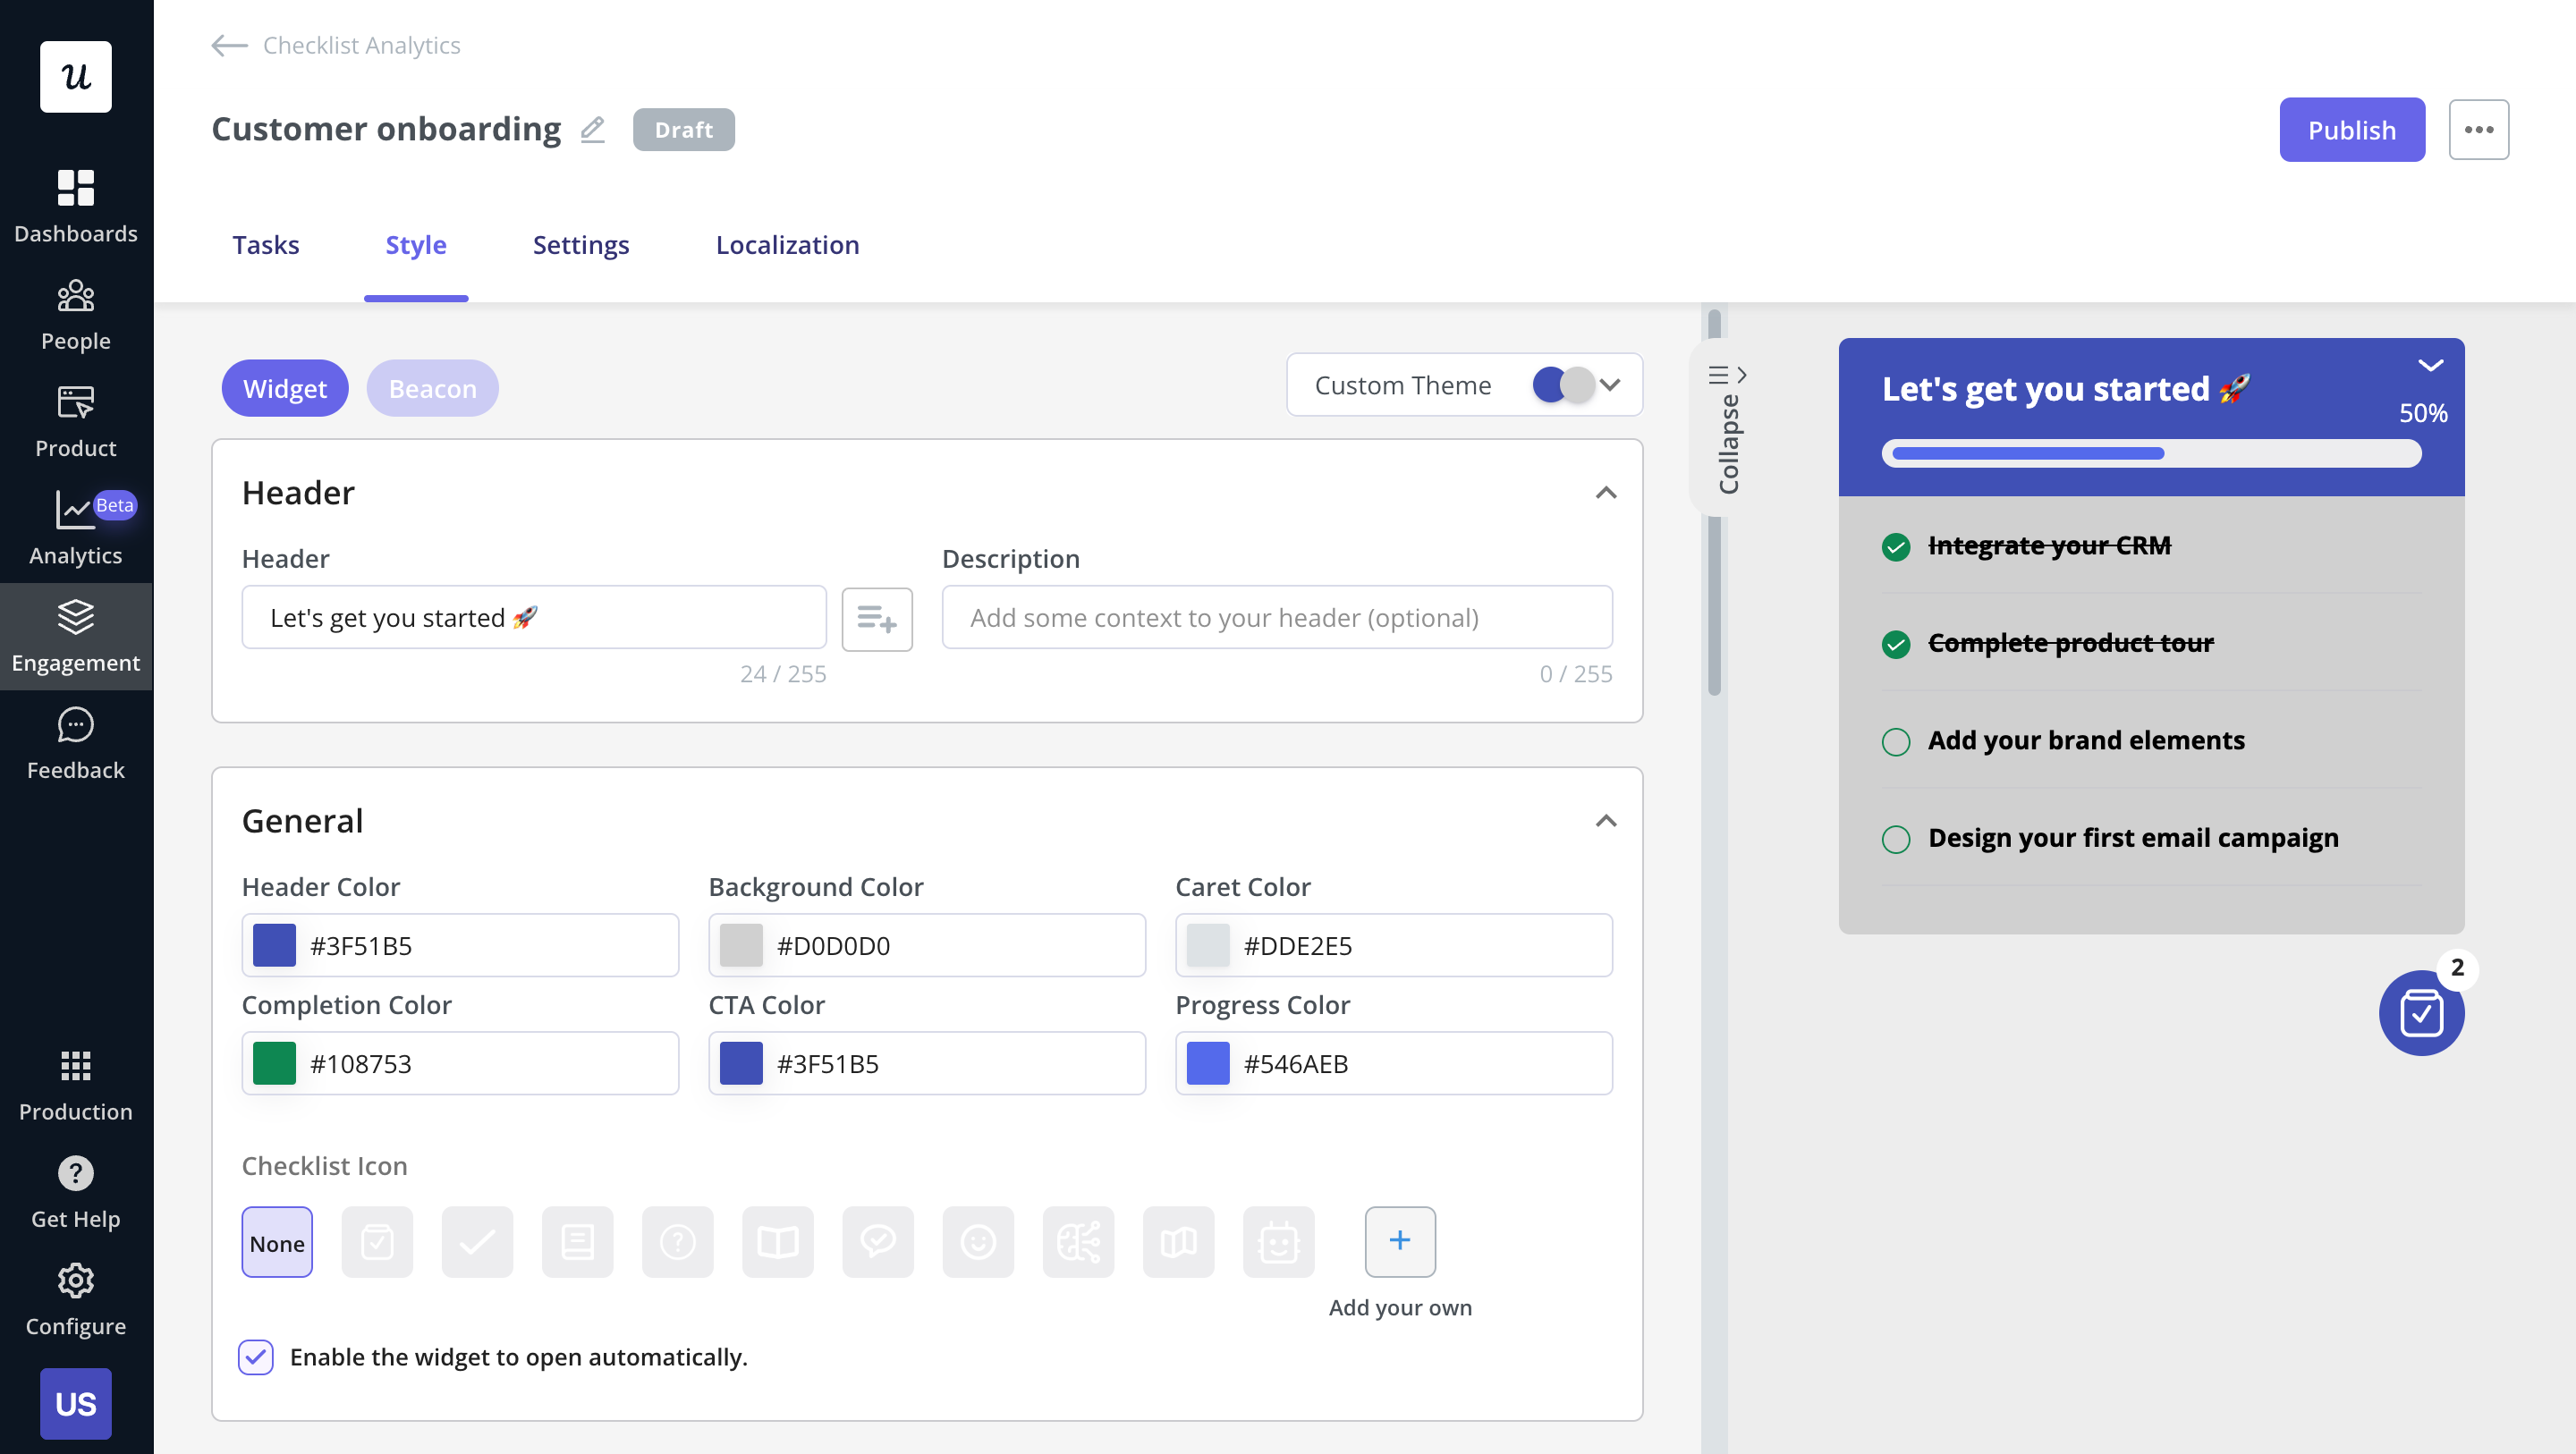
Use checklists to drive users forward
You can add gamification elements like progress bars or dummy tasks to make the experience even more engaging.
Progress bars are a visual representation that acts as a motivation to keep going, and dummy tasks (a task in the list that’s pre-completed) help build a sense of encouragement.
Both are easy to create in Userpilot.
In the example below, we can see how simple it is to create a dummy task: you just have to click one button (‘Do Nothing’ as the task action) and you’re good to go.
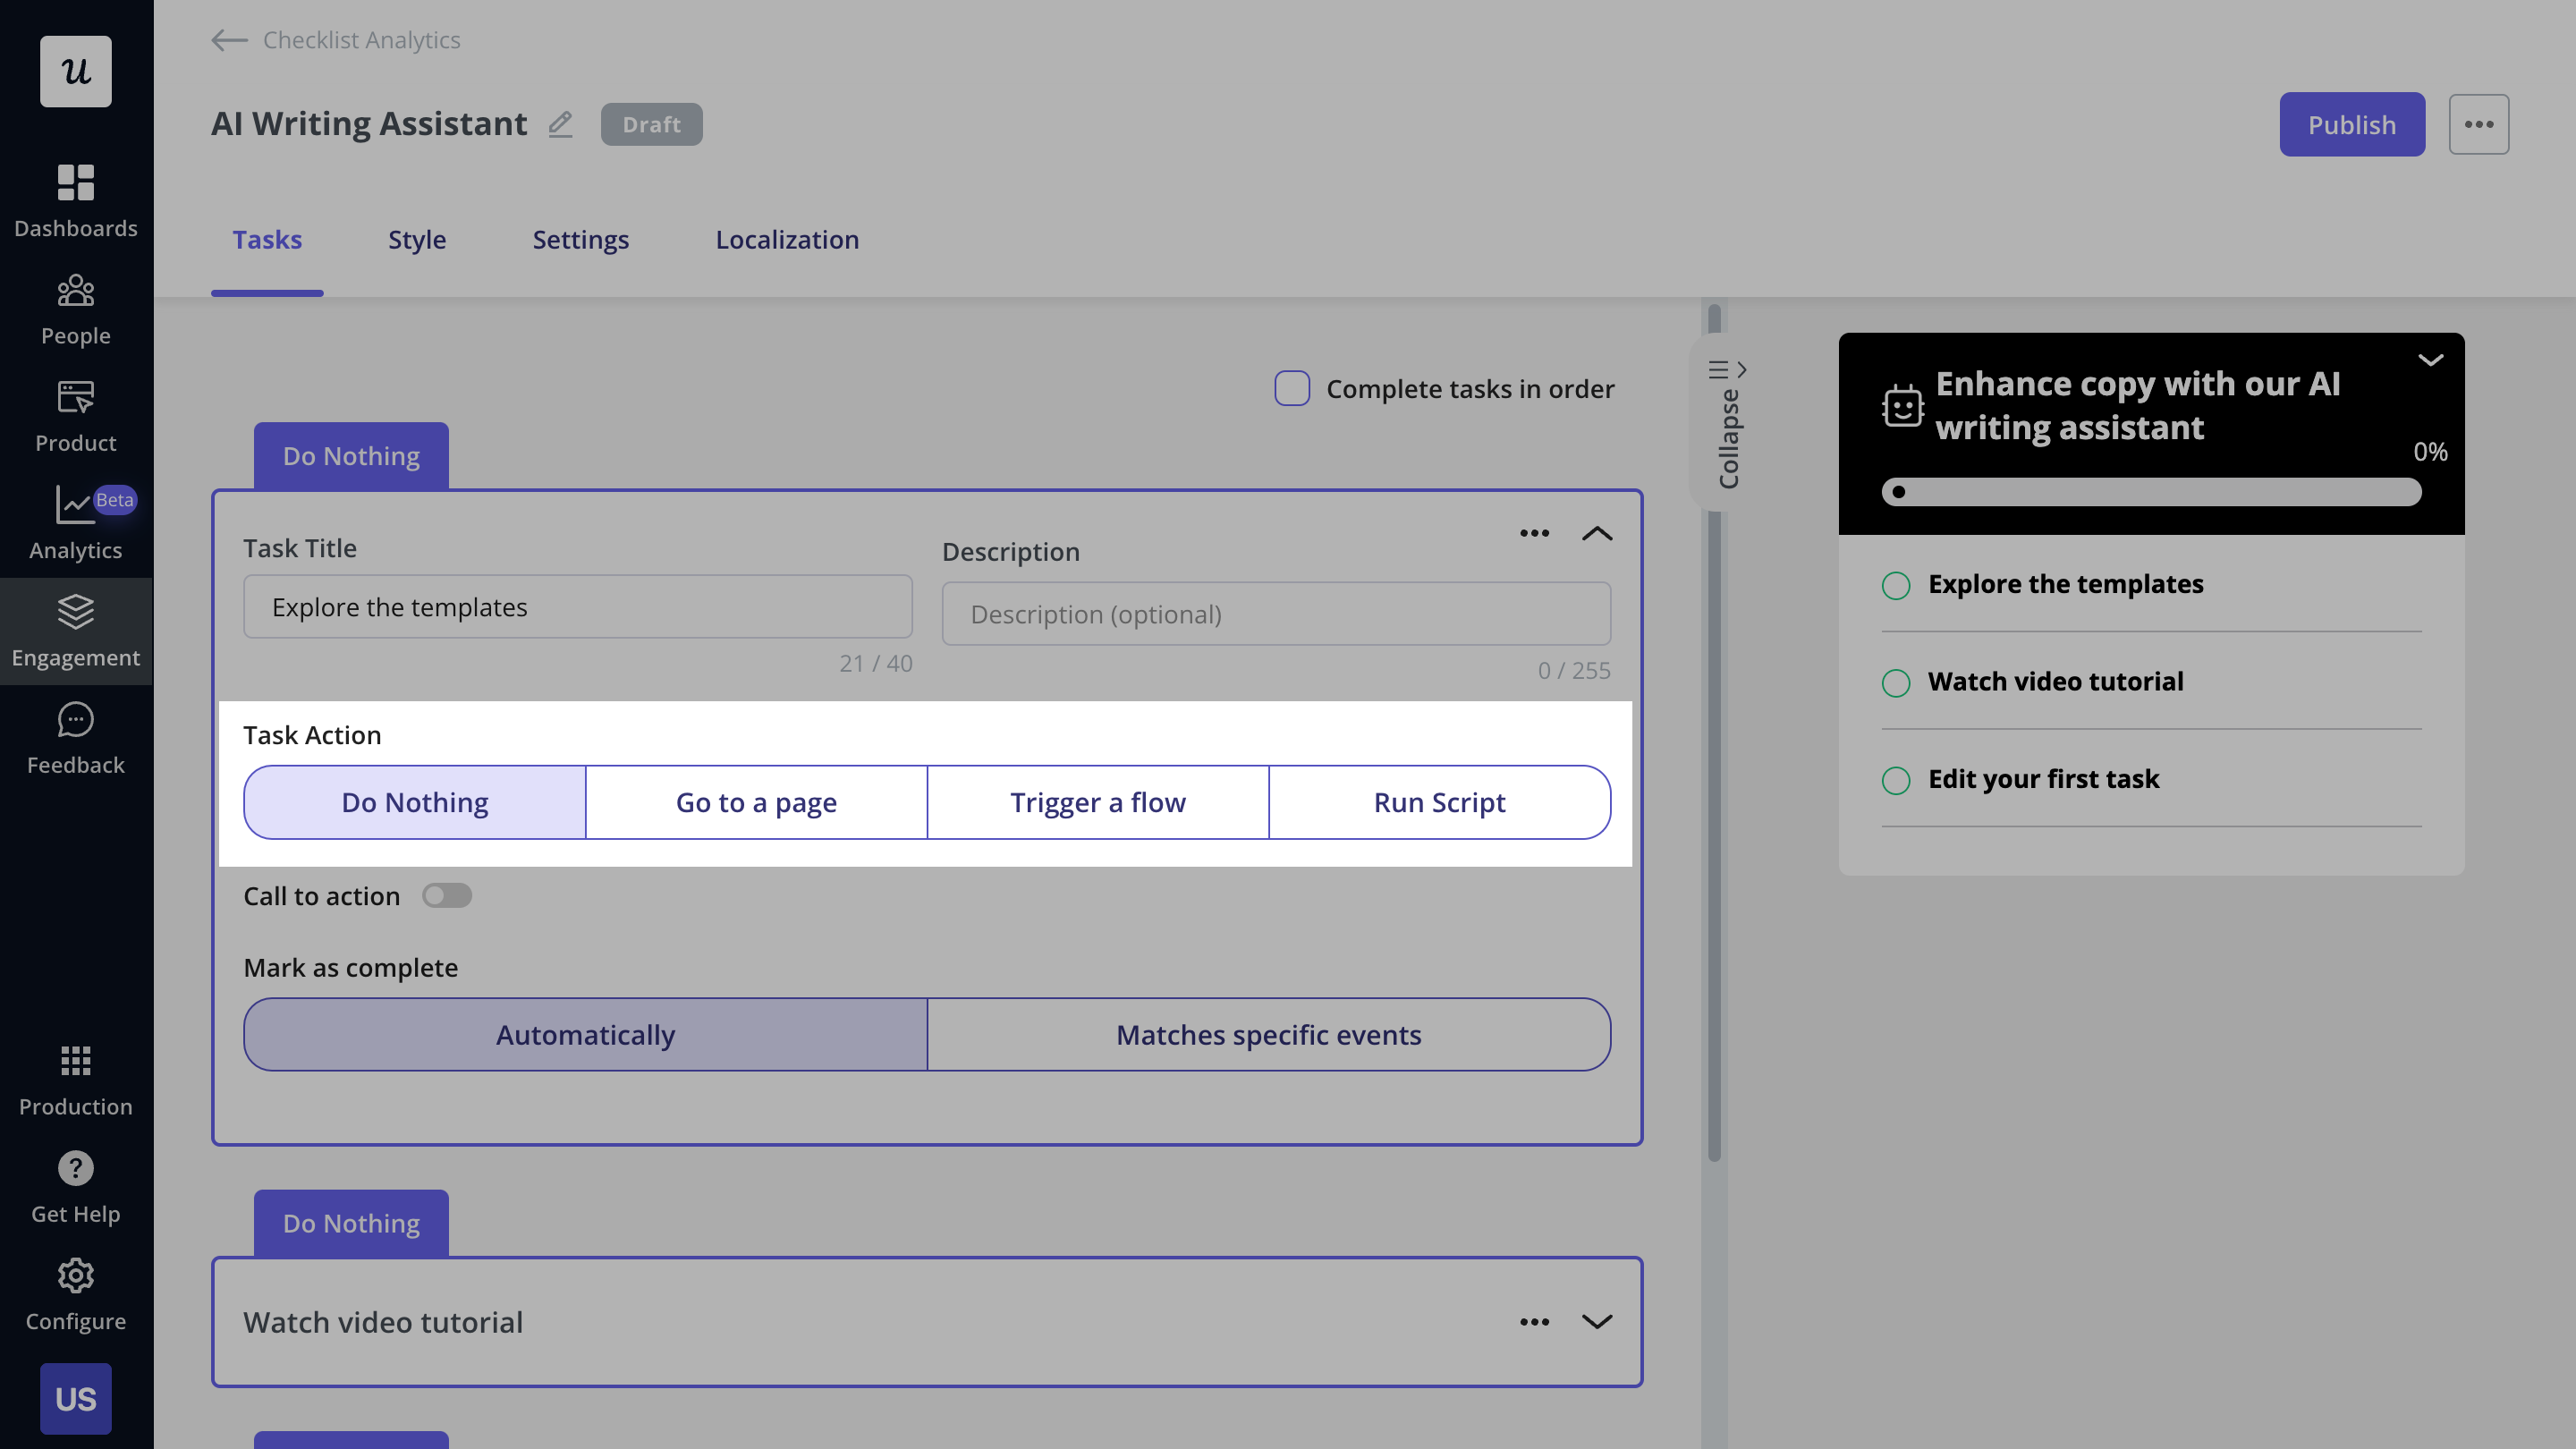
Creating a dummy task in a checklist in Userpilot
Guide new users with interactive walkthroughs
Checklists are a great start, but there’s more you can do.
Once a user takes the next action on a checklist, you can help them complete the task with an interactive walkthrough.
Put simply, an interactive walkthrough is a series of driven actions and processes that help a user adopt a feature for the first time. Critically, they are highly interactive – a user has to engage and learn through doing.
You could set up a walkthrough to trigger once a user clicks on a task in a checklist.
Check out the example below of Kommunicate who created an interactive walkthrough using Userpilot. By adding a walkthrough, among other elements, Kommunicate was significantly able to improve the product adoption rate. Read this case study to learn more.

Kommunicate’s interactive walkthrough created using Userpilot
Enhance customer experience with helpful hints and tips
Don’t leave your users stranded: part of a great progressive onboarding experience is making it as easy as possible for them to navigate your UI and find whatever they’re looking for.
You should aim to provide helpful hints, tips, and guidance, using a range of features to get your message across:
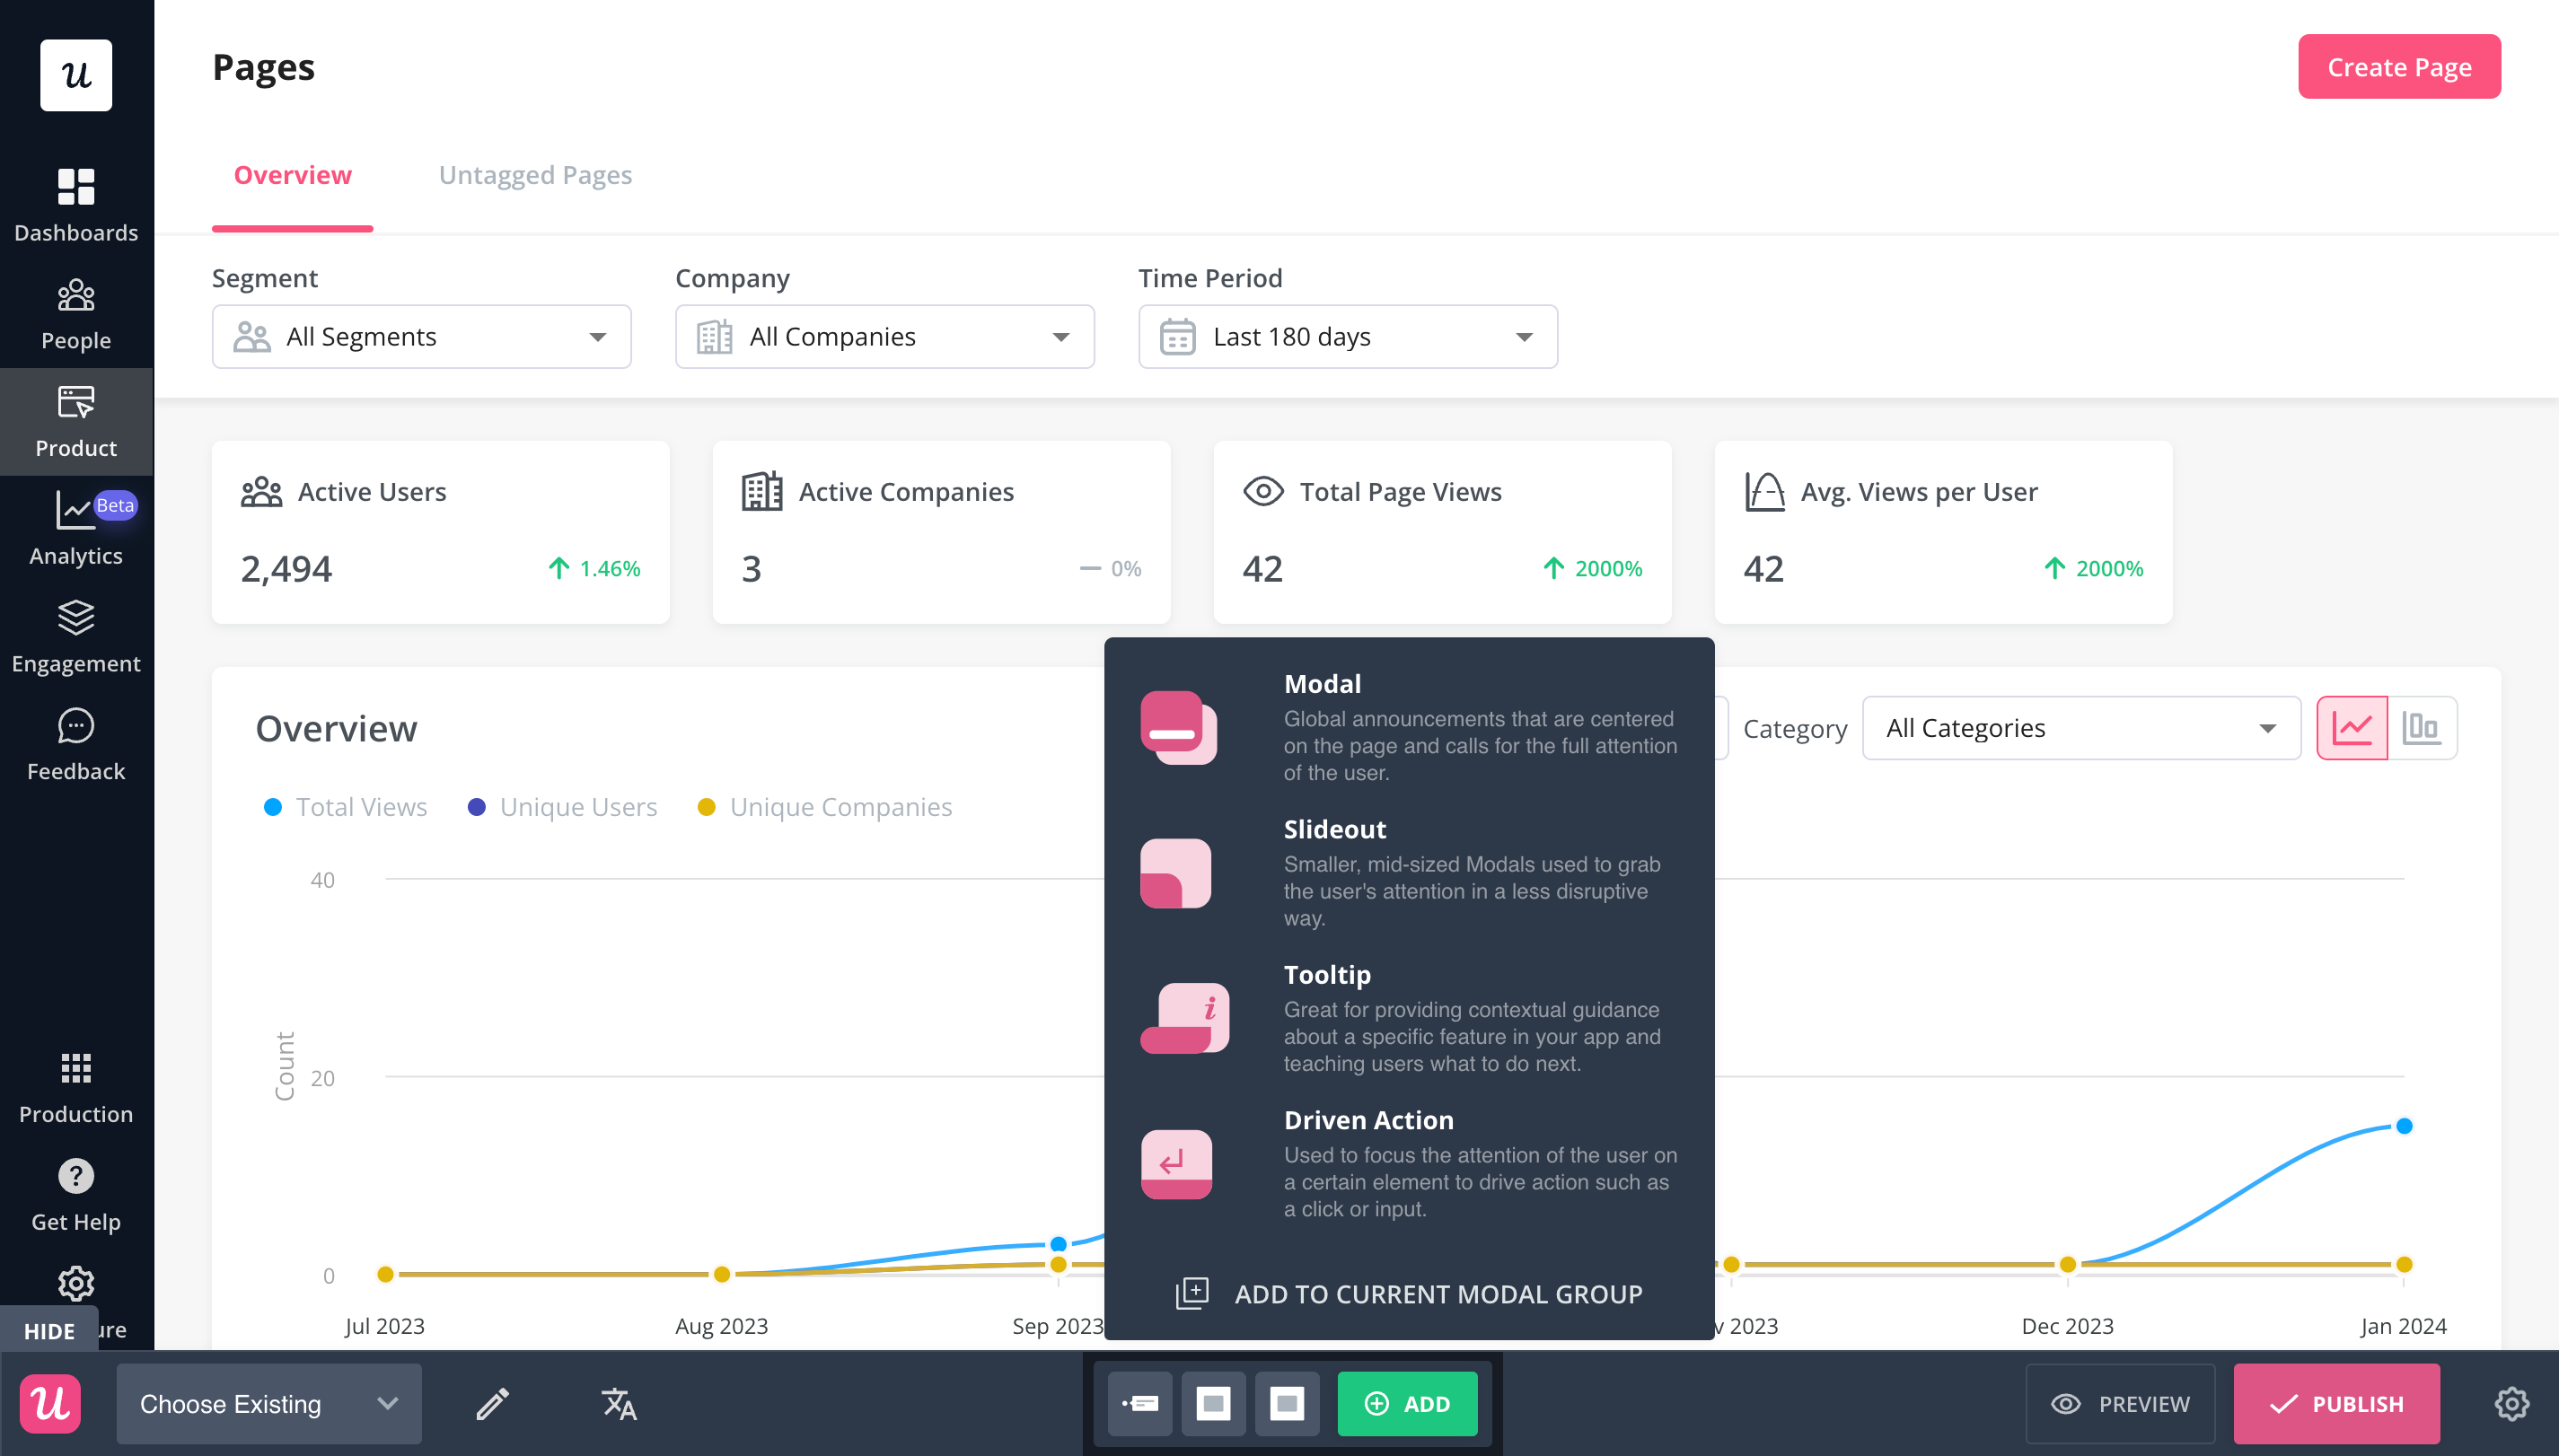
- Hotspots can direct users’ attention to important on-screen elements
- Modals can be an effective method of communicating big ideas
- Tooltips are a great way of explaining features without cluttering the screen
Tooltips in Userpilot
Enable self-service support for a frictionless onboarding experience
Users will always need some level of support: it’s inevitable.
But that doesn’t mean it all needs to be funneled to your customer success team. You can use an in-app resource center to help users solve their own problems, and provide the right kind of support as and when it’s needed.

Userpilot resource center editor
Resource centers can become powerful additions to your onboarding experience: users know exactly where they need to go to access a hub of knowledge. Make sure to include a range of support options to cater to different user needs:
- Share product FAQs and release notes
- In-app guides
- Video tutorials
- Launch interactive walkthroughs
- Direct access to the support team
Conclusion
And there we have it – a punchy guide to minimum viable onboarding. We’ve covered a lot of ground!
Hopefully, you should now:
- Understand what minimum viable onboarding is all about
- Key priorities and objectives (getting to activation)
- The critical steps to introduce minimum viable onboarding in your own product
So, what are you waiting for? If you want to get started with user onboarding, get a Userpilot demo and see how you can craft impactful onboarding experiences today.
![]()
Optimize Your Onboarding Flow With Userpilot