How to make a presentation outline: a step-by-step guide

Georgina Guthrie
May 24, 2024
Whether you’re building a house, baking a cake, or creating a killer presentation — having a plan in place before you begin work will make the task much easier. Planning saves time and enhances the quality of your work. This is especially true for business presentations, which is why you should always start with a presentation outline.
A presentation outline is a streamlined version of your talk, capturing the general direction and key points. Its purpose is to shape your thinking, organize your thoughts, and ensure your material is presented logically.
In this article, we’ll explore what a presentation outline is, how storytelling can engage your audience, and how to create a flawless outline. Let’s dive in.
Defining your presentation’s goal
What are you trying to achieve with your presentation? A good starting point is to think about the overall purpose.
Types of presentation goals
There are six main types of presentation goals:
- Educate
- Inform
- Persuade
- Inspire action
- Inspire or motivate
- Entertain
In a business setting, ‘to inform’ is most common, but it’s usually coupled with at least one other. For example, if you’re there to talk about quarterly results, then you’ll want to inform and motivate. However, if you’re a business coach, your goals will likely be to inspire, motivate, and entertain.
Once you’ve defined your goal, you’ll want to understand the impact you hope to have on your audience. To answer this, ask these questions:
- What do I want people to take away from my presentation?
- How will what I talk about help others in the room?
- What do I want people to do after my meeting?
From here, you should be able to create a summary of your presentation’s goals and purpose in one or two sentences. Put that on your first slide for easy reference.
Understanding your presentation’s audience
Knowing your audience is crucial for crafting a presentation that resonates. Consider their knowledge level, interests, and what they hope to gain from your presentation. Tailoring your content to meet their expectations will make your presentation more engaging and effective.
Questions to understand your audience
- Who are they?
- What is the demographic makeup of your audience (age, gender, profession)?
- What are their roles in the organization or industry?
- What is their knowledge level?
- How familiar are they with the topic you will be presenting?
- Do they have any preconceived notions or misconceptions about the topic?
- What are their interests and motivations?
- What are their primary interests related to the topic?
- Why are they attending your presentation? What do they hope to gain?
- What challenges are they facing?
- What are their current pain points or challenges related to the topic?
- How can your presentation address these challenges?
- What is their preferred learning style?
- Do they prefer visual aids, interactive sessions, or straightforward lectures?
- Are they more inclined towards data-driven insights or anecdotal evidence?
Choosing your story structure
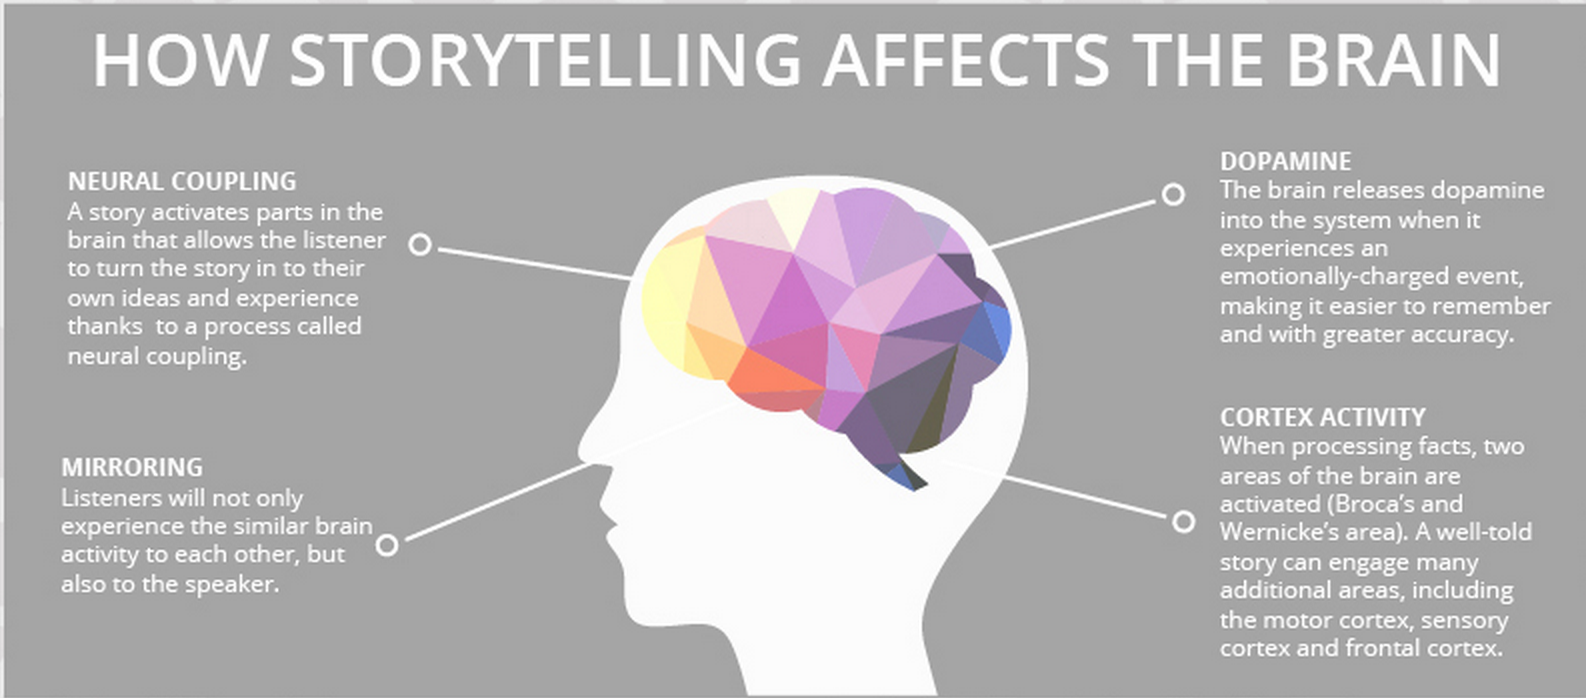
Stories are powerful tools for bringing people and ideas together. Great stories persuade and inform; the best stories inspire and stay with us. But we don’t often see this happening enough in the boardroom.
Stats and numbers are important for supporting claims, but if you want to inspire your audience, you need to weave those stats into a story. The truth is, most stories are formulaic, so once you’ve chosen your formula, filling in the blanks is pretty easy.
Let’s look at a few popular story structure formulas below.
1. Fact and story
Mixing storytelling with facts works in a kind of mutually supportive cycle. Facts add substance to the story; the story adds interest to the facts.
In this structure, you weave the two together and move back and forth between the two.
- Start with a ‘what if’ question. For example, if you were pitching a vacuum cleaner, your initial sales pitch might be ‘what if you didn’t have to lose suction?’
- Add facts that illustrate the current state of things. To continue with our example, it might be current stats on traditional vacuums losing suction. Keep alternating facts with fiction throughout the body of your presentation.
- End on a high note that makes the listeners feel like they learned something and want to move to action because of it. For example, to invest in your new product, or to sponsor your new app.
2. The hero’s journey
From Odysseus to Chihiro, adventure stories typically feature a hero who goes on a journey fraught with peril and learns a vital lesson at the end of it. It’s a formula employed by thousands of writers — and you can draw from it to add some drama to your presentation.
This structure works really well for inspirational personal stories, or tales about a company from its humble beginnings to the success it is today.
- Begin somewhere neutral. The situation is neither ideal nor unbearable.
- Introduce a challenge — one that needs to be solved.
- Present a worsening situation. The problem is being addressed, but things are still getting worse.
- Define rock bottom. The situation seems impossible; there is apparently no way forward and all seems lost. Until…
- Introduce a new discovery that offers hope.
- Show your work. Armed with your new abilities, you tackle the issue head-on.
- Resolve the problem, but instead of returning to the way things were before, the hero (you) discovers an even better way of living.
- Finish with a lesson, which you can share to inspire your audience.
3. The pitch
The ‘pitch’ style of presentation is commonly used by salespeople. The goal is to show how a product or idea can help an individual overcome a hurdle toward a positive outcome. The story should be relatable, so the audience can picture themselves in the situation and, therefore, benefitting from the solution.
- Start with a summary of the way things are in simple terms.
- Introduce the problem or hurdle that needs solving. Make it relatable to help your audience put themselves in the situation.
- Introduce a solution: give your audience a glimpse into a possible solution.
- Create a fork in the road: Give your audience a couple of options for solving the problem. Offer an average option first, then follow up with a better one.
- Close: Choose the better option and explain why that’s the best one (and only real suitable choice).
- Finish up by telling the audience exactly how to solve the problem, step by step.
- Talk about extra benefits that extend beyond simply solving the problem. Finish on an uplifting high.
4. The explanation
This presentation format is for when you want to teach your audience something — whether that’s a process, a new skill, or a way to overcome a problem. It has similarities with the fact and story structure, insomuch as facts should weave into the story.
- Explain how things are at the moment, what the goal looks like, and how you plan to get there. You can even start with a story to add emotional interest from the get-go.
- Take your first step on the journey toward the final destination.
- Add more steps that build on this.
- Take a moment to recap the points you’ve covered so far while tying them to the main point. This will help your audience visualize the ground you’ve covered and see where you’re heading.
- Add the finishing pieces to the puzzle and lead your audience to the end.
- End your journey so your audience feels as though they’ve learned something new.
5. The opportunity
A close relative of the pitch, this three-part structure swaps a hurdle for an opportunity. Here, you want to show your audience that a problem they thought they had actually had an easy fix.
- Start with the situation as it is now.
- Next, add a ‘but’ — this could be a small hiccup that stops things from being as good as they could be. For example, our chocolate pudding company is doing really well. But we could be doing better if we changed supplier.
- Talk about the opportunity, with as many facts and stats as possible to make it feel achievable and real.
- Add a conclusion.
- Explain why the product or service meets the challenges raised. Add more stats and facts to support your point.
Storyboarding your presentation outline
Now you’ve worked out your structure, it’s time to start building your presentation. Storyboarding is the best way to do this. In the same way that directors use storyboards to map out their films scene-by-scene, you’re going to use it to map out your presentation slide-by-slide.
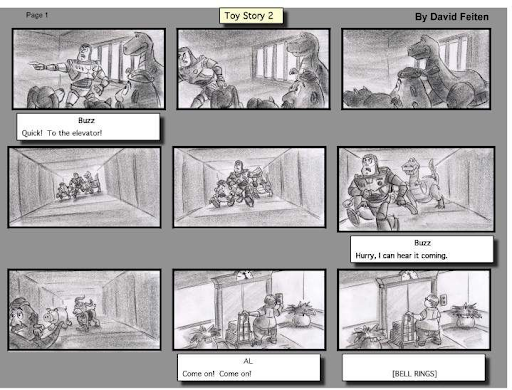
(Don’t worry, you can do stick people and squiggles if drawing isn’t your strong point.) Image Source
The trick here is to avoid adding too much detail too quckly. Ideally, have one or two sentences on each slide summarizing what each one will address. Stick to one main point per slide and no more than 3 subpoints.
You can do this with pen and paper, but since you’ll likely end up going digital eventually, you might as well start there. It looks far neater, and it means that if you need to change something, it’s as simple as deleting or editing a cell or slide rather than starting over.
If you don’t want to start from scratch, a business presentation template is a great place to start. You can storyboard directly on the template, and then flesh out each of the slides in more detail once you’re ready.
Once you’ve got your storyboard mostly ready, all that’s left is to fill in the details! And of course: make it look great.
Formatting your presentation
Proper formatting is crucial to ensuring your presentation is visually appealing and easy to follow. Effective formatting helps to highlight key points, maintain audience engagement, and enhance overall comprehension. Here are some guidelines and best practices for formatting your presentation:
Choose a consistent theme
- Select a template:
- Use a professional and clean template that aligns with your topic and brand.
- Ensure the template is consistent throughout the presentation to maintain a cohesive look.
- Color scheme:
- Choose a color scheme that is visually appealing and easy on the eyes.
- Stick to 2-3 primary colors to avoid visual clutter.
Organize your slides
- Title slide:
- Include a title slide with the presentation topic, your name, and date.
- Add a relevant image or graphic to set the tone.
- Agenda slide:
- Provide an agenda or outline slide to give the audience an overview of what to expect.
- Section dividers:
- Use section divider slides to clearly separate different parts of your presentation.
- Include a brief title for each section.
Keep text clear and concise
- Font choice:
- Use easy-to-read fonts such as Arial, Helvetica, or Calibri.
- Avoid overly decorative fonts that can be hard to read.
- Font size:
- Ensure the font size is large enough to be readable from a distance.
- Titles should be at least 24-30 points, and body text should be 18-24 points.
- Bullet points:
- Use bullet points to break down information into digestible chunks.
- Keep each bullet point concise, ideally one line each.
Visual elements
- Images and graphics:
- Include high-quality images, charts, and infographics to illustrate key points.
- Ensure visuals are relevant and add value to the content.
- Consistency:
- Maintain consistency in the style and size of images and graphics.
- Align visuals properly to avoid a cluttered appearance.
- White space:
- Use white space effectively to prevent slides from looking overcrowded.
- White space helps to highlight key elements and improves readability.
Multimedia and animation
- Videos:
- Embed short videos to demonstrate concepts or provide visual examples.
- Ensure videos are of high quality and relevant to the content.
- Animations:
- Use animations sparingly to emphasize important points without distracting the audience.
- Stick to simple transitions and avoid overly complex animations.
Data presentation
- Charts and graphs:
- Use charts and graphs to present data clearly and concisely.
- Label axes and include legends for clarity.
- Simplify data:
- Avoid overwhelming the audience with too much data.
- Highlight key data points and trends.
Final touches
- Proofread:
- Review the presentation for spelling and grammatical errors.
- Ensure all information is accurate and up-to-date.
- Practice:
- Rehearse your presentation multiple times to ensure smooth delivery.
- Check the flow of slides and the timing of animations and transitions.
By following these formatting guidelines, you can create a presentation that is not only visually appealing but also effective in communicating your message. Proper formatting helps to keep the audience engaged and ensures that your key points are clearly conveyed.
Presentation tools
For those looking for an intuitive and efficient way to create professional presentations, consider using Cacoo, our online diagramming tool. Cacoo allows you to collaborate in real time, offering a variety of templates and design tools that make planning, designing, and presenting a breeze. Whether you’re working solo or with a team, Cacoo helps you streamline the presentation creation process, ensuring that your final product is polished and impactful.
Ready to take your presentations to the next level? Try Cacoo for free today and experience the difference it can make in your workflow.
This post was originally published on April 07, 2021, and updated most recently on May 24, 2024.